YA
LI D
IG
IT
A
L, P
A
R
A
D
A
, R
A
M
O
, I
N
ST
A
LL
AT
IO
N A
N
D O
PE
R
AT
IN
G M
A
N
U
A
L
20
16
-02
-0
1
GB
GENERAL
INFORMATION
• The radiator is equipped with a non-resettable overheat
protection that trips off if the radiator overheats. If the
radiator is removed from the wall brackets, even for a
short time, it must without exception be switched off,
see picture 4B. This may even trip the non-resettable
overheat protection. If the overheat protection trips, its
thermal fuse must be replaced; contact your supplier.
3. OPERATION
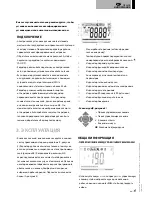
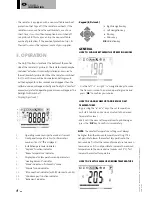
• The On/Off button is located at the bottom of the control
side of the radiator (C, picture 5). The radiator should only be
switched “on” when it is correctly installed and secured to
the wall brackets (picture 4B). When the radiator is switched
“on”, the LCD screen will be illuminated and all segments
will be displayed for a few seconds and disappear. Then the
software version will appear shortly and finally the “Comfort”
or previously selected operating mode screen will appear. The
backlight will switch off.
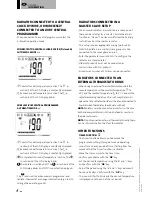
• Display (A, picture 5)
1.
Operating mode menu (active mode is framed)
2.
Front panel temperature limit, or Parameters
number if icon “3” is displayed.
3.
Installation parameter indicator
4.
“Key lock” function indicator
5.
“Room temperature” indicator
6.
Display zone for temperatures and parameters
7.
“Heating demand” indicator
8.
“Mode” indicator in “Automatic” mode
9.
“Manual” mode indicator
10.
“RF connection” indicator (with RF clock or Touch E3)
11.
“Window open” function indicator
12.
“Behaviour” indicator
•
Keypad (B, Picture 5)
Right navigation key
Left navigation key
+
Plus key
–
Minus key
OK
Validation key
GENERAL
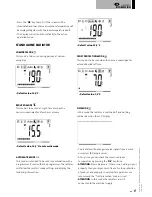
HOW TO CHANGE BETWEEN THE OPERATING MODES.
• Use the left “
” or right “
” navigation keys to move
the frame cursor on the desired operating mode and
press “
OK
” to confirm your choice.
HOW TO CHANGE COMFORT AND REDUCED SET
TEMPERATURES
• By pressing the “
+
” or “
–
“ keys, the set temperature
will start to blink and can be adjusted to the desired
temperature level.
• Wait until the new set temperature stops blinking or
press the “
OK
” key to confirm immediately.
NOTE:
The comfort temperature setting must always
be higher than the reduced temperature setting. If it is
not possible to lower the comfort temperature to the
desired value, first set the reduced temperature to an even
lower value, or, if it is not possible to increase the reduced
temperature to the desired value (maximum 19 °C), first
increase the comfort temperature.
HOW TO VIEW THE MEASURED ROOM TEMPERATURE
|
66


