MAINTENANCE
OF THE CENTRAL VACUUM CLEANER
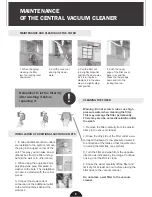
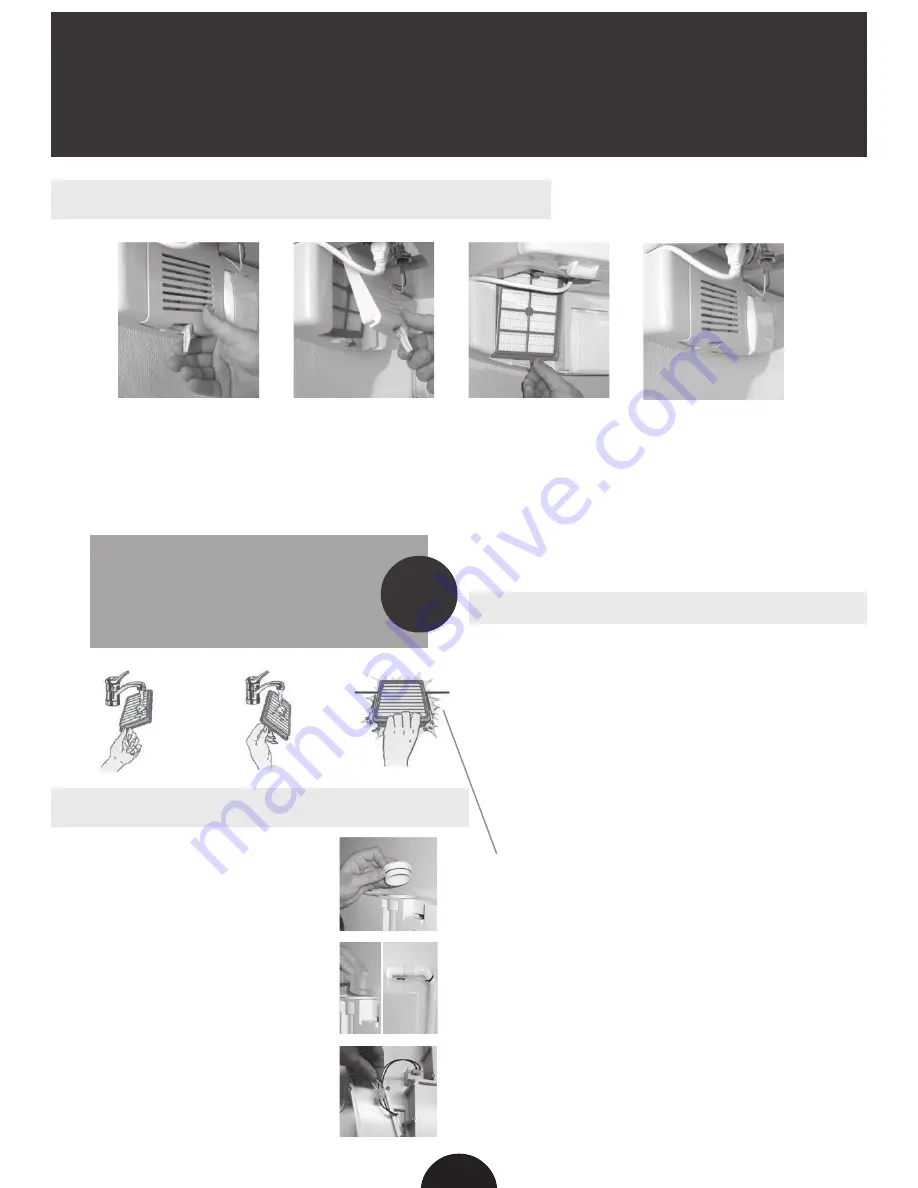
1. When changing/
cleaning the filter,
turn the locking lever
downward.
2. Pull the cover out
and slightly down-
ward.
3. Pull the filter out
in a slightly diagonal
position the same way
as it is in its place.
Replace it in the same
way in a slightly diag-
onal position.
MAINTENANCE AND CLEANING OF THE FILTER
4. Push the upper
edge of the filter cover
back to its position.
Press the lower edge
down and turn the
locking lever up.
Warning: Do not scratch, rub or use high
pressure water when cleaning the filter.
This may damage the filter permanently.
There may also be some discoloration after
the wash.
1. Remove the filter carefully from the plastic
frame in the vacuum cleaner.
2. Rinse the dirty side of the filter under a wa
-
ter tap with lukewarm, low pressured water in
the direction of the folds so that the water can
run along the lamellas. (see picture)
3. Turn the filter and wash from the opposite
direction as indicated by the image. Continue
rinsing, until the filter is clean.
4. Shake the water carefully off the filter and
let it dry for at least an hour before placing the
filter back to the vacuum cleaner.
Do not place a wet filter to the vacuum
cleaner.
Remember to let the filter dry
after washing it before
replacing it.
!
CLEANING THE FILTER
1. In case additional suction outlets
are installed to the system, remove
the plug in the upper corner of the
unit. This way you can take an ad-
ditional box from the filter unit e.g.
behind the wall or to other rooms.
2. When using the original 42 mm
polypropylene pipe, first place a
washer to the hole. The installation
can also be started with the corner
pieces.
3. Connect the weak current
connection of the additional outlet
to the terminal block behind the
wall rack.
INSTALLATION OF ADDITIONAL SUCTION OUTLETS
6


