background image

4

ASSEMBLY INSTRUCTIONS

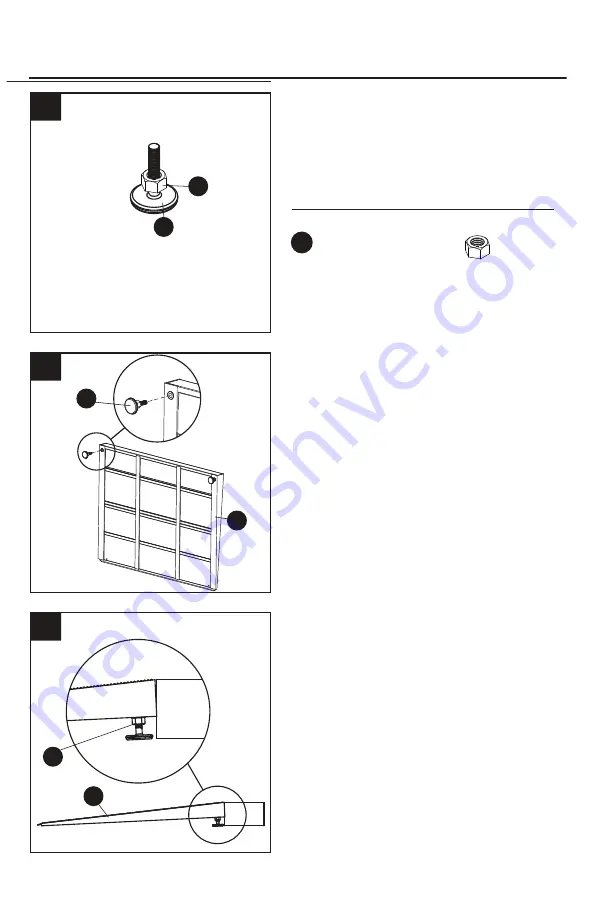
1.  Screw hex nut (AA) onto leveling base (B)

     all the way down. Do not tighten.


Hardware Used

2.  Attach leveling base (B) to bottom of

     adjustable threshold ramp (A) and adjust

     to required height.

1

2

3

B

AA

x 2

Hex Nut

3.  Secure legs by tightening hex nut (AA)

     against bottom of adjustable ramp (A).

AA

A

B

AA

A

4

4

ASSEMBLY INSTRUCTIONS

1.  Screw hex nut (AA) onto leveling base (B)

     all the way down. Do not tighten.


Hardware Used

2.  Attach leveling base (B) to bottom of

     adjustable threshold ramp (A) and adjust

     to required height.

1

2

3

B

AA

x 2

Hex Nut

3.  Secure legs by tightening hex nut (AA)

     against bottom of adjustable ramp (A).

AA

A

B

AA

A

4

ASSEMBLY INSTRUCTIONS

1.  Screw hex nut (AA) onto leveling base (B)

     all the way down. Do not tighten.


Hardware Used

2.  Attach leveling base (B) to bottom of

     adjustable threshold ramp (A) and adjust

     to required height.

1

2

3

B

AA

x 2

Hex Nut

3.  Secure legs by tightening hex nut (AA)

     against bottom of adjustable ramp (A).

AA

A

B

AA

A

Screw hex nut (AA) onto leveling base 

(B) all the way down. Do not tighten.

Attach leveling base (B) to bottom of 

adjustable threshold ramp (A) and 

adjust to required height.

Secure legs by tightening hex nut (AA) 

against bottom of adjustable ramp (A).

1.

2.

3.

Summary of Contents for ATH1232

Page 1: ...o your retailer call our customer service department at 1 877 442 8347 8 a m 8 p m EST Monday Friday ATTACH YOUR RECEIPT HERE Serial Number Purchase Date ITEM 0361653 MODEL ATH2432 ADJUSTABLE THRESHOLD RAMP Español p 8 1 Questions problems missing parts Before returning to your retailer call our customer service department at 1 877 442 8347 8 a m 8 p m EST Monday Friday ATTACH YOUR RECEIPT HERE Se...

Page 2: ...ENTS shown actual size Hex Nut Qty 2 AA BB Flat Head Pan Screw Qty 2 HARDWARE CONTENTS shown actual size Hex Nut Qty 2 AA BB Flat Head Pan Screw 2 HARDWARE CONTENTS shown actual size Hex Nut Qty 2 AA BB Flat Head Pan Screw HARDWARE CONTENTS shown actual size Hex Nut Qty 2 AA BB Flat Head Pan Screw Qty 2 HARDWARE CONTENTS shown actual size Hex Nut Qty 2 AA BB Flat Head Pan Screw Qty 2 SAFETY INFORM...

Page 3: ...Assembly not included None Helpful Tools not included Drill with 3 16 bit wood metal or masonry depending on what type of surface you will be drilling pin holes into Pen Pencil Ramps are designed for wheelchairs and electric scooters Ramps are rated for a 600 pound capacity rating is based on double axle evenly distributed loads For your safety a caregiver or aid should be present at all times whe...

Page 4: ...4 ASSEMBLY INSTRUCTIONS 1 Screw hex nut AA onto leveling base B all the way down Do not tighten Hardware Used 2 Attach leveling base B to bottom of adjustable threshold ramp A and adjust to required height AA x 2 Hex Nut 3 Secure legs by tightening hex nut AA against bottom of adjustable ramp A Screw hex nut AA onto leveling base B all the way down Do not tighten Attach leveling base B to bottom o...

Page 5: ...mp A Mark the pin locations using a pencil 1 2 3 Remove the adjustable threshold ramp A and then using a drill and 3 16 bit drill a hole approximately 2 inches deep Note If anchoring into concrete concrete screws need to be used Replace the adjustable threshold ramp A and screw the flat head pan screws BB into the holes to secure it in place 5 INSTALLATION INSTRUCTIONS 1 Place adjustable threshold...

Page 6: ...follow these tips Store in a cool dry place when not in use Keep ramp clean and free of debris Do not leave ramp out during harsh weather conditions If ice or snow accumulates on ramp do NOT use metal objects to remove Instead use plastic shovel or non corrosive ice melt PART DESCRIPTION PART B Leveling Base 361653 B B REPLACEMENT PARTS LIST For replacement parts call our customer service departme...

Page 7: ...manufacturer s place of business If the product has been discontinued the manufacturer may replace the product with a new product of comparable value and function The manufacturer also reserves the right to refund the purchase price as its exclusive warranty remedy 3 Any claim alleging that the product fails to conform to this warranty may be made only by the original end purchaser and only while ...

Page 8: ...at 1 877 442 8347 8 a m 8 p m EST Monday Friday ATTACH YOUR RECEIPT HERE Serial Number Purchase Date 8 ARTÍCULO 0361653 MODELO ATH2432 RAMPA PARA UMBRAL AJUSTABLE Preguntas problemas piezas faltantes Antes de volver a la tienda llame a nuestro Departamento de Servicio al Cliente al 1 877 442 8347 de lunes a viernes de 8 a m a 8 p m hora estándar del Este ADJUNTE SU RECIBO AQUÍ Número de serie Fech...

Page 9: ... en tamaño real Tuerca hexagonal Cant 2 AA BB Tornillo de cabeza plana Cant 2 ADITAMENTOS se muestran en tamaño real Tuerca hexagonal Cant 2 AA BB Tornillo de cabeza plana HARDWARE CONTENTS shown actual size Hex Nut Qty 2 AA BB Flat Head Pan Screw HARDWARE CONTENTS shown actual size Hex Nut Qty 2 AA BB Flat Head Pan Screw Qty 2 HARDWARE CONTENTS shown actual size Hex Nut Qty 2 AA BB Flat Head Pan ...

Page 10: ... del tipo de superficie en la que perforará los orificios bolígrafo lápiz Las rampas están diseñadas para sillas de ruedas y triciclos eléctricos Las rampas están clasificadas para una capacidad de 272 16 kg la clasificación está basada en cargas de doble eje distribuidas uniformemente Para su seguridad un cuidador debe estar presente en todo momento cuando use cualquier rampa La configuración ade...

Page 11: ...ercahexagonal AA enla basedenivelación B completamente No apriete Fijelabasedenivelación B alaparteinferior delarampaparaumbralajustable A yajuste alaalturadeseada Asegurelaspatasapretandolatuerca hexagonal AA contralaparteinferiordela rampaajustable A 1 2 3 11 INSTRUCCIONES DE ENSAMBLAJE 1 Atornille la tuerca hexagonal AA en la base de nivelación B completamente No apriete Aditamentos utilizados ...

Page 12: ...de los pasadores con un lápiz 1 2 3 Retire la rampa para umbral ajustable A y luego con un taladro y una broca de 3 16 taladre un orificio de aproximadamente 5 08 cm de profundidad Nota Si va a anclarla en cemento deberá usar tornillos para cemento Vuelva a colocar la rampa para umbral ajustable A y ajuste los tornillos de cabeza plana BB en los orificios para asegurar la rampa en su lugar 12 INST...

Page 13: ...segúrela Revise dos veces que l bases de nivelación estén en contacto con una superficie Cuando sea posible use los tornillos de cabeza plana para proporcionar seguridad adicional CUIDADO Y MANTENIMIENTO Estas rampas no necesitan mantenimiento pero siga estos consejos para mantener el producto en excelentes condiciones Almacene en un lugar fresco y seco cuando no la utilice Mantenga la rampa limpi...

Page 14: ...ricante Si el producto se ha discontinuado el fabricante puede reemplazar el producto con uno nuevo de valor y función comparables El fabricante también se reserva el derecho de reembolsar el precio de compra como su recurso exclusivo de la garantía 3 Cualquier reclamo que alegue que el producto no cumple con esta garantía sólo puede ser llevado a cabo por el comprador final original y sólo si dic...

Reviews: