background image

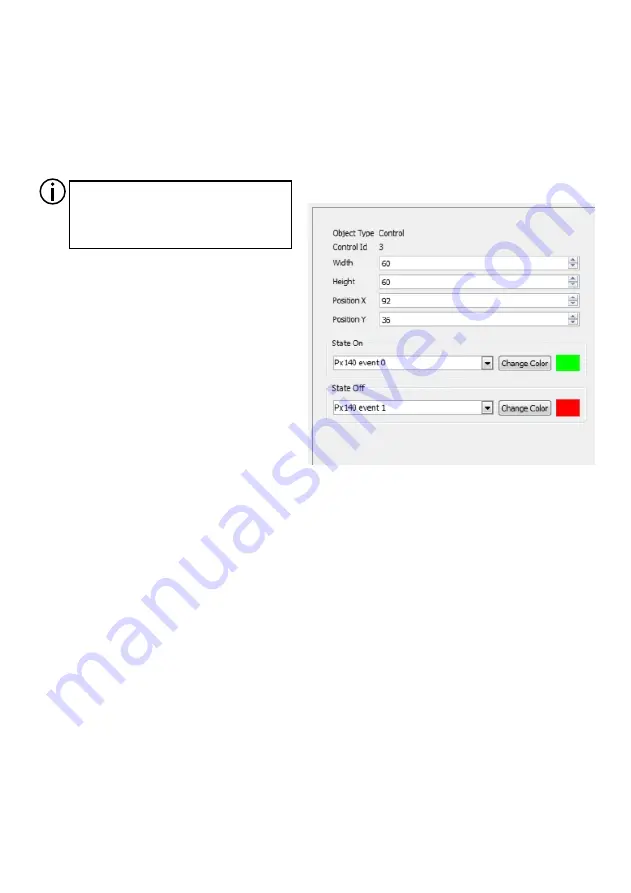
An control light responds to specific signals coming from the PX140 controller. Each control 

light has 2 kinds of statuses (ON and OFF) - each status is ascribed to a different colour and a 
different controller signal number that triggers this status. By default, upon switching the device 
on, all control lights will be ON.

Available parameters:

- Width and height: 

fields that allow you to 

change the dimensions of an control light;

- Position X and Y: 

you can determine the 

position of the upper left corner of an control 
light;

-  State  "On": 

the  fields  that  let  you 

determine a signal to which the control light 
should  respond  by  switching  on  and  which 
colour it is supposed to display;

-  State  "OFF": 

the  fields  that  let  you  determine  a  signal  to  which  the  control  light  should 

respond by switching off and which colour it is supposed to display.

4.3.3. Control lights

16

An  alert  responds  to  all  signals  coming  from  the  PX140  control.  By  default,  the  alert  is 

invisible. Upon receiving a signal from the control, a symbol of an alert will be displayed. If you 
click the alert symbol, a list of signals will be displayed. The symbol of alert will be displayed until 
you have confirmed or deleted signals on the list. If you decide to leave the list of events, you will 
return to the page where the alert appeared. You can set both the position and dimensions of the 
alert.

4.3.4. Alerts

You can highlight several items (by 
holding  the  Ctrl  button)  and  enter 
a  common  value  of  a  given 
parameter for all of them.

Summary of Contents for PANEL DOTYKOWY

Page 1: ...MANUAL TOUCH PANEL PX 181 R...

Page 2: ...ty conditions 3 3 Operation of the device 3 1 Clock 3 2 Panel number and home page 3 3 Signals from PX140 3 4 Screen settings 3 5 Changing passwords 4 PC software 4 1 Installation 4 2 Application wind...

Page 3: ...set forth below 1 The device can be connected to 12 V DC stabilised voltage with current carrying capacity compatible with technical data 2 All the conductors should be protected against mechanical a...

Page 4: ...a home page No 1 ascribed Other users have home pages with consecutive numbers The access to user s home page can be protected with a password To navigate to a given page select an icon of a relevant...

Page 5: ...ing panel indicator lights Irrespective of whether the panel responds to a given signal or not in the Signals from PX140 window you can see all signals coming from the control While configuring the pa...

Page 6: ...lete the password press enter on the keyboard without entering any password In the Screen page you can set main brightness of the screen and activate the screensaver option You can set brightness leve...

Page 7: ...llation process will be completed 2 Licence to continue the user needs to accept the terms and conditions of the licence agreement 3 Selection of components the user can choose to install the applicat...

Page 8: ...e Item area configuration of an item marked Pages area a list of all pages and items located within those pages Preview a preview of a page marked within the pages area Quick access bar quick access t...

Page 9: ...ection 4 3 4 Clock Section 4 3 5 Page Section 4 3 Add Control Section 4 3 3 SnapToGrid SetXGrid SetYGrid Px181 USB serves communication with the panel SaveAllPages saves all pages created within the p...

Page 10: ...ze of the grid in X andYaxes 4 2 2 Status bar The status bar displays information about connection with the device The panel connects with the app automatically upon being connected to the computer If...

Page 11: ...ge the items located on the page To have an even arrangement you can activate the snap to grid feature Add SnapToGrid The size of the grid separately for axes x and y can be adjusted within the 1 160x...

Page 12: ...Delete key Context menu If you click the right mouse button on a page on the list a context menu will be displayed that includes a compilation of the most frequently used functions Delete deletes a p...

Page 13: ...ange between 1 and 24 Input 1 Off a range between 1 and 24 NoAction no action at all 3 colour sliders RGB you can set brightness of each colour component of an object within the range between 0 and 25...

Page 14: ...keys Ctrl C Ctrl v Within the item area you can modify the properties of the button highlighted Available parameters Width and height fields that allow you to change the dimensions of a button Positio...

Page 15: ...to determine a position of the upper left corner of the slider Orientation vertical and horizontal orientation Action Number you can select an event programmed on the PX140 controller that will be tr...

Page 16: ...olour it is supposed to display State OFF the fields that let you determine a signal to which the control light should respond by switching off and which colour it is supposed to display 4 3 3 Control...

Page 17: ...between the pages and events triggered by individual items can be exported to a PDF file To do so select File Save configuration to PDF in the toolbar A preview window will be opened where you can hi...

Page 18: ...rom your computer You can load your panel configuration to the panel at any time For that purpose connect the panel to the computer using the USB cable The status bar will display information that the...

Page 19: ...for the first time ever the operating system will run a standard new device installation The panel connected to the computer will be detected and the system will automatically activate a wizard searc...

Page 20: ...ectory where the configuration application was installed By default it is the Program Files PXM Px181 usb_driver directory When the driver has been successfully installed the configuration application...

Page 21: ...ice 21 The device has a concealed mounting box and a front frame to be attached to the box with two screws 190 140 55 146 Dimensions of the mounting box 85 5 7 Dimensions of the device 58 160 212 3 Mo...

Page 22: ...aled mounting box to the wall by means of 4 assembly screws see the positioning of the screw holes on the previous page When the box has been mounted within the wall attach the panel body to it To tha...

Page 23: ...ned to work with the PX140 The PX140 control must have the option Enable communication with external panels turned on A scheme of connections between multiple PX181 panels and the PX140 control is vis...

Page 24: ...20 e g RS 485 LAPPUNITRONIC LiYCY TP paired 2 x 2 x 0 14 LI2Y St CY1x2x0 22mm2 120 For the purpose of connecting the device you can also use a twist cable and in that case you need to connect the whit...

Page 25: ...ith PX140 2 12V DC min cable cross section 0 5 mm 4W Steel Anodised aluminium 1 2 kg 5 7 320 x 240 Screened twisted pair cable with 120 impedance e g RS485 LAPP UNITRONIC LiYCY TP pair 2x2x0 14 GND GN...

Page 26: ...N OF CONFORMITY according to guide lines 2004 108 WE tel 48 12 626 46 92 fax 12 626 46 94 48 e mail info pxm pl http www pxm pl ul Przemys owa 12 30 701 Krak w Poland Theater stage consoles digital di...

Reviews: