


[M]
[M]
2 seconds
Factory Default
Display
Factory Default Display
Factory Default Display
"DONE" Display
Factory Default Adjustment
"YES" Display
"NO" Display
Absolute Pressure
Display
Absolute Pressure Display
Absolute Pressure Display
Absolute Pressure Display
Barometer Mode
Barometer Mode
hold
[M]
hold
[M]
hold
[M]
hold
[M]
hold
[M]
Adjustment Displays
[S/S] / [L/R]
Barometer Mode
current
temperature
Current
Sea level
pressure
current
ambient
pressure
current
ambient
pressure
current
time
[L/R]
[L/R]
History Graph Display
(Current Time)
Temperature Display
Sea Level Pressure Display
[S/S]
[S/S]
[S/S]
History Graph Display
(1st Record at the hour)
cursor moving
direction
flashing cursor
(1 st record at the hour)
record time
(flashing)
[L/R]
[L/R]
History Display
(-2 to -23 hour)
Sea Level Pressure
History Review
- 23
hour
current
time
SET
Measuring Unit Selection Sequence
8
C (Celsius)
inHg
8
C (Celsius)
mb/hPa
8
F(Fahrenheit)
mb/hPa
8
F (Fahrenheit)
inHg
hold
[S/S]
hold
[S/S]
hold
[S/S]
hold
[S/S]
hold
[S/S]
SET
[S/S]
[S/S]/[L/R]
hold
[S/S]/[L/R]
[S/S]
Increase (decrease)
the number
Increase (decrease)
the number
at a higher speed
Sea level
pressure
history
Sea level
pressure
history
12.1 Barometer Mode -
Measurement Unit Selection and Barometer Adjustment
12.2 Barometer Mode -
Absolute Pressure Adjustment
12.3 Barometer Mode -
Factory Default Adjustment
How to Switch between Measurement Units
!
The Watch can display pressure in mb/hPa or
inHg; the Watch can display temperature in
degree Celsius (
C) or degree Fahrenheit (
F).
!
To switch among different units, hold down the
[S/S] button to change the units following the
adjacent unit selection sequence.
Why the Barometer Needs to be Adjusted
!
The Watch was calibrated for you in the factory.
For normal use, you do not need to calibrate the
Barometer.
!
But for the serious users, the Watch includes 2
adjustment procedures.
8
8
Barometer Adjustment
!
There are 2 kinds of Barometer adjustment
methods: Absolute Pressure and Factory Default
Adjustmenst.
!
Absolute Pressure adjustment: Input the known
atmospheric pressure into the Watch directly.
!
Factory Default adjustment: Restore the Watch to
the factory default setting.
!
For in-depth information for each of the adjustment
methods, please read the coming sections.
NOTE
: When the Ski Function is turned ON,
Barometer Adjustment function is prohibited.
Before Calibrating the Barometer
!
Before calibrating the Barometer, you must have
the absolute pressure of your current position,
because the pressure value will be input into the
Watch during the adjustment.
!
Consult the nearest o b s e r v a t o r y t o g e t t h e
ambient barometric pressure of your current
position.
IMPORTANT:
Inputting an incorrect pressure value
during the calibration procedure results a misleading
pressure reading in the future.
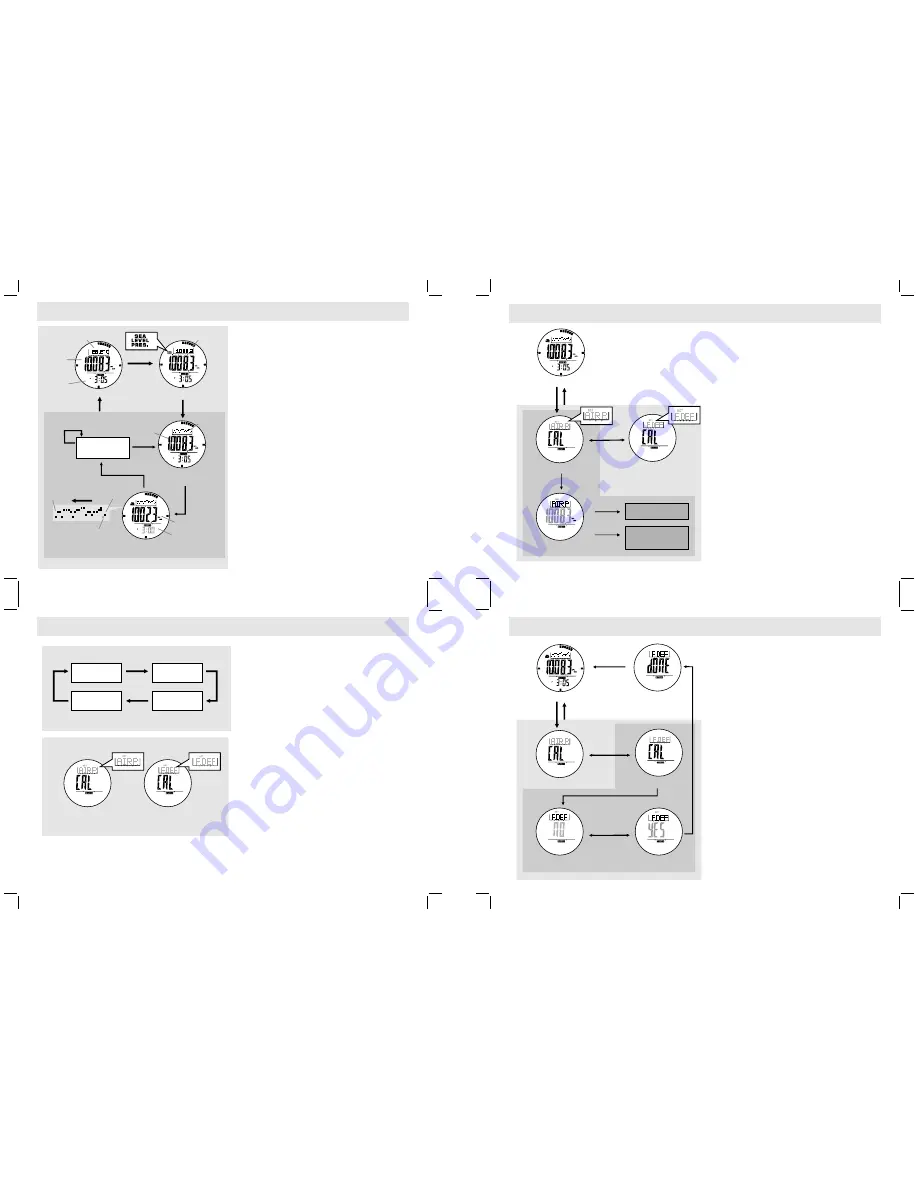
How to Adjust the Barometer Using Absolute
Pressure Adjustment
!
You can adjust the current pressure reading to
an absolute pressure value.
To adjust the Watch using
, p r e s s t h e [ S / S ] b u t t o n i n t h e
Display and the pressure
reading will appear.
!
When the pressure reading appears, press the
[S/S] or [L/R] button to increase / decrease the
number. ( Hold down the button to change the
number at a higher speed).
!
If the setting is completed, hold the [M] button to
confirm the setting and exit the adjustment
display.
!
To select the Adjustment Display, hold the [M]
button in the Barometer Mode, then press the [M]
button to select between the Absolute Pressure
and Factory Default Adjustments.
!
Absolute Pressure
A d j u s t m e n t
Absolute Pressure
How to Adjust the Barometer Using the Factory
Default Adjustment
You can also adjust the pressure reading
calculation using the factory default value.
To adjust the Watch using the factory default
adjustment, press the [S/S] button in the Factory
Default Display, and the indicator "NO" will
appear.
!
When the indicator "NO" appears, press the [S/S]
or [L/R] button to select between "YES" (reset
the Watch to factory default) or "NO" (abort the
resetting).
!
To exit the Adjustment Display, hold the [M]
button for 2 seconds, and then the Watch will go
back to the Barometer Mode. If the "YES"
Display is selected when exiting the Adjustment
Display, the "DONE" Display will appear for 2
seconds prior to the normal operation.
!
!
To select the Adjustment Display, hold the [M]
button in the Barometer Mode, then press the [M]
button to select between Absolute Pressure and
Factory Default Adjustments.
!
Functional Display
!
The Watch includes three Barometer functional
displays: Temperature, Sea Level Pressure and
History Graph Display. One of the three functional
displays will appear in the top row of the display.
Fast sampling
!
During the Altitude Mode, hold down the [L/R] button
will activate fast sampling (sample per second) for
five minutes.
Temperature Display
!
In Temperature Display, the current temperature in
degree Celsius (
C) or degree Fahrenheit (
F)
shows in the top row of the display.
IMPORTANT:
If you want to have an accurate reading
of air temperature, you must take off the Watch from
the wrist (for 20 to 30 minutes) that allows no body
temperature effect on your watch.
Sea Level Pressure Display
!
In Sea Level Pressure Display, the sea level
pressure shows in the top row of the display.
History Graph Display
!
T h e W a t c h r e c o r d s t h e p r e s s u r e r e a d i n g s
automatically on the hour, i.e 1:00, 2:00, 3:00 and
etc. These records will be plotted into a pressure
record graph.
!
In the History Display, the pressure record graph
shows in the top row of the display.
!
To review the pressure records of the last 23 hours,
press the [L/R] button to move the cursor to the left
of the graph cyclically, the corresponding pressure
record and its time recorded (flashing) will appear
8
8
12.0 Barometer Mode -
Temperature and History Display


