background image

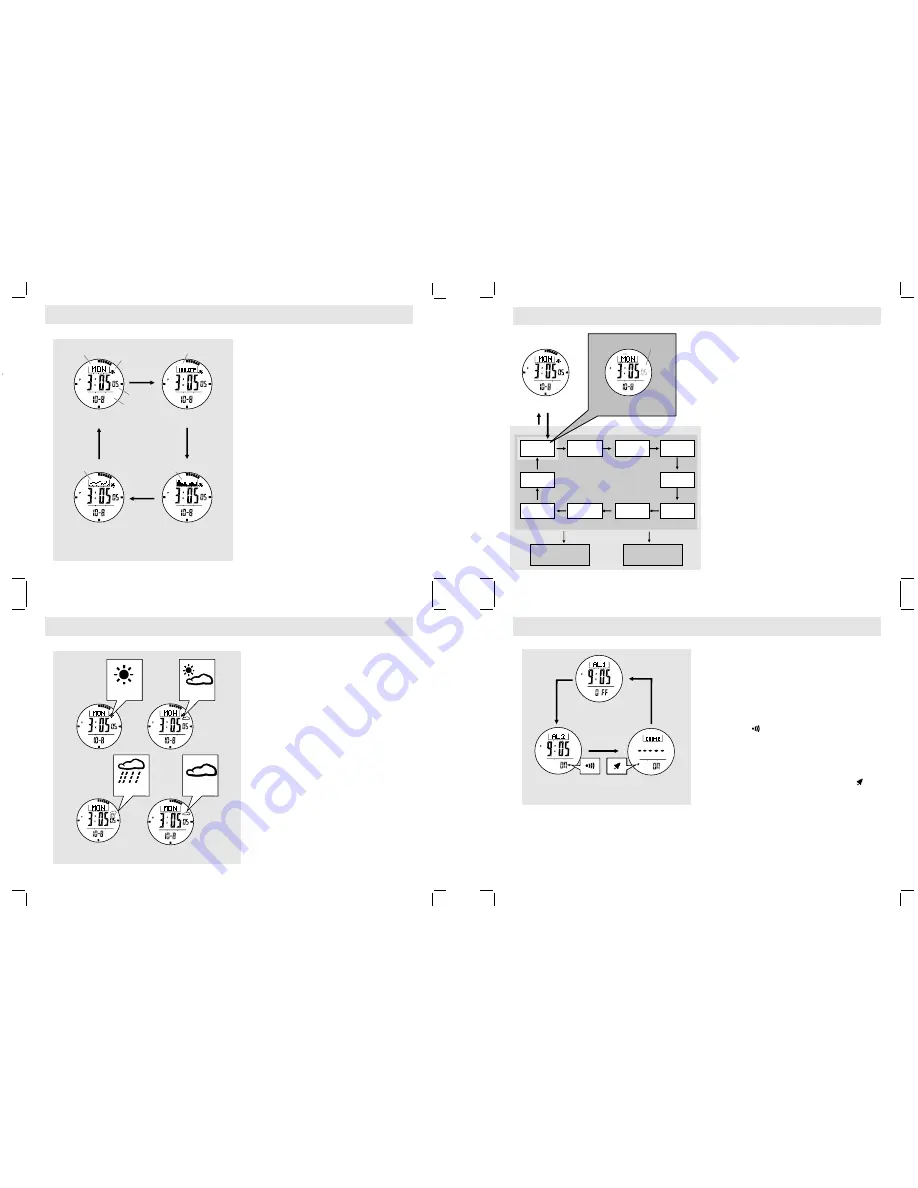
4.0 Current Time Mode - 

Functional Display

4.1 Current Time Mode - 

Weather Forecast Feature

4.2 Current Time Mode - 

Setting the Current Time 

Functional  Display

!

The  Current  Time


Mode  includes  four  kinds  of 

functional  displays:

!

Day  of  Week  Display,

!

Temperature  Display, 

!

Altitude  Tendency  Display  and 

!

Sea  Level  Pressure  Tendency  Display.

!

To  select  among  different  functional  displays, 
press  the  [S/S]  button  following  the  adjacent 
diagram.

Automatic  Display  Switching


!

When  the

  [

S

/

S

]

  button  is


pressed


and


  held, 

four  functional  displays  will  appear  one  by  one


in


sequence.

IMPORTANT:

  If  the  user  intends  to  get  an 

accurate  reading  of  air  temperature,  the  user 
must  taken  off  the  watch  from  the  wrist  for  20  to 
3 0   m i n u t e s   b e f o r e


g e t t i n g   t h e   a c t u a l  

m e a s u r e m e n t .


T h i s


a l l o w s   n o   b o d y  

temperature  effect  on  the  Watch. 

Weather Forecast Feature

!

A  special  feature  of  the  Watch  is  the  weather 
predicting  function.  It  works  by  analyzing  the 
changes of the past air pressure.

How to Indicate the Coming Weather

!

The  Watch  provides  four  different  symbols  to 
indicate the forecast weather, which are:

!

Sunny

!

Partly Cloudy

!

Cloudy

!

Rain

!

The  weather  forecast  feature  can


only  be  shown  in 

the Current Time  and Dual Time Modes.

IMPORTANT

:    Since  the  Watch  predicts  the  coming 

weather  by  using  the  data  of  the  changes  in  the  air 
pressure,    a


higher  accuracy  predication


may


result


when


the


user


stays


at


the


same altitude for at least 

8 hours.

IMPORTANT

:  The  Watch  predicts  the  weather  by 

adopting  general  weather  prediction  principles,  it  is 
NOT capable to reflect a dramatic changes of weather 
within a very short period of time.

How  to  Set  Current  Time

!

To  select  the  setting  display,  hold  down  the  [M] 
button  for  about  2  seconds  in


the

  Current  Time 

Mode.    In


the  setting  display,  the  flashing  "

SET

icon  will  appear.  

!

In


the  setting  display,  press  the  [M]  button  to 

change  the  selection  following  the  adjacent 
Current  Time  Setting  Sequence.

!

When  the  second  digits  are  flashing  (selected), 
press  the  [S/S]  or  [L/R]  button  to  reset  the  digits 
to  "00". 

!

When  the  digits  are  flashing  (selected),   press  the 
[S/S]  or  [L/R]  button  to  increase  /  decrease  the 
number.  (Hold  down  the  button


to  change  the 

number  at  a  higher  speed).

!

When  month-day  order  setting  is  selected,  press 
the  [S/S]  or  [L/R]  button  to  select  between  month-
day  and  day-month  formats.    When  12/24  hour 
format  setting  is  selected,  press  the  [S/S]  button 
to  select  between  12  and  24  hour  formats. 

!

When


the  LCD  contrast  is  selected,  press  the 

[S/S]  or  [L/R]  button  to  increase  /  decrease  the 
contrast  level  (1  to  10).  When  the


key  beep 

setting  is  selected,  press  the  [S/S]  or  [L/R]  button 
to  select  between  ON  and  OFF  the  beep.

!

When  the  settings  are  completed,  hold  down  the 
[M]  button  to  exit  the  setting  display. T h e   W a t c h  
will  also  exit  the  setting  display  if  NO  button


is


pressed  for  1  minute.

Current Time Display

Current Time Setting Sequence

Hold

[M]

Increase/Decrease
 the number at 
a higher speed

Increase/Decrease
 the number 

12/24

hour format

minute

hour

day

year

month

Current Time Setting Display

digits have been 
selected (flashing)

second

[S/S] / [L/R]

Hold

[M]

[M]

Month/Day

LCD

Contrast

Key

Beep

[M]

[M]

[M]

[M]

[M]

[M]

[M]

[M]

[M]

Hold

[S/S] / [L/R]

Current Time Mode

Weather Forecast Symbols

day  of  week

Sea  Level 
pressure
tendency

temperature 

date

current  time 

weather  forecast

altitude
tendency

[S/S]

[S/S]

[S/S]

[S/S]

Day of Week Display

Temperature Display

Altitude Tendency

Display

Sea Level Pressure 

Tendency Display

5.0 Daily Alarm Mode - Daily Alarm 1, Daily Alarm 2 and Chime Display

Daily  Alarm  1  and  Daily  Alarm  2

!

The Watch  has  two  daily  alarms:  Daily  Alarm  1 
and  Daily Alarm  2.  The  Daily  Alarm  1  and  Daily 
Alarm  2  are  working  independently.

!

Press  the  [S/S]  button  to  switch  among  the  Daily 
Alarm  1,  Daily  Alarm  2  and  Chime  Display 
following  the  adjacent  diagram. 

How  to  Turn  ON/OFF  the  Daily  Alarm 

!

To  turn  ON  or  OFF  the  Daily  Alarm  1  (2),  press 
the  [L/R]  button  in  Daily Alarm  1  (2)  Display.  

!

When  the  Daily  Alarm  1  (2)  is  ON,  the  alarm 
indicator  '            '     will  appear. 

!

If  the  alarm  indicator    appears,  the  Watch  will 
sound  at  the  preset  alarm  time  every  day.  When 
the  alarm  sounds,  press  any  button  to  stop  it.

How  to  Turn  ON/OFF  the  Hourly  Chime

!

To  turn  ON/OFF  the  Hourly  Chime,  press  the  [L/R] 
button  in


the  Chime   Display.  

!

When  the  chime  is  ON,  the  chime  indicator   '          '    
will  appear.  If  the  Chime  indicator  appears,  the 
Watch  will  beep

/

strike


on


the


hour

i

.

e

1:00, 

2:00,  3:00  etc.

Daily Alarm 2 Display

Daily Alarm 1  Display

Hourly Chime Display

[S/S]

[S/S]

[S/S]

Daily Alarm Mode

Partly
Cloudy

Sunny

Cloudy

Rain

Summary of Contents for PSKIW25

Page 1: ...g items for repair A letter stating your exact street addres daytime phone number and the problem you are experiencing should be included You must also enclose a copy of the original receipt a sproof of date of purchase Brooklyn NY 11204 1 800 444 5671 Monday Through Thursday gAM to 5PM Friday gAM to 1PM Eastern ...

Page 2: ... Chronograph Timer and Dual Time Modes To select among Ski Ski Recall Altimeter Barometer and Compass Modes To select among the setting items in setting display Sensor Button SR To select between Sensor and Timekeeping Modes Start Stop Button S S To select between functional displays under the same mode To activate the start or stop chronograph function in chronograph mode To toggle Yes No To incr...

Page 3: ...er Hold down the button to change the number at a higher speed When month day order setting is selected press the S S or L R button to select between month day and day month formats When 12 24 hour format setting is selected press the S S button to select between 12 and 24 hour formats When the LCD contrast is selected press the S S or L R button to increase decrease the contrast level 1 to 10 Whe...

Page 4: ...he M button in the Chronograph Display When the Total Time Display appears press the S S or L R button to check the next previous lap time Hold down the M button to go back to the Chronograph Display How to Reset Lap Time To record a new set of lap time hold down the L R button for 2 seconds to reset the chronograph to All Zeros display when the chronograph is stopped Countdown Timer The Watch inc...

Page 5: ...hen the timer is stopped To start a new counting by using a new target time set the timer again either by QSV or UPV Dual Time Mode The Watch has a function Dual Time Mode which shows the current time for a second time zone The second digits of the dual time will be synchronized with that of the Current Time Mode How to Set the Dual Time To select the setting display hold down the M button for 2 s...

Page 6: ...tions can select the Ski Mode sub functional displays Change the Top Row Display Press the S S button to change the top row display between Current Altitude and Current Temperature IMPORTANT If the user intends to get an accurate reading of air temperature the user must take off the watch from the wrist for 20 to 3 0 m i n u t e s b e f o r e g e t t i n g t h e a c t u a l measurement It allows n...

Page 7: ...e change is not significant the decent time timer will stop counting automatically and the current ski lap is recorded How to Activate a Ski Lap Manually Press the M button once in the Ski Mode to select MANUAL Display then the Watch is ready for starting stopping a ski lap manually To start a Ski Run Press the S S button once to start the ski run then the decent time timer will start counting fro...

Page 8: ...cent The maximum descent speed The highest altitude reached The lowest altitude reached and The slope of the ski course The Ski Lap logs the data of a particular ski lap and it includes The lap start time The total descent time The maximum descent speed The average descent speed The highest altitude reached The lowest altitude reached The altitude change and How to Delete the Ski In the press the ...

Page 9: ... site Factory Default Restore the Watch to the default factory setting where the Sea Level Pressure is assumed at 1013 2 mb NOTE When the Ski Function is turned ON Altimeter Adjustment function is prohibited NOTE Altitude is calibrated independently on each mode For example if the absolute altitude is selected the effect of the previous sea level pressure setting will be ignored 11 1 Altimeter Mod...

Page 10: ...se Decrease the number at a higher speed 11 4 Altimeter Mode Zero Altitude Adjustment Adjust the Altimeter Using Zero Altitude Adjustment To adjust the Watch by using press the S S button in Display and the indicator NO will appear When the indicator NO appears press the S S or L R button to select between YES reset the Watch to zero or NO abort the resetting When YES or NO is selected hold the M ...

Page 11: ... the future How to Adjust the Barometer Using Absolute Pressure Adjustment You can adjust the current pressure reading to an absolute pressure value To adjust the Watch using press the S S button in the Display and the pressure reading will appear When the pressure reading appears press the S S or L R button to increase decrease the number Hold down the button to change the number at a higher spee...

Page 12: ...oth compass directions and bearing directions The Compass Directions The compass directions are shown in the adjacent table For example in the figure on the left the compass direction of object B from point A is due East The compass direction of object C from point A is Southeast The compass direction of object D from point A is Northwest The Bearing Directions The Bearing direction of an object i...

Page 13: ... Pole The WeatherMaster like most magnetic compass points to the Magnetic North Pole On the contrary everything measured on a map is related to the True North Pole For a serious compass user who intends to perform an accurate navigation the compass must be adjusted for magnetic declination Calibrating the compass Magnetic Declination Mode Check your position by Backward Bearing Directions Spot two...

Page 14: ...e magnetic declination of the city which is close to your current position That value will be input into the Watch during the calibration To select Magnetic Declination Display press the M button in Rotation Calibration Display When the current magnetic declination appears press the S S or L R button to increase decrease the number Hold down the button to change the number at a higher speed If the...

Page 15: ...es 59 99 seconds Measuring Mode 100 lap memories Recall lap memories and total time Barometer Mode Resolution 0 1 hPa mbar 0 01 inHg Measuring Range 300 hPa mbar to 1100 hPa mbar 8 85 inHg to 32 48 inHg History Recall Last 24 hours Compass Mode Measuring range Thermometer Resolution 0 1 C 0 1 F Measuring range 10 0 C to 60 0 C 14 0 F to 140 0 F Backlight Electro Luminescent EL backlight Battery Si...

Reviews: