background image

How  to  Switch  between  Measurement  Units

!

The  Watch  displays  altitude  either  in  meter  (m)  or 
feet  (ft).

!

The  Watch  displays  temperature  either  in  degree 
Celsius  ( C)  or  degree Fahrenheit  ( F).

!

To  switch  among  different  units,  hold  down  the 
[S/S]  button  to  change  the  units  following  the 
adjacent diagram.

°

°

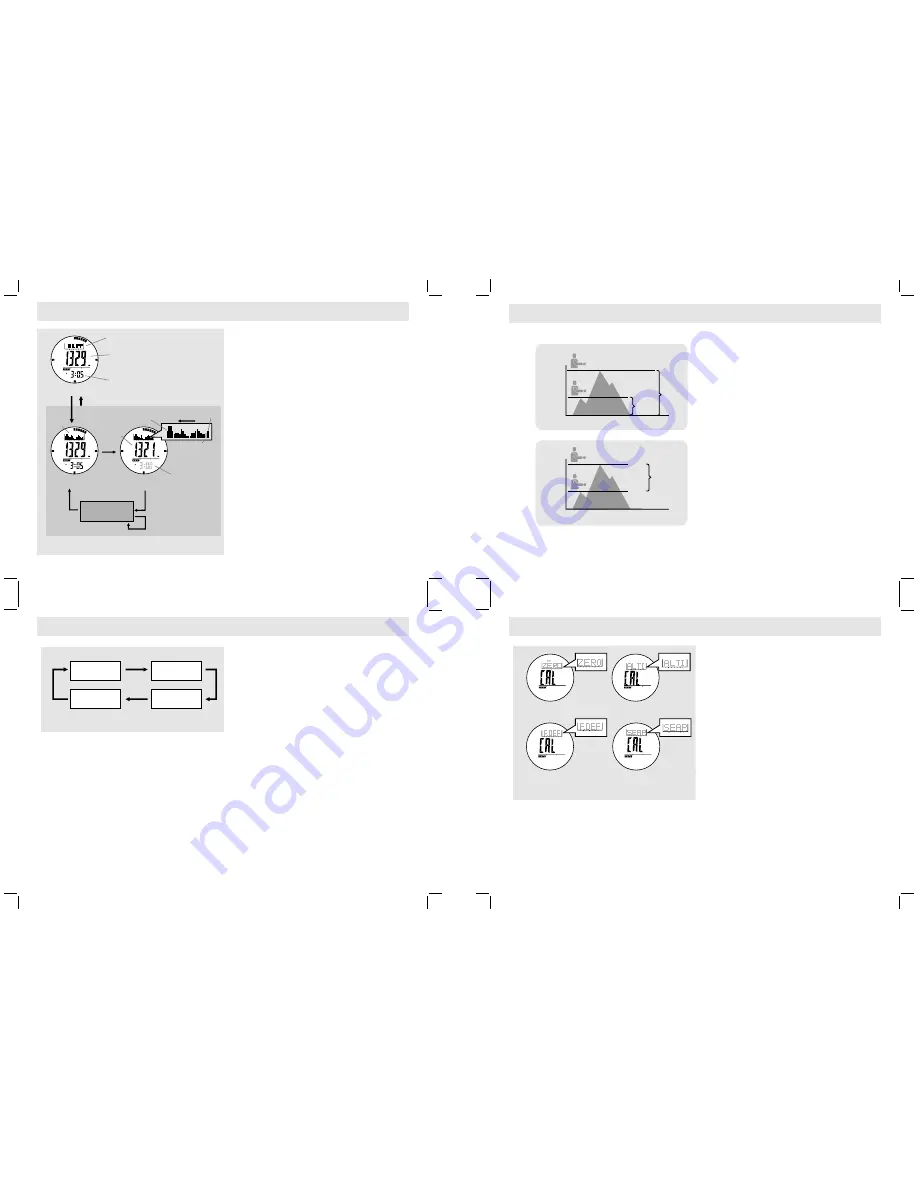
Absolute  and  Relative  Altitude

!

Absolute


altitude  is  the  vertical


distance  between 

your  current altitude  and  Sea  Level  (0  m).

!

Relative  altitude  is  the  vertical


distance  between   

your current  altitude  and  the  altitude  of  a  specific 
level at


which  you  set  the  altimeter  to  zero.

!

An  example  of  using  relative  altitude: 

!

The altitude  difference  between  the  starting 
point  and  the  finishing  point  of  a  trek  can    be 
measured  by  Relative Altitude.

!

Set  the  altitude  to  'Zero'    at  the  starting  point,   
the Watch  will  show  the  altitude  difference at  the 
finishing  point  of  the  trek.

How  to  Switch  between  Absolute  and  Relative 
Altitudes

!

C h e c k  t h e  c o m i n g  c h a p t e r  ' Z e r o  A l t i t u d e 
Adjustment'  for  more  details  on  how  to  set  the 
current  altitude  to  zero  altitude. 

!

An  '

'  indicator  will  be  shown  along  with  the 

altitude  reading  as  long  as  the  Altitude  has  been 
adjusted  by  the  'Zero'  adjustment.

!

To  switch  the  Watch  back  to  absolute  altitude 
measurement,  employ  one  of  the  following  altitude 
adjustments:  Factory  Default  Adjustment,  Sea 
Level  Pressure  Adjustment  and  Absolute  Altitude 
Adjustment.  Check  the  respective  chapters  for 
more  details  on  how  to  make  the  adjustment.

Why  the 

  Needs  to  be  Adjusted

!

As  the  absolute  altitude  is  calculated  from  air 
pressure,  the  change  of  air  pressure  would  affect 
the altitude  reading. 

!

To  achieve  a  more  accurate  result,  the  Watch 
needs  to  be  calibrated  from  time  to  time  as 
pressure  may  change  gradually  even  within  hours.

NOTE: 

The  Watch  includes  an  automatic  Sea  Level 

Pressure  comparison  device,  this  smart  device 
allows  NO  fluctuation  of  altitude  readings    to  be 
recorded  when  staying  at  the  same  altitude. 

Altimeter

?

Altimeter  Adjustment 

!

There  are  4  kinds  of  adjustment  methods:  Zero 
Altitude, Absolute Altitude,  Sea  Level  Pressure  and 
Factory Default Adjustment.

!

Zero  Altitude:    Adjust  the  altitude  mandatorily  to 
zero  for  relative  altitude  measurement.    If  the 
altimeter  is  adjusted  by  Zero  Adjustment,  an    " 

indicator will  appear on the display. 

!

Absolute Altitude:  Set the altitude to a known value 
and it can be recalled for a next setting. 

!

Sea Level Pressure: Input  a  specific  sea  level 
pressure which got from an official site. 

!

Factory  Default:  Restore  the  Watch  to  the  default 
factory  setting  where  the  Sea  Level  Pressure  is 
assumed at 1013.2 mb

NOTE

: When the Ski Function is turned ON, Altimeter 

Adjustment function is prohibited.

NOTE: 

Altitude  is  calibrated  independently  on  each 

mode.  For  example,  if  the  absolute  altitude  is 
selected, the effect of the previous sea level pressure 
setting will be ignored.

11.1 Altimeter Mode -

Measurement Unit Selection 

11.2 Altimeter Mode - 

Absolute and Relative Altitude 

11.  Altimeter Mode -

3

 Altimeter Adjustment  Overview

Zero Altitude 

Display

Absolute Altitude 

Display

Factory Default 

Display

Sea Level 

Pressure Display

Adjustment  Displays

SET

SET

SET

Measuring Unit  Selection  Sequence

hold

[S/S]

hold

[S/S]

hold

[S/S]

hold

[S/S]

hold

[S/S]

°

C (Celsius) 
m (Meter)

°

C (Celsius) 

ft (Feet)

°

F(Fahrenheit)

ft (Feet)

°

F (Fahrenheit)

m (Meter)

[L/R]

[S/S]

[S/S]

[L/R]

[L/R]

[L/R]

- 23

hour

current 
time 

History  Display

(Current  Time)

History  Display

(1st  Record  on  the  hour)

record  time
(flashing)

A LT I

cursor  moving 
direction

the  1st  record 
on  the  hour
(flashing  cursor)

current 
altitude

current time

Temperature Display

Altimeter Mode 

Altitude 
History Review

current
temperature

Altitude 
History 
graph

altitude 
history 

History  Display
(-2  to  -23  hour)

Absolute  Altitude

Relative  Altitude

80m
absolute 
altitude

180m
absolute 
altitude

100m
relative 
altitude

80m

80m

180m

180m

0m

(sea  level)

0m
(where  the 
altimeter  was 
adjusted  to  zero)

100m

0m

(sea  level)

Functional  Display

!

The  Watch  includes  two  Altimeter  functional  displays: 
Temperature  and  History  Display.  One  of  the  two 
functional  displays  will  appear  in  the  top  row  of  the 
display.  

!

Press  the  [S/S]  to  select  between  Temperature  and 
History  Display. 

Fast  sampling

!

In  the  Altitude  Mode,  hold  down  the  [L/R]  button  will 
activate  fast  sampling  (sample  per  second)  for  five 
minutes.

Temperature  Display

!

In  Temperature  Display,  the  top  display  shows  the 
current  temperature  in  degree  Celsius  ( C)  or d e g r e e  
Fahrenheit  ( F).

IMPORTANT:

  To  get  an  accurate  reading  of  air 

temperature,  you  must  take  off  the  watch  from  the  wrist 
for  20  to  30  minutes  which  allows  no  body  temperature 
effect  on  your  watch. 

History  Display

!

The  Watch  records  the  altitude  readings  automatically 
on  the  hour,  i.e  1:00,  2:00,  3:00  and  etc.  These 
records  are  plotted  into  an  altitude  record  graph. 

!

In  the  History  Display,  the  altitude  record  graph 
shows  in  the  top  row  of  the  display.  

!

To  review  the  altitude  records  for  the  last  23  hours, 
press  the  [L/R]  button  to  move  the  cursor  to  the  left 
cyclically,  the  corresponding  altitude  reading  and  its 
time  recorded  (flashing)  appear  on  the  display 
accordingly.

°

°

11.0 Altimeter Mode - 

Temperature and History Display

Summary of Contents for PSKIW25

Page 1: ...g items for repair A letter stating your exact street addres daytime phone number and the problem you are experiencing should be included You must also enclose a copy of the original receipt a sproof of date of purchase Brooklyn NY 11204 1 800 444 5671 Monday Through Thursday gAM to 5PM Friday gAM to 1PM Eastern ...

Page 2: ... Chronograph Timer and Dual Time Modes To select among Ski Ski Recall Altimeter Barometer and Compass Modes To select among the setting items in setting display Sensor Button SR To select between Sensor and Timekeeping Modes Start Stop Button S S To select between functional displays under the same mode To activate the start or stop chronograph function in chronograph mode To toggle Yes No To incr...

Page 3: ...er Hold down the button to change the number at a higher speed When month day order setting is selected press the S S or L R button to select between month day and day month formats When 12 24 hour format setting is selected press the S S button to select between 12 and 24 hour formats When the LCD contrast is selected press the S S or L R button to increase decrease the contrast level 1 to 10 Whe...

Page 4: ...he M button in the Chronograph Display When the Total Time Display appears press the S S or L R button to check the next previous lap time Hold down the M button to go back to the Chronograph Display How to Reset Lap Time To record a new set of lap time hold down the L R button for 2 seconds to reset the chronograph to All Zeros display when the chronograph is stopped Countdown Timer The Watch inc...

Page 5: ...hen the timer is stopped To start a new counting by using a new target time set the timer again either by QSV or UPV Dual Time Mode The Watch has a function Dual Time Mode which shows the current time for a second time zone The second digits of the dual time will be synchronized with that of the Current Time Mode How to Set the Dual Time To select the setting display hold down the M button for 2 s...

Page 6: ...tions can select the Ski Mode sub functional displays Change the Top Row Display Press the S S button to change the top row display between Current Altitude and Current Temperature IMPORTANT If the user intends to get an accurate reading of air temperature the user must take off the watch from the wrist for 20 to 3 0 m i n u t e s b e f o r e g e t t i n g t h e a c t u a l measurement It allows n...

Page 7: ...e change is not significant the decent time timer will stop counting automatically and the current ski lap is recorded How to Activate a Ski Lap Manually Press the M button once in the Ski Mode to select MANUAL Display then the Watch is ready for starting stopping a ski lap manually To start a Ski Run Press the S S button once to start the ski run then the decent time timer will start counting fro...

Page 8: ...cent The maximum descent speed The highest altitude reached The lowest altitude reached and The slope of the ski course The Ski Lap logs the data of a particular ski lap and it includes The lap start time The total descent time The maximum descent speed The average descent speed The highest altitude reached The lowest altitude reached The altitude change and How to Delete the Ski In the press the ...

Page 9: ... site Factory Default Restore the Watch to the default factory setting where the Sea Level Pressure is assumed at 1013 2 mb NOTE When the Ski Function is turned ON Altimeter Adjustment function is prohibited NOTE Altitude is calibrated independently on each mode For example if the absolute altitude is selected the effect of the previous sea level pressure setting will be ignored 11 1 Altimeter Mod...

Page 10: ...se Decrease the number at a higher speed 11 4 Altimeter Mode Zero Altitude Adjustment Adjust the Altimeter Using Zero Altitude Adjustment To adjust the Watch by using press the S S button in Display and the indicator NO will appear When the indicator NO appears press the S S or L R button to select between YES reset the Watch to zero or NO abort the resetting When YES or NO is selected hold the M ...

Page 11: ... the future How to Adjust the Barometer Using Absolute Pressure Adjustment You can adjust the current pressure reading to an absolute pressure value To adjust the Watch using press the S S button in the Display and the pressure reading will appear When the pressure reading appears press the S S or L R button to increase decrease the number Hold down the button to change the number at a higher spee...

Page 12: ...oth compass directions and bearing directions The Compass Directions The compass directions are shown in the adjacent table For example in the figure on the left the compass direction of object B from point A is due East The compass direction of object C from point A is Southeast The compass direction of object D from point A is Northwest The Bearing Directions The Bearing direction of an object i...

Page 13: ... Pole The WeatherMaster like most magnetic compass points to the Magnetic North Pole On the contrary everything measured on a map is related to the True North Pole For a serious compass user who intends to perform an accurate navigation the compass must be adjusted for magnetic declination Calibrating the compass Magnetic Declination Mode Check your position by Backward Bearing Directions Spot two...

Page 14: ...e magnetic declination of the city which is close to your current position That value will be input into the Watch during the calibration To select Magnetic Declination Display press the M button in Rotation Calibration Display When the current magnetic declination appears press the S S or L R button to increase decrease the number Hold down the button to change the number at a higher speed If the...

Page 15: ...es 59 99 seconds Measuring Mode 100 lap memories Recall lap memories and total time Barometer Mode Resolution 0 1 hPa mbar 0 01 inHg Measuring Range 300 hPa mbar to 1100 hPa mbar 8 85 inHg to 32 48 inHg History Recall Last 24 hours Compass Mode Measuring range Thermometer Resolution 0 1 C 0 1 F Measuring range 10 0 C to 60 0 C 14 0 F to 140 0 F Backlight Electro Luminescent EL backlight Battery Si...

Reviews: