background image

- 3 - 

INSTALLATION 


Installation Procedures 

First complete the electrical connections and then check for correctness.   
 

Installation Opening 

This unit can be installed in any dashboard Having 
an opening as shown the right figure. 


Important: 

Remove the transport CD deck screws before use. 


To Install the Car Radio 

Be sure you test all connections first, and then follow these steps to install this unit. 
1. Make sure the ignition is turned off, and then disconnect the cable from the vehicle battery’s 
  negative (-) terminal. 
2. Disconnect the wire harness and the antenna. 
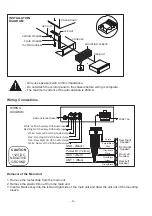
3. Lift the left or right top corner of the plastic outer trim ring then pull it out to remove it. 
4. Insert the two bracket keys into the left and right side of the chassis, as shown the below figure to 

separate the chassis from the housing. 


5. Insert mounting sleeve into the dashboard and bend the mounting tabs out with a screwdriver.   

Make sure that the lock lever is flush with the mounting sleeve and is not projecting beyond. 

6. Insert car radio into the mounting sleeve. 
7. Use a metal strap to secure the rear part of the chassis using the hardware indicated. 
8. Make wiring connections, as illustrated in the “Wiring Diagram.” 
9. Install the plastic outer trim ring.   


182 mm

53 mm

Bracket key

Plastic outer trim ring

Bracket key

Summary of Contents for PLCD43BTM

Page 1: ...Car In dash AM FM MPX Receiver with CD CD CD R RW MP3 Playback USB AUX Inputs PLCD43MRB PLCD43BTM Receiver Models USER S MANUAL CLK...

Page 2: ...ET 7 RADIO OPERATION 8 Switch Between USA area and Europe area Frequency 8 Change Bands BAND 8 Manual Tuning 8 Auto Seek Tuning 8 To Store Recall Preset Stations 8 Automatic Store station Preset stati...

Page 3: ...the car has been in direct sunlight for an extended period you may need to reduce the temperature inside the car before turning on and using the unit If the battery is disconnected discharged or chang...

Page 4: ...and the antenna 3 Lift the left or right top corner of the plastic outer trim ring then pull it out to remove it 4 Insert the two bracket keys into the left and right side of the chassis as shown the...

Page 5: ...INSTALLATION DIAGRAM SPRING WASHER PLAIN WASHER TAPPING SCREW HEX NUT HEX NUT DASH BOARD CONSOLE MOUNTING SLEEVE HEX BOLT ACC Red GND Black ANT Blue Power B Yellow Green Purple Rear Right Speaker Fro...

Page 6: ...on 4 button 9 10 previous 10 tracks Preset station 5 button 10 10 next 10 tracks Preset station 6 button 11 CLK clock setting button button 12 tune down seek down track down fast reverse button 13 tun...

Page 7: ...ress the SEL ENTER button on the remote control to access these additional functions VOL LAS ADJ AREA EU US CLOCK 12 24 BEEP ON OFF VOL LAS ADJ This option allows you to preset a volume level as the p...

Page 8: ...button on the front panel or on the remote control to toggle between EQ OFF ROCK POP CLASS FLAT Release the detachable front panel Press the Release button to detach the detachable front panel then t...

Page 9: ...ion by or button Press and hold the desired preset button numbered 1 6 on the face of the radio for more than 2 seconds to save the station to that preset number To recall a preset station Select the...

Page 10: ...o fast backward press and hold the button Introduction Scan Press the INT button to play the first 10 seconds of each track press again to stop the introduction scan and play the current track Repeati...

Page 11: ...VOL knob to select the number of your favorite track or file with high speed You can also press the numerical keys on the remote control to select a specific track by its serial number c Finally pres...

Page 12: ...n on remote control to input the telephone number and the entered number will be shown on the LCD display b If a number has been incorrectly inputted press the DEL button or button to delete it c Pres...

Page 13: ...ote control reception is about 30 degrees The distance between the emitting window of the remote control and the sensor window of the unit should remain less 5 meters Button Names and Locations 1 Powe...

Page 14: ...z Step 87 5 108 0 MHz 50KHz Step Usable Sensitivity 30 dBu I F Frequency 10 7 MHz AM USA Europe Frequency Range 530 1710KHz 10KHz Step 522 1620 KHz 9KHz Step Usable Sensitivity 20 dBu I F Frequency 45...

Page 15: ...nside the car is too high Cool off or until the ambient temperature return to normal Disc can not be loaded or ejected Condensation Leave the player off for an hour or so and then try again Volume is...

Reviews: