background image

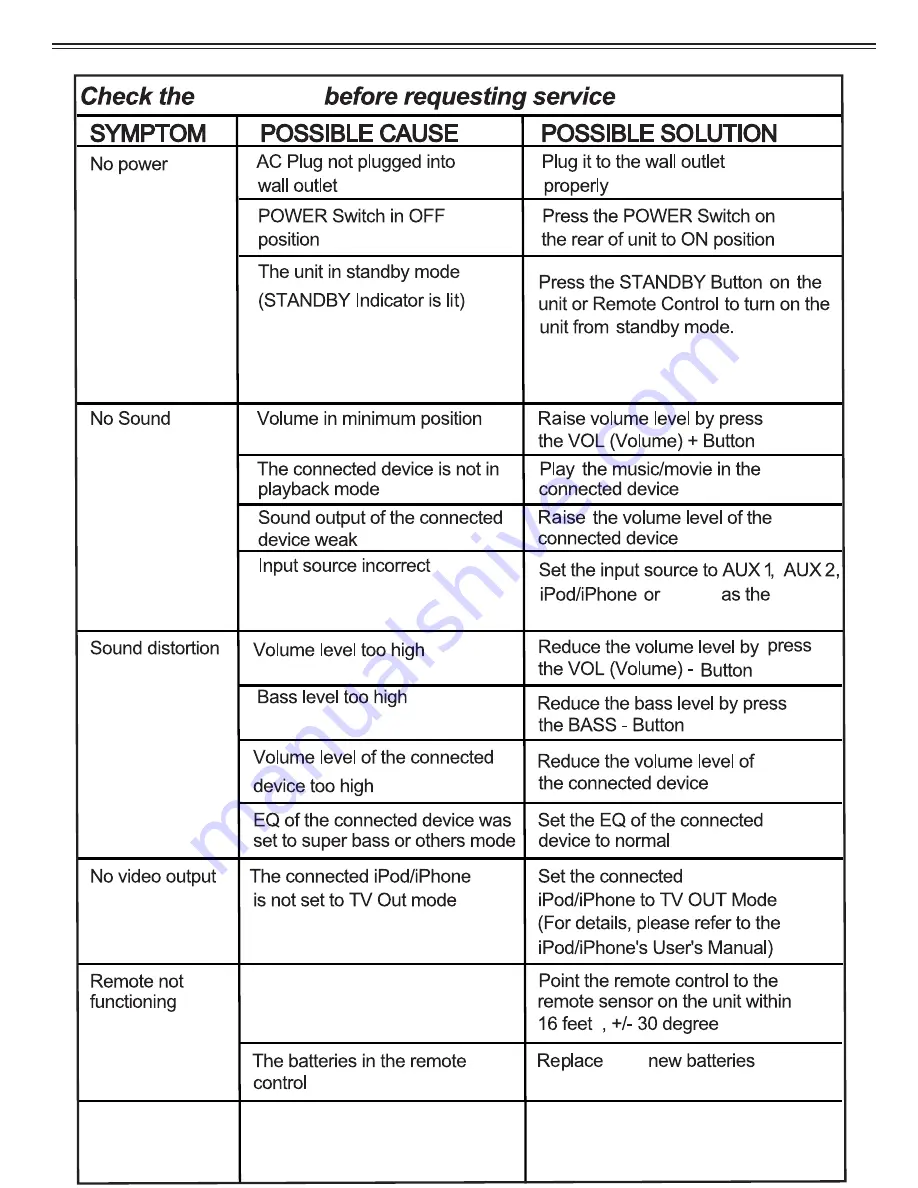
TROUBLESHOOTING GUIDE

STANDBY Indicator will turn off and

the Display will turn ON.

ing

ing

ing

with

corresponding to connected device

Radio

are consumed.

Radio reception
weak

Extend the FM antenna wire on the

rear of the unit and adjust it to get
better reception.

The

following

Summary of Contents for PSBM60I

Page 1: ...User s Manual 240W Watt Amplified Five Speaker iPod Sound System W FM Radio and Wireless Remote PSBM60I www pyleaudio com iPhone Docking System ...

Page 2: ...he apparatus When a cart is used use caution when moving the cart apparatus combination to avoid injury from tip over 12 Unplug this apparatus during lightningstorms or when unused for long periods of time WARNING To reduce the risk of fire or electric shock this apparatus should not be exposed to rain or moisture and objects filled with liquids such as vases should notbe placed on this apparatus ...

Page 3: ...t naked flames or heat Ensure that you always have easy access to the power cord plug or adaptor to disconnect the apparatus from the power Made for iPod Made for iPhone and Made for iPad mean that an electronic accessory has been designed to connect specifically to iPod iPhone or iPad respectively and has been certified by the developer to meet Apple performance standards Apple is not responsible...

Page 4: ...se mainly use symphonic music or pop music for the break in as the frequency range of these two kinds of music is wide and can therefore realize good break in for each frequency range of the speakers Never make the volume too large during the break in or else the speakers will be quite easy to get damaged due to long time overloading run and disturb your families and neighbors Entire wooden case p...

Page 5: ...7 8 1 standby mode Press again to turn the unit off standby 2 INPUT Press repeatedly to select the input source as desire 3 MUTE Press to turn off the sound temporary Press again to turn the sound back 4 VOL Press to reduce the sound level 5 VOL Press to increase the sound level 6 LCD display 7 Remote Sensor 8 Power indicator ST ANDBY Press to turn on the unit from ...

Page 6: ...P PANEL FUNCTIONS 2 1 1 3 5mm audio jack 2 Dock for iPod iPhone iPad 1 Power ON OFF Switch 2 CD L R Input jacks 3 AUX 1 L R input jacks 4 AUX 2 L R input jacks 5 Video input jack 6 FM ANT Antenna 7 AC Power Cord 6 4 2 3 5 1 7 ...

Page 7: ...r panel is same as your AC power Do not operate with wet hands to avoid electric shock 1 CONNECT POWER SUPPLY 2 CONNECT WITH iPad SYSTEM CONNECTIONS Socket Power plug 2 Make sure the home button on iPad is directed at the middle of the dock 1 Plug the stand for iPad into the holes ...

Page 8: ...3 CONNECT WITH PC MP3 To listen the sound source from PC Computer or MP3 Players connect the unit with the external device as below 3 5mm mini plug connection cable MP3 PC ...

Page 9: ... CONNECT WITH TV DVD DVD Audio Out To listen the sound source from Television and or DVD players connect the unit with the external device as below Audio In Video Out TV Video In TV DVD L R TV Audio Out ...

Page 10: ...E Button 4 TUNE Button 5 M Play Pause Memory Button 6 TUNE Button MUTE RANDOM REPEAT ST SOURCE BASS VOL MENU CH M STAND BY TUNE TUNE 7 RANDOM Button 8 MENU Button 9 REPEAT ST Stereo Button 10 SOURCE Button 11 Enter Button 12 BASS Buttons 13 VOL Volume Buttons 13 ...

Page 11: ...gether e g Alkaline and Carbon zinc or old batteries with fresh ones 4 If the batteries in the device are consumed or the device is not to be used for a long period oftime remove the batteries to prevent damage or injury from possible battery leakage 5 Do notby to recharge the battery not intended to be recharged it can overheat and rupbJre FollaN battery manufacturer s instructions 6 The batterie...

Page 12: ...n the unit or Remote Control to turn on the unit from standby mode The STANDBY Indicator will turn off but the LCD Display will turn on 3 Press the SOURCE Button on the unit or Remote Control repeatedly to select the input source as the connections to iPod iPhone iPad LCD shows IPOD AUX 1 LCD shows AUX1 AUX 2 LCD shows AUX2 PC MP3 LCD shows PC or Radio FM mode LCD shows current FM station s freque...

Page 13: ... ST Button on the remote control repeatedly to set the radio to stereo or mono mode STEREO or MONO will appear on the display LISTEN TO FM RADIO Extend the FM antenna wire on the rear of the unit and adjust it to get the best reception 1 Power ON the unit as previously indicated 2 Press the SOURCE button on the unit or remote control repeatedly until FM frequency appears on the display C Press the...

Page 14: ...or will turn off and the Display will turn ON ing ing ing with corresponding to connected device Radio are consumed Radio reception weak Extend the FM antenna wire on the rear of the unit and adjust it to get better reception The following ...

Page 15: ...SPECIFICATIONS Power Supply AC 120V 60Hz Power Output 300W NOTE Specifications are subject to change for improvement without prior notice ...

Page 16: ...e We are not responsible for damage incurred in returning items for repair A letter stating your exact street addres daytime phone number and the problem you are experiencing should be included You must also enclose a copy of the original receipt a sproof of date of purchase ...

Reviews: