background image

-2-

Hardware Kit:

Hardware Kit:

-7-

ID

Description

1

2

6

3

B

1

2

2

4

Screw

M5

mm

×16

bolt

Qty

Description

Square washer

Long bolt
Wall anchor

Long bolt washer

M8×16mm bolt

M6×

mm

16

bolt

4

2

ID

Qty

4
4

F

G

H

4

D

4
4

E

C

4

Ribbon

Wall plate
Bracket

5

1

TV plate

1

2

3

4

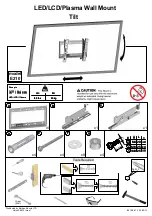
Part 4-Mounting the flat panel screen

NOTE:

Hook the top of brackets

onto the center of wall plate(1). Then swing the

screen down. Fixed slide block(7) into wall plate by screw(6).

(2)

Always use an assistant or mechanical lifting equipment to safely lift

and position heavy equipment.

Part 4-Mounting the flat panel screen

NOTE:

2

5

2

Plastic cover

Magnetic removable
bubble level

A-D

H

E

G

F

6

7

7

2

Slide block(Position lock)

A

4

M4

mm

×16

bolt

6

7

8

8

2

Wrench(4x4,5x5)

Use the box wrench to loose the
screw if there's too tight to tilt

Before installation, please attach these two decorative end caps to the two
sides of TV plate.(FIG.A)

FIG.A

Summary of Contents for PSWLE82

Page 1: ...attempting installation If you are unsure of any part of this installation contact a professional installer for assistance 2 The wall or mounting surface must be capable of supporting the combined weight of the mount and the display otherwise the structure must be reinforced 3 Safety gear and proper tools must be used A minimum of two people are required for this installation Failure to use safety...

Page 2: ...of wall plate 1 Then swing the screen down Fixed slide block 7 into wall plate by screw 6 2 Always use an assistant or mechanical lifting equipment to safely lift and position heavy equipment Part 4 Mounting the flat panel screen NOTE 2 5 2 Plastic cover Magnetic removable bubble level A D H E G F 6 7 7 2 Slide block Position lock A 4 M4 mm 16 bolt 6 7 8 8 2 Wrench 4x4 5x5 Use the box wrench to lo...

Page 3: ...screen A D E Square washer E Small hole for M4 screws Medium hole for M5 and M6 screws Large hole for M8 screws Wood stud Stud finder 2 50mm Φ3 16 5mm Part 1a Wood Stud Mounting Use wall plate 1 as a template make sure it is level and mark four mounting holes along the center lines of the wood studs Drill four 3 16 5mm dia holes 2 50mm deep Level wall plate 1 and attach to wall with four long bolt...

Page 4: ...e televesion once you want to uninstall the TV it can help you to take out the brackets 3 2 50mm Φ3 8 10mm Part 1b Concrete Wall Mounting Level wall plate 1 and use wall as a template to mark four holes Drill four 3 8 10mm dia holes 2 50mm deep Insert four anchors H into holes and secure wall plate with four long bolts G and four washers F Tighten screws firmly Do not overtighten Part 1b Concrete ...

Reviews: