background image

- Error symbol on the display.

Note:
If press

button(1), the unit can't

work yet, please use a cotton swab
soaked in isopropyl alcohol to clean the
disc socket.

RESET

Selecting The Frequency Band
Press

button (14) shortly to select

the desired band. The reception band will
change between FM and AM.

Stereo/Mono
Press

(15) or

on the remote

control to select mono/stereo mode.

Local/Distant
Press

(15) for several seconds

or

to select

between local and distant stations.
LOCAL setting for reception of strong
signal station, and DISTANT setting for
reception of weaker signal stations.

Selecting Station

- Press

for several seconds until

MANUAL appears on the display, and

then press

button to select a station.

If both buttons have not been pressed for
several seconds, they will return to
automatic seek mode .

Automatic Memory Storing & Program
Scanning

- Automatic memory storing

Press

button (17) for several

seconds, the radio searches from the
current frequency and checks the signal
strength until one cycle search is
finished. And then 6 strongest stations
are stored into the corresponding preset
number button.

- Program scanning

Press

button (17) shortly to scan

preset station. When the field strength
level is more than the threshold level of

BAND

ST

MO/ST

ST LOC

LO/DX

AS/PS

AS/PS

on the remote control

- Press preset

button (16) to select a

station which had been stored in the
memory.

1-6

Radio Operation

stop level, the radio is holding at that
preset number for several seconds with
release mute, and then searches again.

Station Storing
- Press

button to activate automatic

seek mode.
- In manual mode, press

button to

select a station
Press preset

button (16) for several

seconds to store current station into the
number button.

.

1-6

CD/MP3 Operation

Playback

Gently insert a disc with the label side

facing up; the disc will be pulled into the
unit automatically. The disc playback
begins.

For CD:

1.

2.

3.

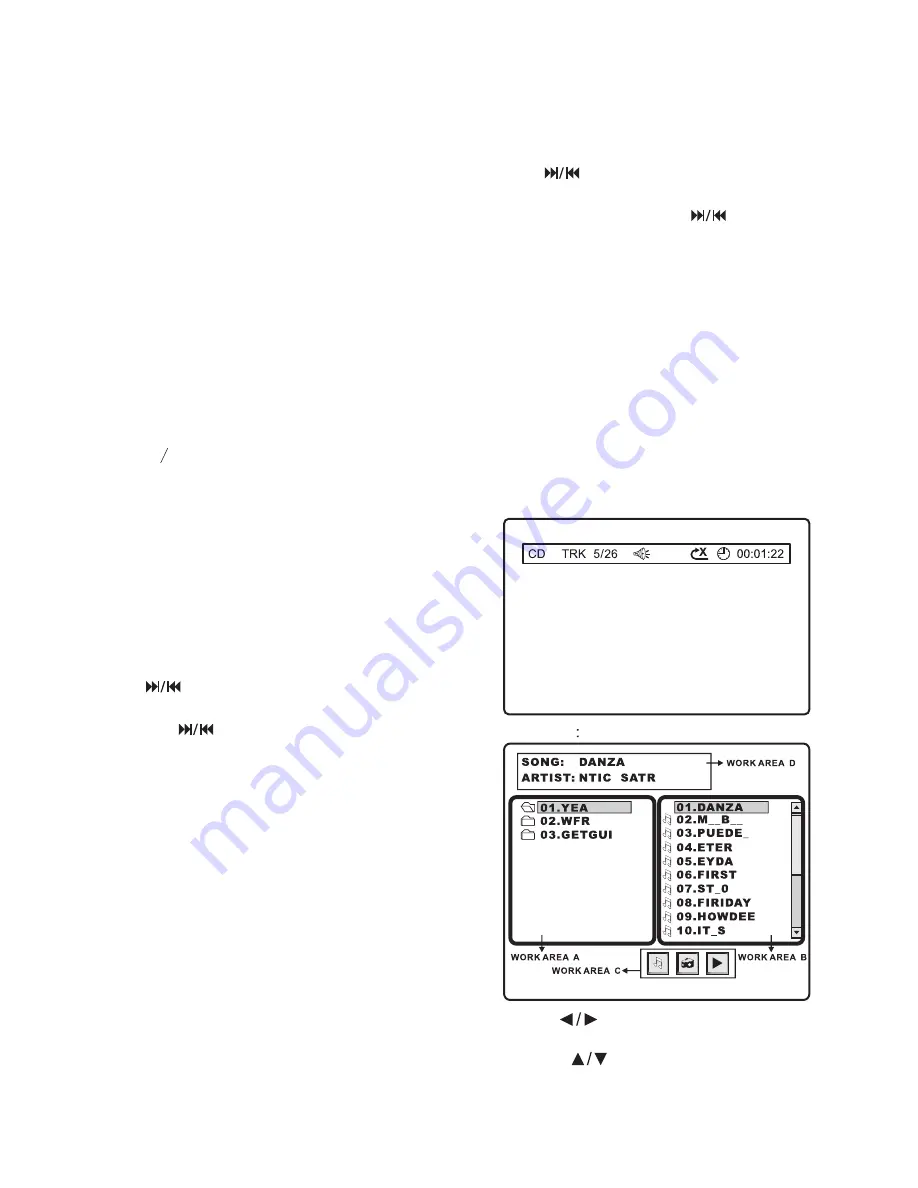
For MP3

1).

3).

Press

button to move between

work area A, B and C.

Press

button to select the

desired folder or file of this work area.

2).

Press

button (30) to confirm

the selected item.

ENTER

9

Summary of Contents for View PLD175TBT

Page 1: ...le Front Panel Anti Shock Mechanism A V Output A V Input CAR VIDEO SYSTEM Sub woofer Function AM FM 2 Band Radio PAL NTSC Color System Instruction Manual PLD175TBT Bluetooth Function CD RW Compatible DVD VCD MP4 MP3 CD CD R WWW PYLEAUDIO COM ...

Page 2: ......

Page 3: ...evice Data Disc Play Operation 15 DVD VCD Operation 11 CD MP3 Operation 9 Radio Operation 9 General Operation 7 Using The Detachable Front Panel 7 6 Preparing The Remote Control 5 Location and Function of Keys Operation 5 4 Wiring Diagram 2 DIN REAR MOUNT Method B 3 Installation 2 1 DIN FRONT MOUNT Method A 2 Safety Information 1 Operation of Memory Card 15 TV Operation 16 Specification 23 ...

Page 4: ... is prohibited Region Management Information Region Management Information This automotive DVD Player is designed and manufactured to respond to the Region Management Information that is recorded on a DVD disc If the Region number described on the DVD disc does not correspond to the Region number of this car DVD Player this car DVD Player cannot play this disc 1 Handling and Cleaning Dirt dust scr...

Page 5: ...included with the unit to ensure proper installation The use of unauthorized parts can cause malfunctions Consult with your nearest dealer if installation requires the drilling of holes or other modifications of the vehicle Install the unit where it does not get in the driver s way and cannot injure the passenger if there is a sudden stop like an emergency stop If installation angel exceeds 30 fro...

Page 6: ...e You can also use the key to remove the frame from the left side 3 Release Unit Key After releasing the frame insert the release unit keys supplied with the accessory into the grooves at both sides of the unit as shown in figure until they click Pulling the keys makes it possible to remove the unit from the dashboard 2 DIN Rear Mount Method B T ab 1 6 2 3 4 5 1 Factory installed radio bracket 2 C...

Page 7: ...ut RCA Green to SUB Woofer output Red to Rear Rch RCA output White to Rear Lch RCA output Violet Rear Right Violet Black Rear Right Grey Front Right Grey Black Front Right White Front Left White Black Front Left Green Rear Left Green Black Rear Left Blue to ANT Red to ACC Black to GND B Yellow to Battery B TV Socket Bluetooth Antenna ...

Page 8: ...on of Keys When you press button 3 and the front panel flip down 25 24 23 22 21 20 6 13 18 9 19 15 11 8 16 17 7 3 2 1 43 12 26 5 4 41 14 43 To connect with mobile audio or video system by the cable included in unit AV IN 10 42 44 5 ...

Page 9: ...t subject the remote control to excessive shock Do not put in a trouser pocket Keep away from food moisture and dirt Do not place in direct sunshine Battery replacement Battery type a button cell lithium battery CR2025 3V 1 Remove the battery holder by pressing the locking tab with your thumb and pulling it out 3 Closing the cover Gently push in the holder until securely locked into place 2 Replac...

Page 10: ...trol operation Menu Whenever press button 5 to eject the disc te Adjusting the volume level VOL BASS TREB BAL EQ LOUD SUBW Volume level 00 63 Bass level 07 07 Treble level 07 07 Balance 15L 15R Fader 15R 15F EQ Flat Classic Pop Rock Loudness ON OFF FAD General Operation 7 Using The Detachable Front Panel 1 Press the Open button 3 to flip down the front panel 2 Grasp the right side of the front pan...

Page 11: ...udness on off Equalization Press button 12 to turn on VOL Remote control operation DISP DISP VOL IR LOUD EQ equalization function and to select desired audio mode There are f ur kinds of mode as below o Mute Function Press button 2 to silence the sound instantly press it again to resume previous volume level MUTE Mode Function Press button 13 to switch to the desired mode The mode will change ever...

Page 12: ...nt frequency and checks the signal strength until one cycle search is finished And then 6 strongest stations are stored into the corresponding preset number button Program scanning Press button 17 shortly to scan preset station When the field strength level is more than the threshold level of BAND ST MO ST ST LOC LO DX AS PS AS PS on the remote control Press preset button 16 to select a station wh...

Page 13: ...al playback Repeat Play Paragraph Repeat Play When you want to repeat play whole disc a track or a directory in the disc Press button 22 repeatedly to select different repeat modes For different kinds of discs pressing button 22 has different effects For CD Repeat play 1 RPT 2 RPT For MP3 NOTES Only the current track file is repeatedly playing Only tracks files in the current folder are repeatedly...

Page 14: ... 37 Playback Control setting is on button 35 during playback Each time the button is pressed the speed of fast forward changes according to the disc as follows FORWARD 2X 4X 8X 20X In fast forward state press button 20 to recover normal playback 2 Fast Reverse Press button 34 during playback Each time the button is pressed the speed of fast reverse changes according to the disc as follows BACKWARD...

Page 15: ...apter or track This function cannot be used on discs which no chapter numbers are recorded Playing In Random Sequence On Screen Display Function Press the button for several seconds during playback to display the each time Press button to switch the random mode on off If the random mode is on tracks files on the disc will be play in random sequence p 18 19 to skip and play Note 0 9 38 RDM SUB T co...

Page 16: ...ayed even when this is set to off The language number is different PBC ZOOM 2 ZOOM 3 ZOOM 4 ZOOM 1 2 ZOOM 1 3 ZOOM 1 4 ZOOM OFF according to the disc Some discs only contain one subtitle language Each time press button 39 during playback the sound switches between the audio tracks recorded on the disc Some discs only contain one soundtrack language For DVD discs what with multiple audio tracks you...

Page 17: ...button 33 to activate program Program Play Function PROG ENTER PROG edit interface as follow Use cursor button to select the item that you want to program 1 The item you selected will become highlight 2 Input the track number that you want to program by numeric buttons 0 9 on the remote control 3 Press cursor buttons to move to PLAY operation button and then press button 30 to program playback Fre...

Page 18: ...touch or take out the device If following the instruction above the unit can t still read the device please check if the device is in good condition or take out the device then insert it into the USB port 26 once more The main unit can only support the standard USB memory disc which is approved by Microsoft USB MP3 player is not a standard which means different brand name or different models have ...

Page 19: ...o 8 varies depending upon the country and the type of content on the disc The parental control levers are that are not fitting for children it will be cleared or replaced by the other fitting scene automatically Attachment This disc player offers you the option of using the auxiliary A V input to connect a video game digital camera camcorder or other units you wish to use in your automobile audio ...

Page 20: ...udio data MP3 encoding is capable of compressing audio data at extremely high ratios reducing the size of music files to as much as one tenth their original size This is achieved while still maintaining near CD quality The MP3 format realizes such high compression ratios by eliminating the sounds that are either inaudible to the human ear or masked by other sounds Method for creating MP3 files Aud...

Page 21: ...ER ENTER RATING ENTER ENTER SETUP Language Setup Select AUTO format the player TV output Change the TV mode among NTSC PAL and AUTO The default setting is NTSC format SCREEN SAVER Change the SCREEN SAVER on or off SETTING the TV TYPE Use the procedure described below to set the output screen according to the type of TV monitor being used Setting contents 4 3PS 4 3LB 16 9 For some discs the picture...

Page 22: ...NG When you open the AUDIO menu you will see the following picture 1 AUDIO OUT Change among SPDIF OFF SPDIF RAW and SPDIF PCM 2 KEY Change among b 4 2 0 2 4 When you open the DIGITAL SETUP ENGLISH GERMAN SPANISH FRENCH PORTU GUESE ITALIAN RUSSIAN POLISH ENGLISH GERMAN SPANISH FRENCH PORTU GUESE ITALIAN POLISH ENGLISH GERMAN SPANISH FRENCH PORTU GUESE ITALIAN POLISH ENGLISH GERMAN SPANISH FRENCH PO...

Page 23: ...this preset item ENTER ZOOM BT MENU a Select preset number list b Edit preset number list ENTER NONUMBER ENTER Dial phone number of menu list d Switch auto or manual answer Bluetooth function Tipwizard 1 PAIR 2 CONNECT 4 Accept Reject End call During pairing please input pairing PIN code 888 The bluetooth module can auto connect with your mobile phone so long as you activate the bluetooth of the m...

Page 24: ...e phone manual If your mobile phone support function Advance Audio Distribution Profile that it is special designed for transmitting stereo music to bluetooth device You can listen to the music stored in your mobile phone by this car audio The and button are available in A2DP playback status Press the button to switch to other mode Please be sure that the distance between Your mobile phone and car...

Page 25: ...at is not matching up to the TV set used PAL NTSC Disc Does Not Play Ensure the disc label is upwards Clean the disc Check if the disc is defective by trying another disc No Sound Check audio connections If using a HIFI amplifier try another sound source Distorted Sound from HIFI Amplifier Check to make sure that no audio connections are made to the amplifier phono input The Player Does Not Respon...

Page 26: ... at 10 KHz 10 dB Maximum Output Power 4x60 watts Current Drain 15 Ampere max 2 DVD PLAYER Signal to Noise Ratio 55 dB Channel Separation 40 dB Frequency Response 20Hz 20 KHz 3 RADIO FM Frequency Coverage FM 87 5 107 9 MHz IF 10 7 MHz Sensitivity S N 30dB 4 V Stereo Separation 25dB AM Frequency Coverage 530 1710 KHz IF 450 KHz µ Specification 23 ...

Page 27: ...24 ...

Reviews: