8
.
Clip
Circuit
and
Indicator
This
special
circuitry
protects
the
amplifier
and
speaker
system
from
being
damaged
by
overdriving
power
levels
.
Indicator
lights
remind
the
user
to
reduce
the
volume
when
amplifier
output
is
excessive
.
9
.
Power
Meter
Indicate
the
output
signal
level
.
10
.
BYPASS
/
EQ
Switch
Sets
the
switch
to
the
EQ
position
,
you
can
connect
an
equalizer
.
Sets
the
switch
to
the
BYPASS
position
,
the
equalizer
has
no
effect
on
your
system’s
sound
.
11
.
EQ
IN
/
OUT
RCA
Jacks
To
connect
an
equalizer
to
these
jacks
,
you
can
have
the
effect
on
your
system’s
sound
.
12
.
AUX/PHONO
RCA
Inputs
To
connect
any
high
-
level
sound
source
,
such
as
a
CD
player
,
tape
deck
,
or
tuner
to
the
amplifier’s
AUX/PHONO
jacks
.
14
.
PHONO
/
MIC4
Switch
If
you
connect
a
low
level
audio
input
source
to
the
PHONO
jacks
,
set
/
MIC4
to
the
position
.
If
you
set
/
MIC4
to
the
MIC4
position
,
you
can
use
MIC4
.
15
.
Four
Microphone
Inputs
Allows
you
connect
up
to
four
Microphones
by
balanced
XLR
type
sockets
or
unbalanced
6
.
35mm
type
sockets
.
16
.
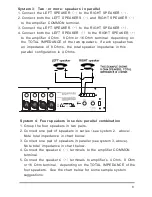
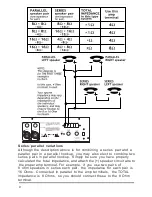
Speaker
Terminals
Connect
your
speaker
system
to
these
terminals
.
You
can
connect
one
or
more
4ohm
,
8ohm
,
16ohm
speakers
to
the
amplifier
,
with
or
without
transformers
.
To
ensure
equal
volume
from
each
speaker
,
all
the
connected
speakers
should
have
the
same
impedance
rating
.
17
.
GND
Screw
Terminal
13.PHONO Input Jacks
To connect a low level audio input source (such as a magnetic cartridge
turntable) to the amplifier’s L and R PHONO jacks.
To avoid a low frequency hum, connect your turntable’s ground wire to the
amplifier’s GND screws.
PHONO
PHONO
PHONO
3


