


Payroll Setup
Employee Setup
Using Time Clock
Click
“Edit” to start.
Wave prox badge within two inches
of the target area.
Click
“Edit” to begin. Enter Daily and
Weekly Overtime Hours. If using semi-
monthly or monthly pay period, choose
day and time that workweek begins.
Please refer to Software Reference Guide for
Advanced Employee Group Setup.
Wave prox badge within two
inches of target area.
If employee badge number is
successfully read, the time clock
terminal will beep and the badge
number will be displayed briefly
on terminal screen.
Employee records generated from
prox badge punches are stored
within the terminal. The terminal
stores the last 6,000 punches
before download is required.
Depending upon usage, punches
can be retrieved on a more or
less frequent basis.
Click
“Edit” to start. Choose Pay Category
Classification, Rate Multiplier and enter
Category Code (supplied by Payroll
Provider if applicable).
Check
“Apply To Weekly Overtime” to
accrue category hours towards overtime.
Click
“Yes” to continue.
Choose Pay Period
format, start day,
and
start time. Click “Save” then click
“Setup Pay Categories” to continue.
Start time should be one hour after last Out
punch of previous pay period and one hour before first In
punch of current pay period. Do not start at 12 midnight.
Click
“Add” to enter a new employee.
Enter the employee data and 10 digit badge
number located on the back of badge.
Click
“Save” after entering each employee.
Click
“Save”. Click “Close” to continue
Setup.
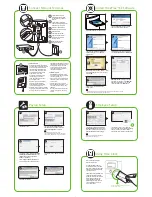
PAYROLL SETUP
Connect & Mount Terminal
Install TimeTrax™ EZ Software
Insert
TimeTrax™ CD into CD-ROM drive.
Enter temporary User Name “
ADMIN
”. Enter
temporary password
“
PTI
” (case sensitive).
Click
“Login”.
Click
“Finish” when install is complete.
Click on
Pyramid TimeTrax
TM
desktop icon.
Connect Ethernet cable
into Ethernet port located
in compartment on back of
terminal.
Connect power supply into
power port located in compart-
ment on back of terminal.
Route the cables through
channel at base of terminal.
Mount terminal
(see instructions below).
Plug free end of Ethernet
cable into network jack,
router or switch.
Plug free end of power
supply into outlet.
To mount terminal.
•
Hold mounting bracket flush against
wall with cable access cutout towards
floor. Note: The bottom of bracket
should be approximately 45 inches
from floor. Allow for 6ft long cable.
•
Level bracket & mark four screw
holes close to corner tabs.
•
Drill holes as marked and insert
included anchors if needed.
•
Screw mounting bracket to wall
with included screws.
•
Drill hole centered in rectangular
opening of bracket for cables.
The hole should be large enough
to route cables through wall.
•
Push terminal onto mounting bracket
aligning four tabs on bracket with four
matching slots on back of terminal.
•
Slide terminal downward until locking
tab clicks into place. When properly
mounted, terminal cannot be slid
up and off bracket without using
included wall bracket release key
to disengage locking tab.
To detach terminal.
•
Hold included wall bracket release
key with pointed end up & diagonally
cut side away from you.
•
Insert key into narrow slot located on
bottom of terminal to right of cable
access cutout.
•
Push key all the way up into slot.
Key will slide easily until last ½ inch
until some resistance from locking
tab is felt.
•
With key fully pushed into slot, slide
the terminal up and off mounting
bracket.
Click
“Yes/Unblock” to allow program
to make changes to this computer.
“Recorder Found” message will appear.
Click
“OK” to continue. If “No Recorder
Found” message appears, check cable
connections and click
“Reconnect”.
TimeTrax™ EZ InstallAware Wizard will
automatically open. Click
“Next” to
begin install.
1
Choose
“Yes” to continue to Payroll
SetUp screen.
1
1
3
5
1
1
3
5
7
2
4
6
2
2
4
6
2
3
4
5
6
1
2
3
5
6
4
s
s
s
s
s
s
s
1
InstallAware Wizard screens will appear twice (TimeTrax
TM
EZ install & TimeTrax Sync
TM
install).
Be sure to accept license agreements for both applications.


