background image

Remote control fails to adjust volume

§

Make sure the batteries are inserted correctly

§

Make sure that the TV IN Connection on Q-TV2 is vacant

§

Make sure that you have a line of sight with Q-TV2 within a 5 metre range

§

Make sure that the SET DELAY switch is set to NORMAL (LED indicator 

not

 orange)

§

Make sure the SOURCE VOLUME switch is set to NORMAL

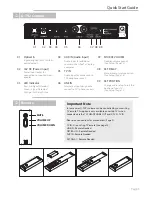
Remote Control

Remote Control

Ü

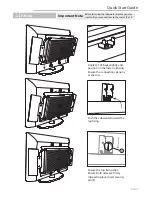
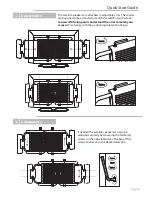
Fixing Rails are visible above the TV Screen

Satellites

General

Subwoofer

§

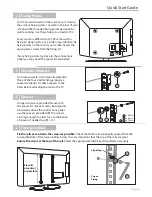
Make sure that the rails are fixed to the TV as centrally as possible

§

Remove Q-TV2 from the rails and lower them by 1 fixing point

Fixing Rails obstruct TV Screen connections

§

Make sure that you are using the spacers provided (Page 6)

§

Remove fixing rails and fit spacers between TV and Rails to clear connections

Fixing Rails don't feel secure

§

Make sure that you are using the shoulder washers provided

§

Remove fixing rails and fit appropriate shoulder washers to bolts (Page 6)

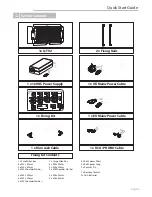
Fixings

Ü

Troubleshooting

Speaker type:

Sealed box with wide angle dispersion. 
2 x 15W / 3cm x 12cm BMR (Balanced Mode Radiator)

Frequency Response:

(+/- 3dB) 180Hz – 20kHz

Power:

25W rms per satellite

Speaker type:

Force cancelled bass reflex with dynamic 
EQ. 4 x 15W,  3cm x 12cm bass drivers

Frequency Response:

(+/- 3dB) 50Hz – 180Hz

Power:

50W rms

Dimensions (W x H x D):

870 - 1200mm  x  450mm  x  38mm(Sub)

Weight:

6.57kg (Q-TV2 Only)

Specification

Page 18

Summary of Contents for Q-TV2

Page 1: ...User Manual for 30 42 Screens Q TV2...

Page 2: ...ns and replacements 14 Setup 14 Lip Sync 06 Fixing Rails 07 Fitting Q TV2 08 Adjusting Q TV2 arms Q Acoustics Q TV2 is the latest innovative audio solution in the Q AV range Using the latest slim line...

Page 3: ...ther A grounding type must not be exposed to dripping and plug has two blades and a third splashing and no object filled with grounding prong The wider blade or the liquids such as a vase of flowers s...

Page 4: ...solution to HD Sound Q TV 2 requires only one audio connection between the TV and itself to significantly improve the acoustic performance of your flat screen TV Q TV2 also acts as a music system when...

Page 5: ...xing Kit Fixing Kit Contents 1 x RCA PHONO Cable 4 x Rail Spacer Short 4 x Rail Spacer Long 2 x Security Pin 1 x Remote Control 2x AAA Batteries 1 x Small Allen Key 4 x M4 x 20mm 4 x M4 x 50mm 4 x M4...

Page 6: ...Green Signal Detected Orange Set Delay Active 01 02 04 03 05 06 07 08 SET DELAY 09 SET POSITION Manual audio synchronisation See Setup Page 14 Change audio setup to suit the position of your TV See Se...

Page 7: ...rear of your TV using the screens fixing points Located on the rear of your screen will be threaded fixing points designed for wall mounting Use these fixings to attach Q TV2 Every screen is different...

Page 8: ...at the top Push the subwoofer toward the top fixing Important Note Before fastening the subwoofer in place you may want to fit your connections to the rear of the TV Fitting Quick Start Guide Page 7 S...

Page 9: ...the desired direction Adjustments Loosen Tighten The satellite speakers are attached to adjustable arms These arms are designed to be extended to match the width of your screen Loosen all 4 fixing po...

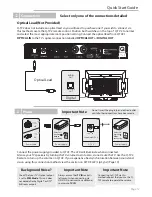
Page 10: ...ontrol Better quality audio connection Volume will be controlled by the Q TV2 remote OPTICAL SOCKET Better quality audio connection Volume will be handled by Q TV2 remote Optical Toshlink cable not pr...

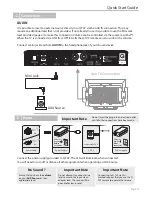
Page 11: ...NOTE If your TV does not mute when the headphone socket is plugged in we recommend either selecting another connection method See page 9 or moving the mini jack connection on Q TV2 See page 15 Connec...

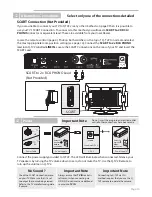
Page 12: ...ad synchronisation between sound and vision using this connection method view the section on SET DELAY Lip Sync Page 14 Select only one of the connections detailed Important Note Connecting to Q TV2 v...

Page 13: ...nnect the power supply provided to Q TV2 The LED will illuminate when connected Silence your TV speakers by turning the TV volume down to zero do not mute the TV Use the Q TV2 Remote to turn up the vo...

Page 14: ...Connect the power supply provided to Q TV2 The LED will illuminate when connected You will need to turn off or silence all other equipment when operating an AUX Source Important Note Connecting to Q T...

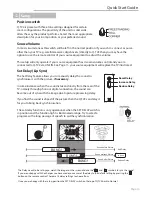
Page 15: ...nces when the sound is taken directly from the rear of the TV namely through phono or digital connection the sound can become out of sync with the image due to picture processing delay If you find the...

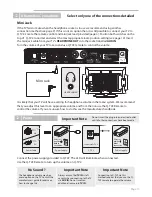
Page 16: ...propriate volume and from then on use the Q TV2 Remote to control the volume If you are unsure how to do this see the manufactures handbook Alternative Connections Page 15 16V 5A Connect the power sup...

Page 17: ...tive Connections SCART Connect the power supply provided to Q TV2 The LED will illuminate when connected Silence your TV speakers by turning the TV volume down to zero do not mute the TV Use the Q TV2...

Page 18: ...t connected a line level output to a mini jack input Check that you TV s audio out is set to PCM mode Optical Only No Volume Control Mini Jack Connection Make sure that the SOURCE VOLUME switch is in...

Page 19: ...ng point Fixing Rails obstruct TV Screen connections Make sure that you are using the spacers provided Page 6 Remove fixing rails and fit spacers between TV and Rails to clear connections Fixing Rails...

Reviews: