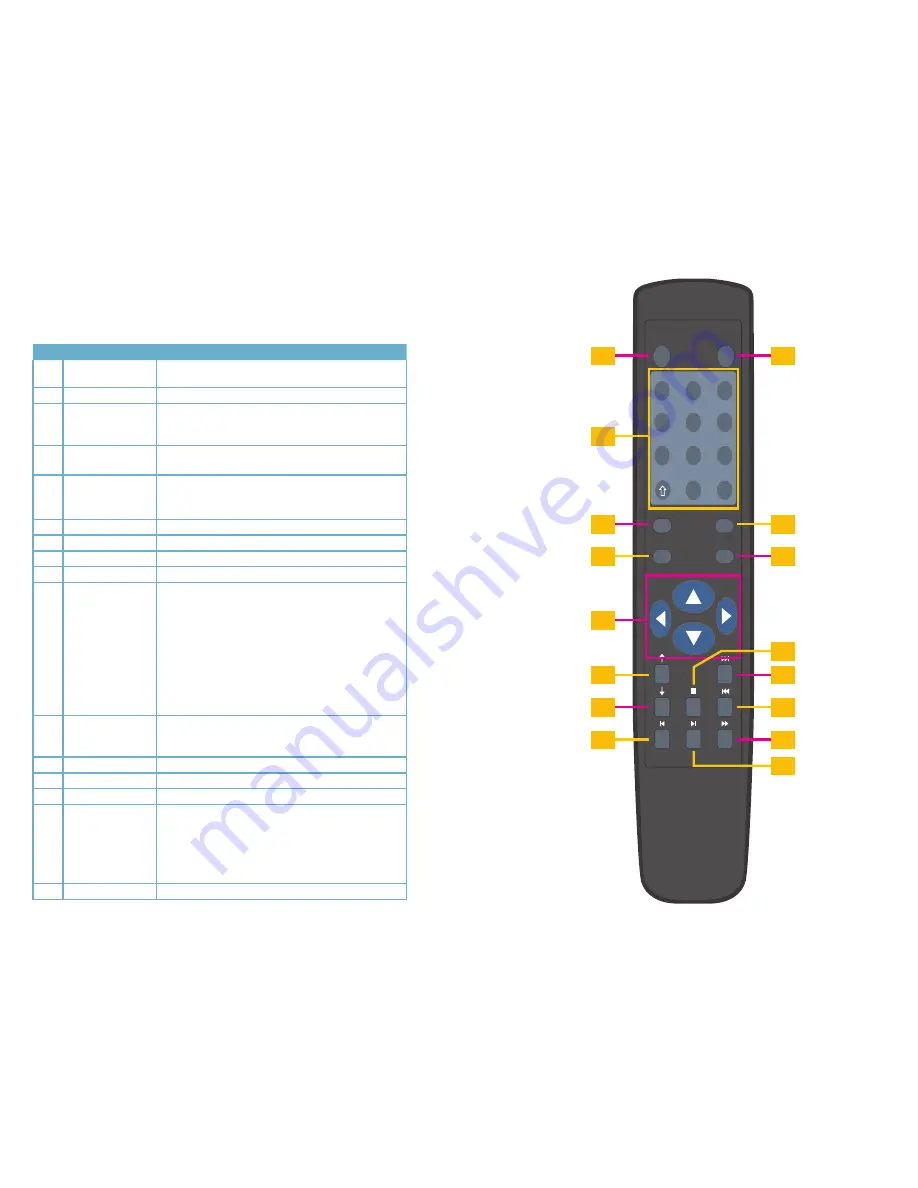
REMOTE CONTROL
The buttons on the Remote Control operate in the same manner as on a conventional DVR remote.
Some buttons have multiple functions depending on which menu is being accessed. The Remote
Control is intended to supplement use of the mouse by providing a simple interface for basic
operation once the DVR is set up. Certain functions, such as PTZ control, are simpler when using
the remote control.
#
Name
Function
1
Multiple-window
switch
Switch between multiple-window and one-window view
2
0-9 number key
Input password, channel or switch channel.
3
Record
Start or stop recording manually
In record interface, working with the direction buttons to
select the channel to record
4
Enter /Menu key
Go to default button
Go to the menu
5
Direction keys
Switch current activated control, go to left or right.
In playback mode, it is to control the playback process bar.
Aux function(such as switch the PTZ menu)
6
Previous
In playback mode, playback the previous video.
7
Next
In playback mode, playback the next video.
8
Slow Play
Multiple slow play speeds or normal playback.
9
Address
Click to input device serial number
10
Function/Aux Key
In 1-channel monitor mode: pop up assistant function: PTZ
control and Video color
Switch the PTZ control menu in PTZ control interface.
In motion detection interface, functions as a directional key
to complete setup
Backspace: Press for 1.5 seconds to clear all contents in
current text box.
In HDD information interface, used to switch between HDD
record time and other information
Special combined operation in some menus.
11
Escape/Cancel
Go back to previous menu or cancel current operation
(close upper interface or control)
In playback mode, it goes to real-time monitor mode.
12
Stop
In playback mode, stop current playback.
13
Forward
Various forward speeds and normal speed playback.
14
Backward
Various backward speeds and normal speed playback.
15
Play/Pause
Reverse playback or paused mode, click this button to
realize normal playback.
In normal playback click this button to pause or resume
playback.
In real-time monitor mode, click this button to enter video
search menu.
16
Fast Forward
Various fast speeds and normal playback.
Mult
Add
.,
ABC
DEF
GHI
JKL
MNO
PQRS
TUV
WXYZ
1
4
7
2
5
8
0
3
6
9
-/--
Record
Fn
Enter/Menu
Esc
DVR
1
2
3
4
5
6
7
8
9
10
11
13
12
14
15
16


