background image

3.4

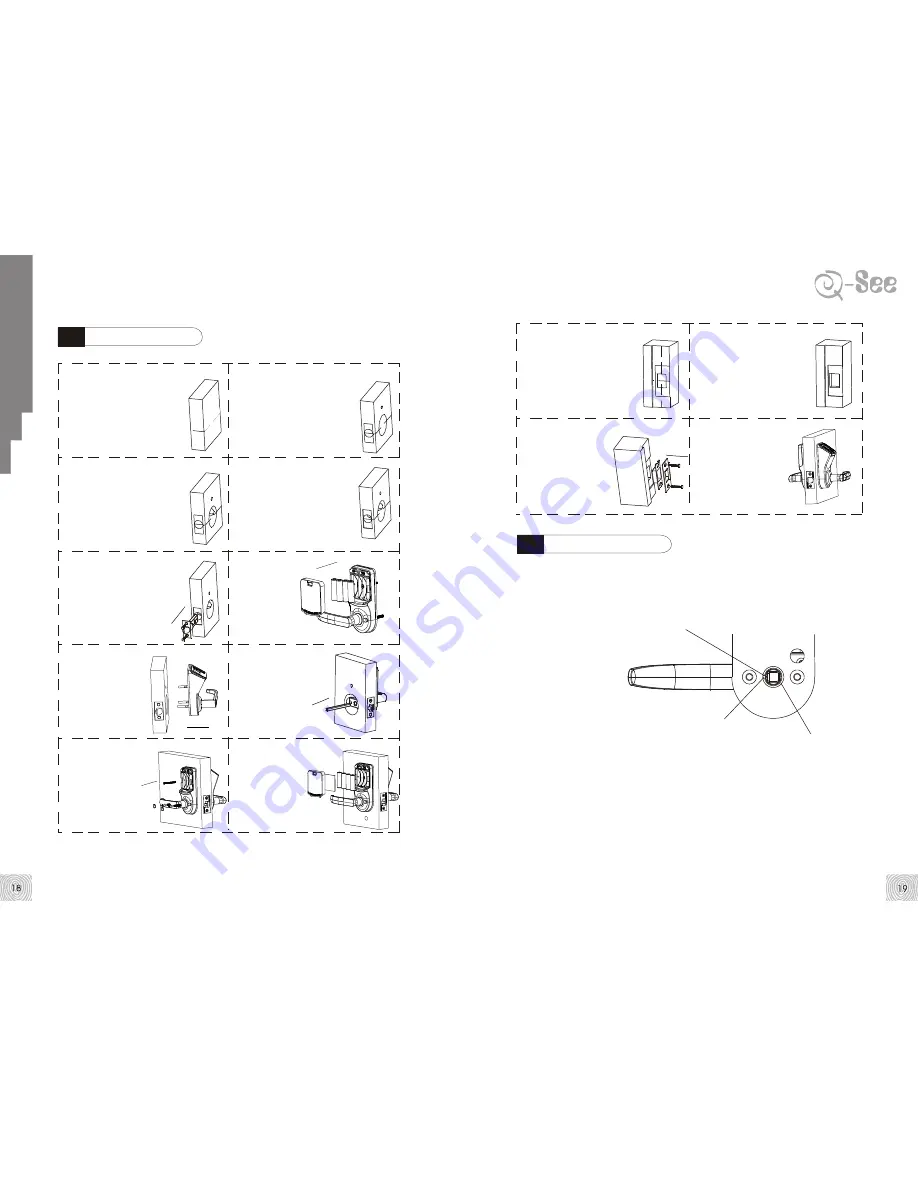
Installation steps

1.Draw handle center line 
as your request, the 
recommended height for it 
is 1m above the ground.

2.Mark the door for drilling 
hole with a pencil according 
to installation template.

4.Drill the latch cavity and 
side plate groove.

8 . M a k e   t h e   s q u a r e  
spindle through the hole 
of latch then into the 
front plate.

10.Put in the batteries, 
close the battery cover. .

6.Take apart 
the battery 
cover , take 
out the 
batteries.

3.Drill the door from both 

sides of the door with 

electric drill.

5.Put the latch into latch 
cavity, fix the side plate 
in the door with screw 
M4 x 25.

9.Fix back plate with front 
plate by screw M5.

7.Fix front plate on the 
door.

11.Mark position of strike 
and strike plate with a 
pencil according to 
installation template.

13.Fix strike and strike 
plate in the door frame 
with screw M4 x 25.

12.Cut grooves for strike 
and strike plate with a 
chisel .

14.Test  the lock as per 
operation instruction.

3.5

Tips for installation

1.Before you fix the front plate on the door, make sure the protuberant 

spot on the back of front plate is in the position as below:

2.After the square spindle was put into the clutch of front plate, DO 

NOT turn the square spindle;

3.Please rotate the inside handle when tighten the screw under the 

handle to avoid scratching the back finish. 

There's an indentation here, for either right 
or left hand oriented lock,The protuberant 
should point straightly to the indentation. 
otherwise the clutch won't work.

Inside edge of clutch

Ha

nd

le c

ent

er l

ine

the protuberant spot

H

tt

p

:/

/w

w

w

.q

-s

e

e

.c

o

m


LOCK

Summary of Contents for QSB180

Page 1: ...ject to change without notice The manufacturermakes no representa tions or warranties with respectto the contents hereof and specifically disclaims any impliedwarranties of selling or functionality fo...

Page 2: ...6 2 2 1 What is wake up code 6 2 2 2 How to change the wake up code 6 2 2 3 The principle for key combination of wake up code 7 2 2 4 How to restore the default wake up code 7 2 3 Unlocking code 8 2...

Page 3: ...2 Troubleshooting 20 Appendix 21 A Packing list 21 B Handle orientation of the lock 22 12 13 14 14 14 15 15 15 16 17 18 19 Model number 1 Introduction Main features Adopts optical fingerprint sensor C...

Page 4: ...Accessories Cylinders Total Cylinder cover opener 1pc mm Battery cover Back plate Cylindrical Sensor Indicator Keypad Front plate Batte ry co ver Back p late Cylin drica l Sens or Indic ator Keypa d F...

Page 5: ...nce Sensor surface Optical glass with PVD coated 4 AA alkaline batteries DC 4 5 6 0v Approx 12 months 25 85 10 A 110mA 180mA Operating voltage Battery life Temperature for storage Static current Dynam...

Page 6: ...e up code continuously the default code is 0 1 2 3 a long beep is heard and green indicator flash once figure 2 6 Step 3 Immediately input twice the new Wake up code continuously If the new code is tw...

Page 7: ...2 10 Step 2 After a beep is heard input the previous unlocking code continuously the default code is 1 2 3 1 2 3 1 2 3 1 2 a long beep is heard Immediately input the new unlocking code twice continuou...

Page 8: ...ingerprint Enrollment Code Let s take the default enrollment code 21321321321 for example Press and hold digit 2 for 2 seconds till you hear a beep and green indicator flashes figure 2 15 Step 2 Input...

Page 9: ...oor will be locked again automatically figure 2 19 How to delete enrolled fingerprints 2 7 Step 1 Press and hold digit 3 for about 6 seconds till you hear a short beep as shown in 2 20 Press and hold...

Page 10: ...state Or B Input the valid unlocking code and the lock come back to close state Step 1 Open the battery cover Step 2 Take out 1 of the batteries then replace the battery again after 3 seconds Press a...

Page 11: ...File Screwdriver Cut off knife Chisel Auger Auger bit Tape measure Pencil Hammer 3 3 Installation template Model QSB180 lock drilling view doorframe Handle center line Handle center line mm mm Http ww...

Page 12: ...strike and strike plate with a pencil according to installation template 13 Fix strike and strike plate in the door frame with screw M4 x 25 12 Cut grooves for strike and strike plate with a chisel 1...

Page 13: ...r can t be opened When you put your valid enrolled fingerprint onto the sensor to unlock red indicator flashes and follows two short beeps door can t be opened 1 Invalid fingerprint key 2 Your fingerp...

Page 14: ...if the hinge is on the left it is Left handed lock Right handed Standing out of the door if the hinge is on the right it is Right handed lock Handle orientation of the lock B The End Left Handed Right...

Reviews: