QSDF8204 Digital Video Recorder User Manual
33
(7) BACKUP
Before to backup, users should select BACKUP MEDIA, BACKUP FILE,
CHANNEL, START TIME, END TIME and EVENTS.
STEP1
Press "
BACKUP
" button, the backup information of DVR will
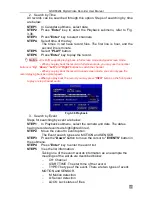
display on the screen (refer to Fig. 3.40).
STEP2
Press "
START
" button, and backup will start.
The progress of backup will be displayed on the screen. If stopping
recording at backup, its speed will be faster.
STEP3
When the backup is over, the system will pop up a dialog box
saying ‘BACKUP COMPLETELY’.
2. VIEW BACKUP
If backing up with AVI format, most media players can play directly as long as
to install a decoder in advance. Installation method: Enter "Decode" file (being
created automatically by system at your backup.), then double-click
"InstallDecode.bat" file to Install successfully.
If backing up with the format DVR supports, the file player will be copied
automatically in the file copying media.
DELETE
Delete submenu is shown as Fig. 3.42. The operation is shown below:
Fig 3.42 Delete
STEP1
Press "
Enter
" key to enter the Delete submenu.
STEP2
Press "
Enter
" key to select the record.
STEP3
Move the cursor to "
DELETE
" button and press "
Enter
" key,
information will be given as below:
‘SOME RECORDS WILL BE DELETED, CONTINUE?’
STEP4
Select "
OK
" button.
STEP5
Press "
Enter
" key to delete this record.
Fig 3.40 Backup Information

