background image

USB2.0-Videograbber

Bedienungsanleitung

Summary of Contents for PE-6084-919

Page 1: ...USB2 0 Videograbber Bedienungsanleitung ...

Page 2: ...erstützt Aufnahmen in voller Videoauflösung 720 x 480 x 30 Bildern pro Sekunde für NTSC oder 720 x 576 x 25 Bildern pro Sekunde für PAL Darüber hinaus kann es ganz einfach an den Koaxialkabelstecker und S Video Anschluss von Videorekordern Camcordern Videospielen und anderen Videoquellen angeschlossen werden Das beiliegende Programm Ulead VideoStudio 7SE DivX gibt die echten Video Audiodaten auf I...

Page 3: ...c für MPEG 1 und MPEG 2 zum generieren von VCD oder DVD Filmen Plug and Play Klein und transportabel Unterstützte Systeme Windows 98SE ME 2000 und XP Technische Daten Videoanschlüsse ein S Video Anschluss und ein RCA Koaxialkabelstecker Unterstützte Videosysteme NTSC PAL und SECAM Audio Anschluss über Miniklinke oder Audiokarte Stromverbrauch 5 V Gleichstrom 250 mA max über USB Anschluss LED zur A...

Page 4: ...len Video für Windows und Direct Show kompatible Videokarte Windows kompatible Soundkarte CD ROM oder DVD ROM Laufwerk Hinweis Befolgen Sie die Installationsanweisungen des Hardware Zubehörs genau Setzen Sie sich besonders mit den Spezifikationen Ihrer Videokarte auseinander und schauen Sie sich das Handbuch Ihres Camcoders oder des Videoübertragungsgerätes an Hardware Überprüfung vor der Verwendu...

Page 5: ...Z das CD ROM Laufwerk an Wenn die Dateien angezeigt werden klicken Sie doppelt auf das SETUP Symbol Damit starten Sie das Installationsprogramm Bitte installieren Sie auch die unten aufgeführten und auf der CD beiliegenden Anwendungen Diese werden benötigt wenn Sie digitale Videobearbeitung auf Ihrem Computer vornehmen wollen und diese komfortabel laufen sollen Das Programm wird Sie durch die Inst...

Page 6: ...t kommen Sie direkt zur Treiberinstallation die auf der nächsten Seite beschrieben wird Legen Sie die Installations CD in Ihr CD ROM Laufwerk und starten Sie von dort die Datei DXSETUP EXE Sie finden diese Datei auf der Installations CD im Verzeichnis Ulead VideoStudio7 Driver DirectX Damit wird die benötigte DirectX Version auf Ihrem Computer installiert Die Installation läuft in folgenden Schrit...

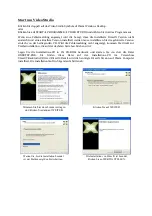
Page 7: ...X installieren mussten startet die Installation automatisch wenn Sie die CD in Ihr CD ROM Laufwerk einlegen Klicken Sie auf WEITER Wählen Sie ein Verzeichnis aus in das die Software installiert werden soll Sind Sie mit dem vorgeschlagenen Verzeichnis einverstanden klicken Sie auf WEITER Wählen Sie eine Sprache für die Installation aus und dann auf WEITER Klicken Sie auf WEITER Klicken Sie auf JA w...

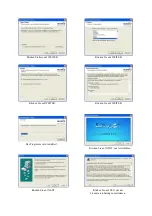
Page 8: ... WEITER Klicken Sie auf WEITER Klicken Sie auf WEITER Klicken Sie auf WEITER Das Programm wird installiert Klicken Sie auf NEXT um fortzufahren Klicken Sie auf NEXT Klicken Sie auf YES um der Lizenzvereinbarung zuzustimmen ...

Page 9: ...f NEXT Klicken Sie auf NEXT Klicken Sie auf NEXT Klicken Sie auf CLOSE Nach der Installation erscheint dieses Fenster Klicken Sie FERTIG STELLEN Nach der Installation muss Ihr Computer neu gestartet werden Wählen Sie deshalb Computer neu starten und klicken Sie dann OK ...

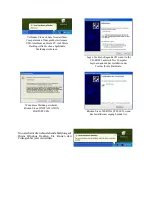
Page 10: ... auf INSTALLATION FORTSETZEN Klicken Sie auf FERTIG STELLEN wenn der Installationsvorgang beendet ist Nun erscheint die nebenstehende Meldung auf Ihrem Windows Desktop Sie können den Videograbber jetzt verwenden Verbinden Sie nach dem Neustart Ihres Computers den Videograbber mit einem USB Anschluss an Ihrem PC Auf Ihrem Desktop sollte die oben abgebildete Meldung erscheinen ...

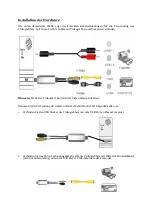
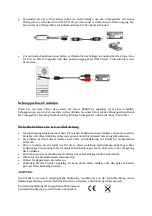
Page 11: ...weis Die beiden Videokabel sind nicht im Lieferumfang enthalten Nehmen Sie die Verbindung der Geräte und Kabel Schritt für Schritt folgendermaßen vor 1 Verbinden Sie den USB Stecker des Videograbbers mit dem USB Port an Ihrem Computer 2 Verbinden Sie das Video Verbindungskabel gelb des Videograbbers mit Hilfe eines Koaxialkabels nicht im Lieferumfang mit einem DVD Player Videorekorder oder Camcode...

Page 12: ... mit den Funktionen dieses Gerätes vertraut zu machen Bewahren Sie diese Anleitung daher stets gut auf damit Sie jederzeit darauf zugreifen können Sie erhalten bei Kauf dieses Gerätes zwei Jahre Gewährleistung auf Defekt bei sachgemäßem Gebrauch Bitte verwenden Sie das Gerät nur für die in dieser Anleitung beschriebenen Funktionen Eine anderweitige Verwendung führt eventuell zu Beschädigungen am P...

Page 13: ...Boîtier d acquisition vidéo USB2 0 Mode d emploi ...

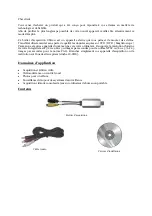
Page 14: ...scope et autres appareils du même type vers votre ordinateur Il supporte la résolution d origine de votre enregistrement 720 x 480 x 30 images par secondes pour la norme NTSC ou 720 x 576 x 25 images par secondes pour la norme PAL Branchez simplement vos appareils d acquisition ou de restitution sur l une des deux prises cinch et S VHS Domaines d application Acquisition et édition vidéo Vidéoconfé...

Page 15: ...tinu 250 mA max par l alimentation USB LED d indication de l état de l alimentation et de la connexion Dimensions 80 mm x 30 mm x 15 mm Configuration minimale requise Ecran avec fonction avance rapide Puissance du processeur 1 GHz MPEG2 Puissance du processeur 2 0 GHz ou plus élevée 640 x 480 MPEG2 Puissance du processeur 1 7 GHz ou plus élevée 128 MB de mémoire si possible 256MB Windows 2000 XP C...

Page 16: ...s n avez pas dû installer DirectX l installation se lance automatiquement dès que vous insérez le CD d installation Cliquez sur Suivant Choisissez un dossier dans lequel le programme doit être installé Si vous acceptez le dossier prédéfini cliquez simplement sur Suivant Choisissez votre langue puis cliquez sur Suivant Cliquez sur Suivant Cliquez sur Oui Tapez votre nom le nom de votre entreprise e...

Page 17: ...Cliquez sur Suivant Cliquez sur Suivant Cliquez sur Suivant Cliquez sur Suivant Le programme est en train d être installé Cliquez sur Suivant Cliquez sur Suivant Cliquez sur Oui YES ...

Page 18: ...r Suivant Cliquez sur Suivant Cliquez sur Suivant Cliquez sur Fermer Close Après l installation cette fenêtre apparaît Cliquez sur Terminer Votre ordinateur doit être redémarré après l installation Choississez Redémarrer l ordinateur puis cliquez sur OK ...

Page 19: ...e fenêtre s ouvre cliquez simplement sur Continuer l installation Cliquez sur Terminer Un nouveau message apparaît sur votre bureau Vous pouvez utilisez votre boîtier Branchez l appareil après avoir redémarré votre ordinateur sur un port USB de celui ci Un message apparaît en bas à droite sur votre bureau ...

Page 20: ...er Remarque Les deux câbles vidéo ne sont pas livrés avec l appareil Branchez vos appareils et vos câbles comme suit 5 Branchez la prise USB du boîtier sur un port USB de votre ordinateur 6 Branchez le câble cinch jaune non livré sur la prise cinch du boîtier puis reliez le à la source d acquisition lecteur DVD magnétoscope ou caméscope ...

Page 21: ...ls de sécurité Ce mode d emploi vous sert à vous servir correctement du produit Gardez le précieusement afin de pouvoir le consulter à tout moment N utilisez l appareil que comme indiqué dans la notice Aucune garantie ne pourra être appliquée en cas de mauvaise utilisation du produit N ouvrez pas l appareil sous peine de perdre toute garantie N essayez pas de réparer l appareil vous même Faites at...

Page 22: ...USB2 0 Capture Box User s Manual ...

Page 23: ...pments deployment is always not enough Don t worry Garb Show 110 will give you more capacity Grab Show 110 is an external USB2 0 video grabber box Through the connection of USB2 0 port you can transfer Video from VCD DVD VCR Camcorder player or relative devices to PC truly and promptly without any distortion It provides full video resolution 720x480 30fps for NTSC or 720x576 25fps for PAL recordin...

Page 24: ...imension MPEG2 P 2 0GHz or above 640 x 480 MPEG2 P 1 7GHz or above 128MB of RAM 256MB prefer Windows XP 2000 for USB2 0 Sound card Package Checklist Check and identify the supplied items as below before operating this machine If finding any shortage or damage please contact your dealer as soon as possible Software Utilities You have to install the Grab Show 110 driver so that you can configure the...

Page 25: ... GB Ultra DMA 667200 rpm hard disk Video for Windows and DirectShow compatible video capture card Windows compatible sound card CD ROM or DVD ROM drive Hardware checkup before using Video Studio To ensure that your video production runs smoothly and trouble free click Control Panel System Hardware Device Manager and check if your devices are working properly in accordance with your Operating Syste...

Page 26: ...re very important in making digital video work well on your computer The installation program will walk you through installing Quick Time Windows Media Format Real Player Acrobat Reader To run Video Studio Double click the Video studio icon on your Windows desktop OR Select the Video Studio icon from the Video Studio program group on The Windows Start menu Please follow the instructions to install...

Page 27: ...teps 1 Press Next 2 Press Next Windows Installation The install Shield Wizard auto detect screen will appear 1 Press Next 2 Select folder where setup will install files then Press Next 3 Waiting for installing 4 Press Finish ...

Page 28: ... Next 3 Select the language for the installation from the choices below then Press Next 4 Press Next 5 Press Yes 6 Key in Name Company Serial You can find the serial on the CD envelope 7 Press Next 8 Press Next ...

Page 29: ... 11 Waiting for installing 10 Press Next 12 Ulead Video studio 7 SE DVD setup Wizard is launching the programs you selected in setup option 13 Waiting for installing 14 Press Next ...

Page 30: ... 19 Press Next 15 Press Next 16 Press Yes 17 Press Next 18 Press Next 20 Waiting for installing ...

Page 31: ... 21 Press 22 Press Close 23 Press Finish 24 Press Next 25 Press Next 26 Press Next ...

Page 32: ...h 29 Select Yes I want to restart my computer now then Press OK 30 Connect Grab Show 110 device and USB device will be found 31 Insert the Grab Show 110 CD on CD ROM and Press Next then it will be install automatically 32 Press Continue Anyway ...

Page 33: ... 33 Waiting for installing 35 Your new hardware is installed and ready to use 36 Grab Show 110 hardware has been installed complete and you can use it now 34 Press Finish ...

Page 34: ...Hardware Installation The figure below shows the proper cable connections for installing Grab Show 110 and connecting it your audio video equipment Installations and Setup ...

Page 35: ...how 110 device and peripherals Composite Connector Composite Cable 3 If your VCD DVD player or related device has the S Video output port you can also connect the Grab Show 110 to the S Video cable included VCD DVD VCR Camcorder Player s Composite output port VCD DVD VCR Camcorder Player s Composite output port ...

Page 36: ...of VCD DVD player or related device to the audio input port of your PC s sound card directly 5 If you want a swift capture of vision you can press the SNAP shot button on Grab Show 110 device s side panel SNAP Shot button Audio input port of PC s Sound Card ...

Reviews: