background image

www.aristospray.com

5

PREVENT STATIC
SPARKING
FIRE/EXPLOSIONS

Vapors created when spraying can be
ignited by sparks.
To reduce the risk of fire, always locate the
sprayer at least 20 feet (6 m.) away from
spray area. Do not plug in or unplug any
electrical cords in the spray area. Doing so
can cause sparks which can ignite any
vapors still in the air. Follow the coating &
solvent manufacturers safety warnings
and precautions.

MEDICAL ALERT - Airless Spray
Injection Injuries

If any fluid appears to penetrate your skin, 

GET EMERGENCY MEDICAL CARE AT
ONCE.
DO NOT TREAT AS AN ORDINARY CUT.

High pressure fluids from spray or leaks
are powerful enough to easily penetrate
the skin and cause extremely serious
injection injury, leading to the possible
need for amputation.

NEVER

point the spray gun at anyone

or any part of the body.

NEVER

put your hand or fingers over

the spray tip. Do not use a rag or any
other materials over your fingers. Paint
will penetrate through these materials
and into the hand.

NEVER

try to stop or deflect leaks with

your hand or body.

ALWAYS

have the tip guard in place

when spraying.

ALWAYS

lock the gun trigger when

you stop spraying.

ALWAYS

remove tip from the gun to

clean it.

NEVER

try to "blow back" paint, this is

not an air powered sprayer.

ALWAYS

follow the 

PRESSURE

RELIEF PROCEDURE

before cleaning

or removing the spray tip or servicing
any system equipment.

Be sure the equipment safety devices
are operating properly before each use.

Tighten all of the fluid connections
before each use.

NEVER

alter equipment in any manner.

NEVER

smoke while in spraying area.

NEVER

spray highly flammable

materials.

NEVER

use around children.

NEVER

allow another person to use

sprayer unless he is thoroughly
instructed on its safe use and given
this operator’s manual to read.

ALWAYS

wear a spray mask, gloves

and protective eye wear while
spraying.

ALWAYS

ensure fire extinguishing

equipment is readily available and
properly maintained.

NEVER LEAVE SPRAYER UNATTENDED
WITH PRESSURE IN THE SYSTEM.
FOLLOW PRESSURE RELIEF
PROCEDURES  

ALWAYS INSPECT
SPRAYING AREA

Keep the spraying area free from
obstructions.

Make sure the spraying area has good
ventilation to safely remove vapors and
mists.

NEVER

keep flammable material in

spraying area.

Summary of Contents for Q-P019

Page 1: ...USER MANUAL Q TECH Q P019 ELECTRIC AIRLESS SPRAY PUMP CAUTION This manual contains important warnings and information PLEASE READ KEEP FOR FUTURE REFERENCE ISSUE DATE 31 05 2014 ...

Page 2: ...700W 110 120V 50 60Hz 220 240V 50 60Hz 0 021 1 9 l min 0 42 gpm 207 bar 3 000 psi 36 x 25 x 40 cm 11 4 kg Wood interior Ceiling Wood exterior Lacquer Varnish Stain Sealer Enamel High build Exterior stain Vinyl Acrylic Latex Material Applications Carry Handle Brush Cap Fuse On Off Switch Outlet Fitting Packing Nut Pressure Adjustor Knob Drain Tube Inlet Strainer Suction Hose Priming Valve ...

Page 3: ...let is properly grounded If the sprayer should electrically malfunction or break down grounding provides a low resistance path to carry electricity away from the user b Avoid body contact with grounded surfaces such as pipes radiators ranges and refrigerators There is an increased risk of electric shock if your body is earthed or grounded c Do not expose airless sprayers to rain or wet conditions ...

Page 4: ...Relief Procedure Take precautions to avoid high pressure component rupture DANGER INJECTION INJURY Skin injection by high pressure paint is not a simple cut It must be treated surgically immediately WARNING FIRE AND EXPLOSION HAZARD Take all precautions to avoid sources of sparks and ignition when spraying Keep the machine at least 6 meters away from the spraying operation WEAR PROTECTIVE EQUIPMEN...

Page 5: ...ct leaks with your hand or body ALWAYS have the tip guard in place when spraying ALWAYS lock the gun trigger when you stop spraying ALWAYS remove tip from the gun to clean it NEVER try to blow back paint this is not an air powered sprayer ALWAYS follow the PRESSURE RELIEF PROCEDURE before cleaning or removing the spray tip or servicing any system equipment Be sure the equipment safety devices are ...

Page 6: ...nd then remove the spray tip to clean it NEVER wipe off build up around the spray tip TOXIC FLUID HAZARD ALWAYS remove tip guard tip to clean AFTER pump is turned off and the pressure is relieved by following the PRESSURE RELIEF PROCEDURE Hazardous fluid or toxic fumes can cause serious injury or death if splashed in eyes or on skin inhaled or swallowed Know the hazards of the fluid you are using ...

Page 7: ...e sure to use one heavy enough to carry the current your product will draw If in doubt use the next heavier gauge 2 Fluid hose use only grounded hoses 3 Spray gun or dispensing valve grounding is obtained through connection to a properly grounded fluid hose and pump 4 All solvent pails must be conductive metal material and properly grounded Do not place on a non conductive insulating surface unles...

Page 8: ...afety latch and trigger the gun to relieve residual fluid pressure Hold metal part of the gun in contact with grounded metal pail 4 Turn the Priming Valve to the open priming position to relieve residual fluid pressure 5 Re engage gun safety latch and close Priming Valve If the SPRAY TIP OR HOSE IS CLOGGED follow Step 1 through 5 above Expect paint splashing into the bucket while relieving pressur...

Page 9: ...sk of static sparking fire or explosion Hold the metal part of the gun firmly to the side of a metal pail All solvent pails must be conductive metal material and properly grounded Do not place on a non conductive insulating surface unless a ground wire is added to a true earth such as a metal water pipe 9 Close the priming valve 10 Allow the pump to run and watch the fluid discharging from the gun...

Page 10: ...ee the section below Spray Tip Selection to choose the right tip for your application 1 Double check to be sure the gun safety latch is locked before assembling tip and tip guard to the gun 2 If it is not installed ensure the seal is snapped in place on the seat and insert the seat into the tip guard Make sure that it is aligned to the circular opening in the tip guard 3 3 Thread the tip guard ont...

Page 11: ... gun before moving and release the trigger after each stroke Overlap each previous stroke by half Do this by aiming the tip to the edge of the previous stroke Work in sections within your reach When painting corners point the gun parallel to the corner Cut in edges and corners first Then paint flat areas Do not allow the material to run out Remember to follow the PRESSURE RELIEF PROCEDURE before r...

Page 12: ... deliver the same amount of paint over a different area wider or narrower strip A spray tip with a narrow fan width makes it easy to spray in tight places Thickness of the material coat per stroke is determined by spray tip fan width rate of the spray gun movement and distance to surface The numbers on the tip identify its orifice size and fan width The first number on the tip identifies the fan w...

Page 13: ...machine on and turn the pressure control knob clockwise just enough to run the pump watch the material discharging from the drain tube until the material begins to thin This indicates that the flushing fluid is beginning to pump out Now transfer the drain tube to the waste bucket and continue to flush until clear flushing fluid flows out 5 Shut off the machine and back off the pressure control kno...

Page 14: ... sprayer with a rag soaked in the appropriate solvent 19 If flushing was with water flush again with Q Tector Pump Conditioner to prevent corrosion inside the pump CAUTION Never leave water in the pump for any length of time Water will corrode the pump LONG TERM STORAGE For long term storage use Q Tector Pump Conditioner as directed on the container To fill the pump 1 Place the both the suction tu...

Page 15: ...onger maintain pressure has diffculty priming and paint seeps into the throat of the pump and tightening the packing nut no longer helps then the packings will require replacement This is best entrusted to a qualified repair technician To remove the pump and replace the packings follow the instructions below PUMP REMOVAL 1 Remove the suction tube by releasing the hose clip and pulling the hose fre...

Page 16: ... running at no load to clean out accumulated dust If operating in especially dusty conditions perform this operation more often LUBRICATION The gear case grease may be changed every 200 hours of operation This is best entrusted to a qualified repair technician THE CARBON BRUSHES The carbon brushes are a normal wearing part and must be replaced when they reach their wear limit When the brushes are ...

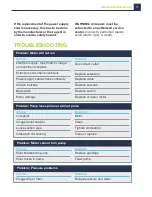
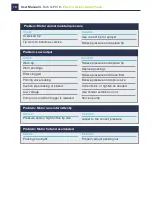
Page 17: ...check continuity Carbon brushes Bad switch Motor damage Use correct outlet Replace extension Replace cable Replace brushes Replace switch Replace or repair motor Check Problem Motor will not run Solution TROUBLESHOOTING Low paint Clogged inlet strainer Loose suction pipe Intake ball not seating Refill Clean Tighten connection Clean or replace Check Problem Pump loses prime or will not prime Soluti...

Page 18: ...r kinked Low voltage Pump runs on when trigger is released Relieve pressure and replace tip Replace packings Relieve pressure and Clean filter Relieve pressure and repair valve Correct kink or tighten as needed Use shorter extension cord Service pump Check Problem Low output Solution Pressure set too high for the tip size Adjust to the correct pressure Check Problem Motor runs intermittently Solut...

Page 19: ...www aristospray com 19 WIRING ...

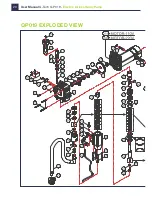
Page 20: ...User Manual Q Tech Q P019 Electric Airless Spray Pump 20 QP019 EXPLODED VIEW ...

Page 21: ...www aristospray com 21 ...

Page 22: ... QP019 PCA PCA KIT PRESSURE CONTROL ASSY 9 17 82 1 INCLUDES PARTS QP019 18 18 BALL BEARING 6200 ZZ 1 QP019 19 19 INTERNAL CIRCLIP IR 28 2 QP019 20 20 CONNECTING ROD 1 QP019 21 21 NEEDLE BEARING TLA2212 1 QP019 22 22 CRANK SPINDLE 4 5mm 1 QP019 23 23 PARALLEL KEY 5 x 5 x 10 1 QP019 24 24 CRANK GEAR M1 0 x 86T 1 QP019 25 25 BALL BEARING 6000 ZZ 1 QP019 26A 26A MOTOR UNIT 110V 1 QP019 26B 26B MOTOR U...

Page 23: ...RE ACTUATOR 1 F2100 60 OUTPUT NIPPLE PT 1 4 x 1 4 19PF 1 QP019 61 61 SOCKET PRESSURE PLUG PT 1 4 1 QP00013 62 PRIMING VALVE 1 QP000014 63 DRAIN TUBE PT1 8 x 0 92M 1 QP019 64 64 FLAT WASHER 1 4 x Ø10 x 1 4 QP019 65 65 SOCKET CAP SCREW M6 x 110 4 QP019 66 66 SPACER Ø25 5 x Ø38 x 7 1 QP019 67 67 INNER SPACER Ø22 x Ø32 x 9 1 QP00008 68 BALL GUIDE 1 QP019 69 69 BALL SEAT Ø9 x Ø20 x 5 1 QP019 70 70 GLAN...

Page 24: ...anville House Wallingford Road Uxbridge UB8 2RW T 01895 276751 E sales aristospray com Dublin 2b Stephenstown Industrial Park Balbriggan Co Dublin T 00353 1690 3162 F 00353 1690 3480 E sales aristospray com www aristospray com ...

Reviews: