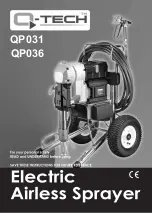
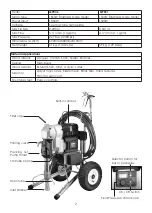
background image

1

QP036

QP031

Summary of Contents for QP031

Page 1: ...1 QP036 QP031 ...

Page 2: ...et Weight 61 kg 134 2 Lbs 59 kg 129 8 Lbs Material Applications Wood interior Lacquer Varnish Stain Sealer Enamel Ceiling High build Wood exterior Exterior Stain Vinyl Acrylic Latex Masonry Alkyd Vinyl Latex Elastomeric Block filler Hand textures Paint for skim coat Structural steel Heavy coating Drain tube Inlet Strainer Filter cap Packing nut Pump throat Priming valve On Off Switch Selector butt...

Page 3: ...t be plugged into an outlet properly installed and grounded in accordance with all codes and ordinances Never remove the grounding prong or modify the plug in any way Do not use any adaptor plugs Check with a qualified electrician if you are in doubt as to whether the outlet is properly grounded If the tools should electrically malfunction or break down grounding provides a low resistance path to ...

Page 4: ...thes jewellery or long hair can be caught in moving parts g If devices are provided for the connection of dust extraction and collection facilities ensure these are connected and properly used Use of these devices can reduce dust related hazards Power tool use and care a Do not force the power tool Use the correct power tool for your application The correct power tool will do the job better and sa...

Page 5: ... cause extremely serious injury OBSERVE ALL WARNINGS SPECIFIC SAFETY RULES WARNING HIGH PRESSURE Never leave pressurized system unattended Always follow the Pressure Relief Procedure Take precautions to avoid high pressure component rupture DANGER INJECTION INJURY Skin injection by high pressure paint is not a simple cut It must be treated surgically immediately WARNING FIRE AND EXPLOSION HAZARD T...

Page 6: ... NEVER put your hand or fingers over the spray tip Do not use a rag or any other materials over your fingers Paint will penetrate through these materials into the hand NEVER try to stop or deflect leaks with your hand or body ALWAYS have the tip guard in place when spraying ALWAYS lock the gun trigger when you stop spraying ALWAYS remove tip from the gun to clean it NEVER try to blow back paint th...

Page 7: ...ay gun while spraying The tip guard alerts you to the injection hazard and helps prevent accidentally placing your fingers or any part of your body close to the spray tip SPRAY TIP SAFETY Use extreme caution when cleaning or changing spray tips If the spray tip clogs while spraying engage the gun safety latch immediately ALWAYS follow the PRESSURE RELIEF PROCEDURE and then remove the spray tip to ...

Page 8: ...G r o u n d t h e s p r a y e r o t h e r components in the system to reduce the risk of static sparking fire or explosion which can result in serious bodily injury and property damage For detailed instructions on how to ground check your local electrical code ALWAYS ensure switch is in OFF position before plugging unit in Always Ground All of These Components 1 Sprayer plug the power supply cord ...

Page 9: ...AYING CLEANING WITH FLAMMABLE PAINTS AND THINNERS 1 When spraying with flammable liquids the unit must be located a minimum of 25 feet away from the spraying area in a well ventilated area Ventilation must be sufficient enough to prevent the accumulation of vapors 2 To eliminate electrostatic discharge ground the spray unit paint bucket spraying object See GROUNDING Use only high pressure airless ...

Page 10: ...lified electrician IMPORTANT use only a 3 wire extension cord that has a 3 blade grounding plug and a 3 slot receptacle that will accept the plug on the product Make sure your extension cord is in good condition When using an extension cord be sure to use one heavy enough to carry the current your product will draw an undersized cord will cause a drop in line voltage resulting in loss of power and...

Page 11: ... When changing between water based and oil based materials First flush with clear water then flush with mineral spirits 4 When changing colors Flush with a compatible solvent such as water or mineral spirits as needed 5 When cleaning up See the section on CLEANUP later in this manual 6 Storage Leave the pump filled with a 50 50 mixture of mineral spirits and motor oil CAUTION Never leave water in ...

Page 12: ...ely clean flushing fluid is coming out WARNING Do not release the gun trigger during this process If you release the trigger pressure will build in the line and when you re squeeze the trigger there will be a splashback hazard 11 Then turn the unit off and turn the pressure control knob anticlockwise back to the minimum setting Then unplug the unit The pump is now clean and ready to be primed with...

Page 13: ...SSURE RELIEF PROCEDURE before performing any adjustment with the tip Please see the section below Spray Tip Selection to choose the right tip for your application 1 Double check to be sure the gun safety latch is locked before assembling tip and tip guard to the gun 2 If it is not installed ensure the seal is snapped in place on the seat and insert the seat into the tip guard Make sure that it is ...

Page 14: ...ure any higher than is necessary Operating the sprayer at a higher than necessary pressure wastes material causes early tip wear and shortens sprayer life Excessive pressure can also result in PRESSURE RELIEF PROCEDURE Whenever you stop spraying even for a short break follow the Pressure Relief Procedure IMPORTANT To avoid possible serious body injury always follow this procedure whenever the spra...

Page 15: ...CEDURE before refilling material If the material does run out the pump will suck in air This air must be bled out before continuing Follow the instructions for Priming above TO REMOVE CLOGS FROM SPRAY TIP reversible tips 1 Lock gun safety latch and follow the PRESSURE RELIEF PROCEDURE 2 Turn Tip handle 180 degrees 3 Disengage trigger lock trigger gun into pail 4 If the Tip handle appears locked lo...

Page 16: ...m hose by following the PRESSURE RELIEF PROCEDURE Secure gun with the safety latch take off guard take out the tip soak in appropriate solvent clean with a soft brush Do not use a needle or sharp pointed instrument to clean the tip The tungsten carbide is brittle and can chip SPRAY TIP SELECTION Spray tip selection is based on paint viscosity paint type and job needs There are two variables to ide...

Page 17: ...r based materials mineral spirits for oil based materials or lacquer thinner for lacquers Special flushing fluids may be required for component materials or epoxies etc 4 To reclaim the material in the pump place the drain tube in the original material bucket With the priming valve still in the open position turn the machine on and turn the pressure control knob clockwise just enough to run the pu...

Page 18: ...lushing fluid to recirculate for 2 3 minutes to make sure that all traces of the material are cleaned out 14 Turn off the machine and unplug Open the priming valve to relieve residual pressure 15 Remove the suction tube out of the flushing fluid If you are using a hopper continue flushing until the hopper is empty 16 Clean the inlet strainer or hopper strainer Remove and clean it with a soft brush...

Page 19: ... Procedure and perform the following Add about 2 drops of throat Seal Oil to lubricate the packings Clean the pump filter Clean the gun filter Clean the tip Clean the inlet strainer or hopper strainer As needed CAUTION Never lay the pump on its back Material could flow backward and damage the electronics or motor DAILY MAINTENANCE 1 Keep the displacement pump packing nut lubricated with throat sea...

Page 20: ...he gland nut 2 and remove the pickup tube 3 from the bottom of the pump At the same time remove the inlet ball seat disc 5 o ring 6 check ball 7 and ball guide 8 2 Lay the machine on its back and remove the heat sink electronics unit 67 This will allow access to unplug the pressure sensor 12 from the electronics unit 3 Disconnect the junction 42 and three screws 40 on the pump filter bracket and r...

Page 21: ...CE LUBRICATION The gear case grease may be changed every 200 hours of operation This is best entrusted to a qualified repair technician THE CARBON BRUSHES Only motors with carbon brush system The carbon brushes are a normal wearing part and must be replaced when they reach their wear limit When the brushes are worn to a length of 1 4 they should be replaced as a set TO CHANGE THE BRUSHES 1 Unplug ...

Page 22: ...re problems Check Solution Clogged tip or filter Relieve pressure and clean Problem Motor cannot maintain pressure Check Solution Oversized tip Use correct tip for spayer Tip worn to become oversize Relieve pressure and replace tip Problem Low output Check Solution Worn tip Relieve pressure and replace tip Worn packings Replace packings Filter clogged Relieve pressure and Clean filter Priming valv...

Page 23: ...ted Check if Pressure transducer and LCD display are disconnected E06 material shortage Fill material again E07 Overload must be replaced by the service organization Check Motor or Pressure transducer E09 Maximum pressure exceeded Check Pressure transducer ...

Page 24: ...24 WIRING W V U AC MOTOR PRESSURE TRANSDUCER CONTROL BOX ELECTRONICS UNIT EARTH ...

Page 25: ...25 ...

Page 26: ...99 99 95 96 97 96 95 90 91 75 75 91 90 92 84 85 85 88 87 82 68 64 65 20 66 46 72A 72B 72C 73 83 37 38 108 107 107 108 110 112 114 115 111 113 118 119 120 90 106 106 106 106 105 89 93 94 94 76 20 20 76 76 67 109 25 28 01A 01B 116 117 34 34 34 26 63 35 33 27 100 100 101 101 102 103 104 62 122 09 123 124 125 32 126 01C 01D 05A 05B 17A 17B 19A 19B 48A 48B 53A 53B 86A 86B NO 01 126V1 0 ...

Page 27: ...SMALL Ø7 x Ø15 x 5 1 1 16 QP036 16 CHECK BALL 3 8 SUS 440C Ø9 52 1 1 17A QP031 17 DISPLACEMENT PISTON SUS 420 237 8 1 17B QP036 17 DISPLACEMENT PISTON SUS 420 295 3L 1 18 QP036 18 PACKING SET HOLDER 1 1 19A QP031 19 PUMP HOUSING 187 5L 1 19B QP036 19 PUMP HOUSING 242 5L 1 20 QP036 20 OUTPUT NIPPLE PT 3 8 x 3 8 19PF 3 3 21 N A 22 QP036 22 PACKING SET SEAT Ø41 5 x 25 1 1 23 N A 24 QP036 24 PACKING N...

Page 28: ...zz 3 3 56 QP036 56 GEAR PINION M2 5 x 14T 1 1 57 QP036 57 PARALLEL KEY 5 x 12 2 2 58 QP036 58 INPUT GEAR M1 5 x 59T 1 1 59 QP036 59 EXTERNAL CIRCLIP S 25 1 1 60 QP036 60 GEAR PLATE 1 1 61 QP036 61 INLET STRAINER 1 1 62 QP036 62 PRIMING VALVE 1 1 63 QP036 63 DRAIN TUBE PT1 8 x 0 5M 1 1 64 QP036 64 ELBOW UNION FITTING 1 1 65 QP036 65 PRESSURE TRANSDUCER 1 1 66 QP036 66 HIGH PRESSURE HOSE 75CM 5000PS...

Page 29: ...CLIP E 7 2 2 102 QP036 102 CROSSPIECE REAR 1 1 103 QP036 103 CROSSPIECE FRONT 1 1 104 QP036 104 FRAME 1 1 105 QP036 105 END CAP 2 2 106 QP036 106 FLAT WASHER Ø20 1 x Ø52 x 2 4 4 107 QP036 107 WHEEL 2 2 108 QP036 108 E CLIP E 19 2 2 109 QP036 109 SCREW M5 x 6 1 1 110 QP036 110 CONTROL BOX CAP 1 1 111 QP036 111 PIN Ø4 x 175 1 1 112 QP036 112 WINDOW 76 x 42 x 3 1 1 113 QP036 113 ADJUSTOR WHEEL 1 1 11...

Page 30: ... 2b Stephenstown Industrial Park Balbriggan Co Dublin Tel 00353 1690 3162 Fax 00353 1690 3480 www edx tools co uk E sales aristospray com London Aristospray UK Granville House Wallingford Road Uxbridge Middlesex UB8 2RW ...

Reviews: