background image

8. How to use

-

O

ne pull chain switch is for light control, another one for speed control

-

T

he speed can be selected by pressing the speed key on remote control

-

L

ight on off can be controlled by remote
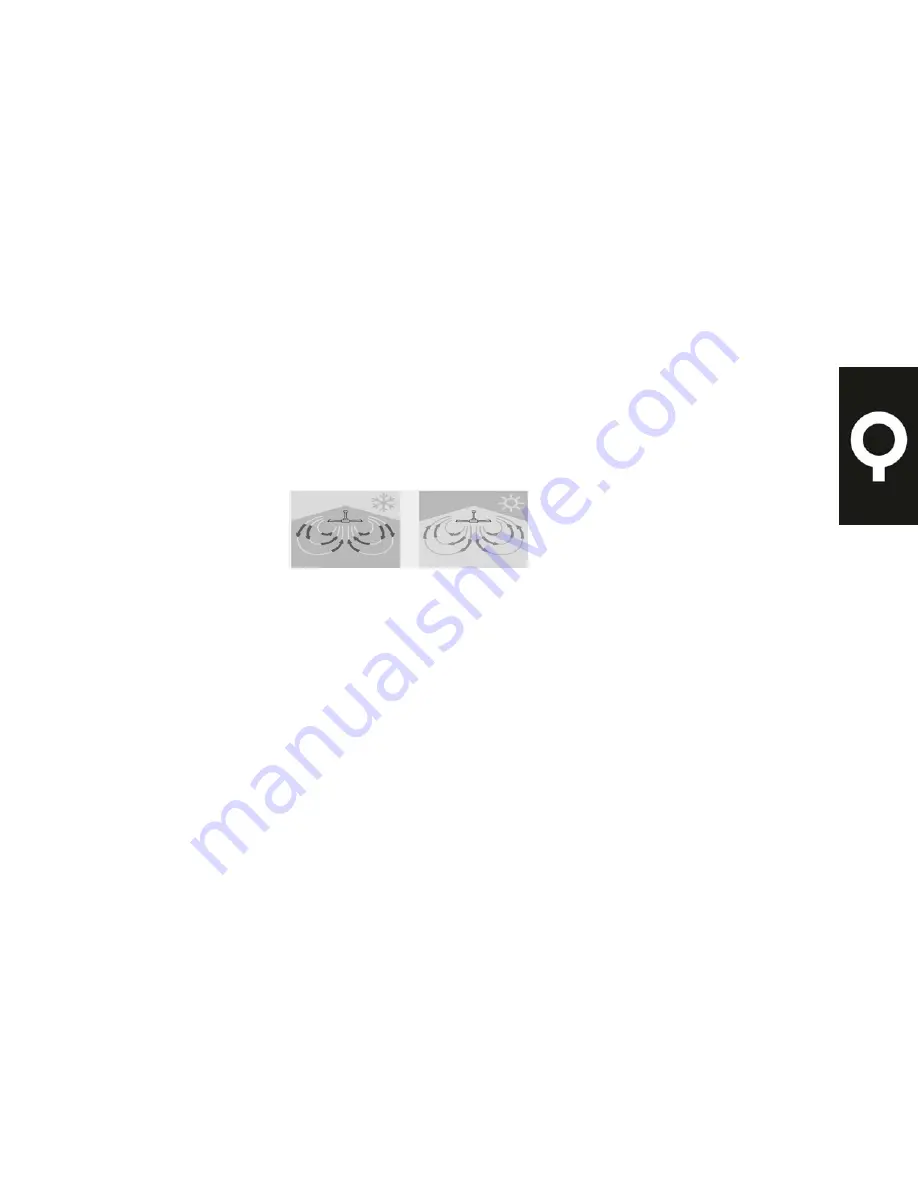
-

D

irection switch on the fan ‘s switch box(SUMMER and WINTER switch)

-

D

own for summer make the air movement directly from ceiling

-

U

p for winter, to circulate the warm air generated by heater to floor

9. Remote Control

T

his ceiling fan can be installed with remote control, but make sure you know how to install the device in safe way or

consult licensed electrician

W

arranty may be affected if you install the improper remote control or install it in improper way

10.Disconnect from mains before maintenance or cleaning.

D

o not use a wet sponge to clean the appliance.

1.

B

efore conducting any cleaning or maintenance work, disconnect the lamp from the electrical supply and wait until it

cools down
2.

N

o abrasive products, solvents, detergent or any other liquid may be used to clean the fan or lamp

3.

B

e sure the power is off when you clean the fan

4.

D

on’t clean the motor, switch house and other electric parts of the fan with water in order to avoid short circuit

P.9

Summary of Contents for 91342

Page 1: ...P 1 INSTRUCTION MANUAL Breeze Fan 48 Chrome Breeze Fan 48 White 91342 91343...

Page 2: ...n manual thoroughly before using the appliance and save it for future reference and if necessary pass the instruction manual on to a third party WARNING When using electrical appliance basic safety pr...

Page 3: ...en without supervision Children should be supervised to ensure that they do not play with the appliance This appliance is for indoor use only Means for disconnection must be incorporated in the fixed...

Page 4: ...ng point for environmentally friendly disposal in accordance with local regulations Contact your local authorities or stockist for advice on recycling The packaging material is recyclable Dispose of t...

Page 5: ...RACKET 2 SCREWS 3 SCREWS 4 TERMINAL BLOCK 5 REMOTE CONTROL 6 MALE AND FEMALE PLUS 7 HANGER BALL 8 UPPER CANOPY 9 DOWNROD 10 SCREW 11 UPPER CANOPYCOVER 12 SCREWS 13 BLADE HOLDERS SCREW 14 BLADE 15 LIGH...

Page 6: ...ws from the rectangular cover on the motor housing and remove the plate insert the blades through the slots around the motor Align the blade with the e three holes and secure the three screws through...

Page 7: ...ue wire N Green yellow wire 8 The connect the female and male plus 1 to 1 2 to 2 Fig 9 9 Fix the screw to the upper canopy Fig 10 10 Inset the len into the receiver and connect the supply wire of the...

Page 8: ...If the fan or light kit is PARTIALLY pre assembled you can skip the assembly procedures to next step 14 14 Now the fan is completed Fig 14 P 8...

Page 9: ...you know how to install the device in safe way or consult licensed electrician Warranty may be affected if you install the improper remote control or install it in improper way 10 Disconnect from main...

Page 10: ...troller A Lower Canopy from ceiling to ensure minimum 3 mm clearance B Re tighten all screws on fan blades but never over tighten C Re tighten all screws in the hanging bracket or plate D Change the c...

Page 11: ...ol usually high speed setting to the speed which creates to greatest wobble Turn the fan off select on blade place the balance clip on it Halfway between the blade holder and the blade up on the rear...

Page 12: ...ot be made by children unless they are older than 8 and supervised Keep the appliance and its cord out of reach of children aged less than 8 years Appliances can be used by persons with reduced physic...

Reviews: