


Network Switch Installation Guide
29
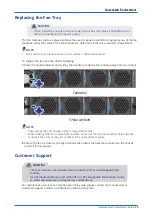
Hardware Installation
NOTE:
• The examples used throughout this section are based on the T7032-IX1/IX1B
switch (unless specified
otherwise).
Unpacking the Hardware
Upon receiving the switch, inspect the packing box. If the packing box was not damaged in
transit, unpack it carefully.
NOTE:
• Retain the packing box in case you need to transport the switch.
• The packing box is heavy. It is recommended for two persons to carry the box and perform the
installation.
Package Contents
The following items are included with a standard package. When you open the box, check if all
items are included and free of damage.
• One QuantaMesh Ethernet switch
•
Two AC power cords
• Console cable
• One set of rail kit
• Statement paper
It is important to ensure all items are included in the package before starting the installation.
1
Place the box on a flat and stable surface and cut the straps securing the box.
2
Carefully remove the switch. Then place it on a flat and clean surface.
3
Remove all other items from the box and inspect each item.
Installing the Switch
Site Survey
Consider the following when choosing a location to install the switch:
Installation Location
• Ensure that there is adequate space to allow you to access the front and rear panel ports for
easy cable management and maintenance.
• Ensure that the site is located within a proper distance to the power source. The power source
must be properly grounded and readily accessible.
• Ensure that the site is free from strong electromagnetic field sources, such as radiators,
motors, and heat sources.
• Ensure that the site is not exposed to direct sunlight, rain or moisture.
Ventilation
• The installation surroundings must have adequate ventilation. Proper clearance between the
switch and the wall or other equipment must be observed.


