background image

of the cord below the level of the receptacle, or connector if an extension cord is used, to prevent water
traveling along the cord and coming in contact with the receptacle.

B. If the plug or receptacle does get wet, DO NOT unplug the cord. Disconnect the fuse or circuit breaker that

supplies power to the tool. Then, unplug and examine for presence of water in the receptacle.

ELECTRICAL REQUIREMENTS

• CONNECTING TOOL TO POWER SOURCE OUTLET. This tile saw must be connected to a grounded power

source while in use to protect the operator from electrical shock.

• In the event of a malfunction or breakdown, grounding provides a path of least resistance for electrical current

to reduce the risk of electrical shock. The tile saw is equipped with an electrical cord with a grounding
conductor and a grounding plug. Insert the 3-prong electrical plug into a 3-pole receptacle that is properly
installed and grounded in accordance with all local codes and ordinances.

• Do not modify the plug provided if it will not fit the outlet. Have the proper outlet installed by a 

qualified electrician.

• Improper connection of the equipment-grounding conductor can result in a risk of electric shock. The

conductor with insulation that is green on the outside (with or without yellow stripes) is the equipment-
grounding conductor. If repair or replacement of the electrical cord or plug is necessary, do not connect the
equipment-grounding conductor to a live terminal.

• Check with a qualified electrician or service personnel if the grounding instructions are not completely

understood, or if in doubt as to whether the tool is properly grounded.

• Use only 3-wire extension cords that have 3-prong grounding plugs and 3-pole receptacles that accept the tile

saw’s plug.

• Repair or replace damaged or worn cord immediately.

• To avoid the possibility of the appliance plug or receptacle getting wet, position tile saw to one side of a wall-

mounted receptacle to prevent water from dripping onto the receptacle or plug. The user should arrange a
“drip loop” in the cord connecting the saw in a receptacle. The “drip loop” is that part of the cord below the
level of the receptacle, or the connector if an extension cord is used, to prevent water travelling along the cord
and coming in contact with the receptacle.

• If the plug or receptacle does get wet, do not unplug the cord. Disconnect the fuse or circuit breaker that

supplies power to the tool. Then, unplug and examine for presence of water in the receptacle.

• Only UL-listed extension cords should be used with this product.

• Improper use of extension cords may cause inefficient operation of your tool, which can result in overheating.

Be sure your extension cord is rated to allow sufficient current flow to the motor. For the proper gauge for this
tile saw, please refer to Table 1.

• Do not let your fingers touch the terminals of plug when installing or removing the plug to or from the outlet.

• This tile saw must be properly grounded. The

risk of electric shock and bodily injury are
greatly increased if it is not, particularly when
used in damp locations or in proximity 
to plumbing.

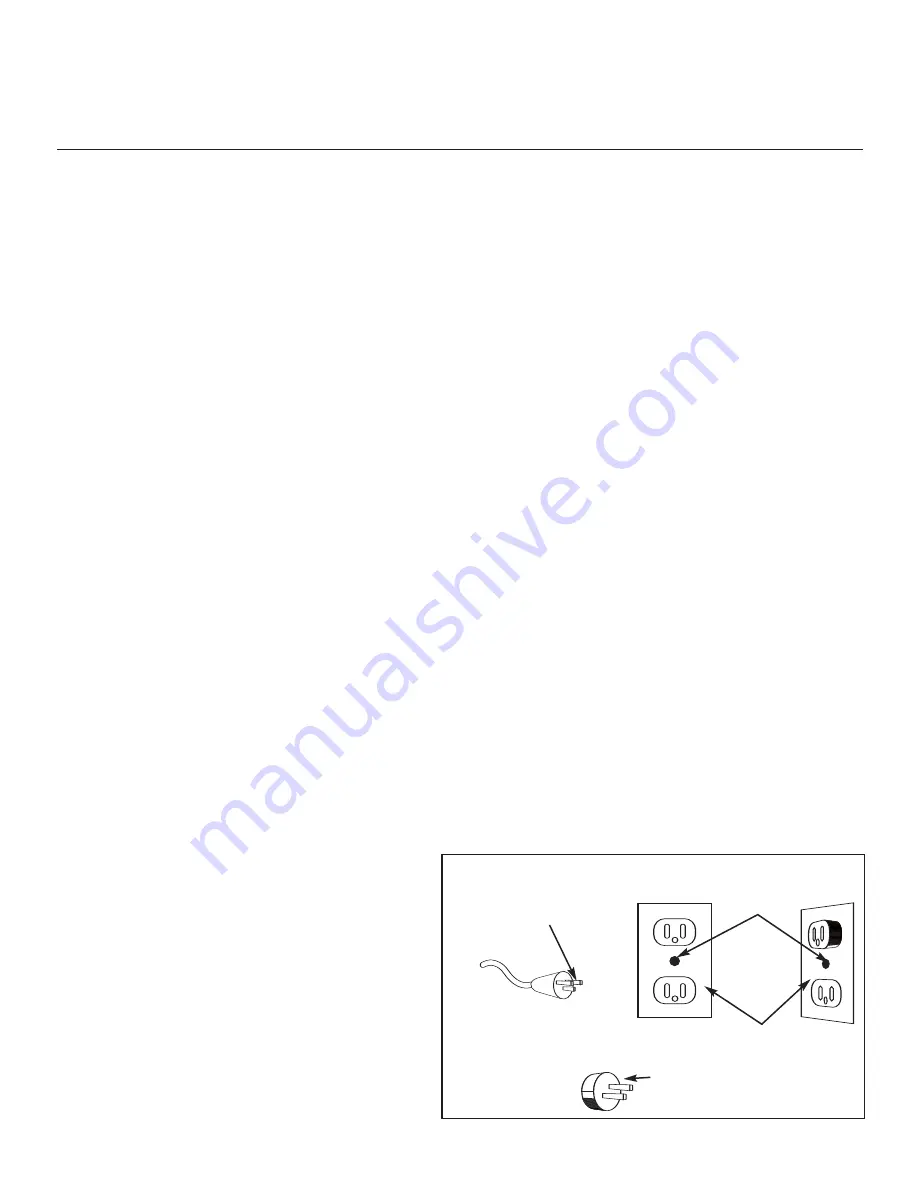
NOTE: This tool is intended for use on a circuit
that has an outlet that looks like the one shown in
Illustration 2. The tool has a grounding plug that
looks like the plug in 2(A). A temporary adapter,
which looks like the adapter illustrated in 2(B) and
2(C), may be used to connect this plug to a 2-pole
receptacle as shown in 2(B) if a properly grounded
outlet can be installed by a qualified electrician.
The green-colored rigid prongs extending from
the adapter must be connected to a permanent
ground such as a properly grounded outlet box.

(C) GROUNDING ADAPTER

(A) GROUNDING PIN

(B) GROUNDED OUTLET BOX

METAL

SCREW

(Not Permitted In Canada)

ILLUSTRATION 2

- 4 -

Summary of Contents for 60084A

Page 1: ...102 mm para cortar losetas MANUAL DE OPERACIÓN No 60084A Read and follow all safety and operating instructions before using this saw Lire et suivre toutes les directives de sécurité et d opération avant d utiliser cette scie Lea y siga todas las instrucciones de funcionamiento y seguridad antes de usar esta sierra ...

Page 2: ... operation for which it can be used 3 Disconnect saw before cleaning or changing blade 4 Do not use any cutting blade with openings and grooves Use only continuous rim blades 5 Replace damaged blade before operating 6 Do not expose to rain or use in damp locations Pour assurer votre securite lisez le moide d emploi avant d utiliser le coupeur 1 Toujours porter des lunettes protectrices pendant la ...

Page 3: ...footing and balance at all times 13 MAINTAIN TOOLS WITH CARE Keep tools clean and in good working condition for maximum safety performance Follow instructions for lubricating and changing accessories 14 DISCONNECT TOOLS BEFORE SERVICING when changing accessories such as blades bits cutters etc 15 REDUCE THE RISK OF UNINTENTIONAL STARTING Make sure switch is in OFF position before plugging in 16 US...

Page 4: ...rn cord immediately To avoid the possibility of the appliance plug or receptacle getting wet position tile saw to one side of a wall mounted receptacle to prevent water from dripping onto the receptacle or plug The user should arrange a drip loop in the cord connecting the saw in a receptacle The drip loop is that part of the cord below the level of the receptacle or the connector if an extension ...

Page 5: ......

Page 6: ...ials Adjusting table for precision angle cuts 15 30 45 Depth of cut with a 4 in blade is 3 4 in 19 mm This saw comes with a diamond blade that is ideal for cutting ceramic tile If your project requires the cutting of other substrates including porcelain it is recommended that you use the specific type of blade for the material being cut ASSEMBLY AND SETUP FOLLOW ALL OF THE ASSEMBLY AND INSTALLATIO...

Page 7: ...or 45 angle cutting put the tile and 45 angle cutting guide together Then push towards the blade to cut the tile See Diagram 5 Note Be sure to keep the reservoir filled with water to the recommended level DIAGRAM 2 DIAGRAM 3 DIAGRAM 4 Pivot Tab DIAGRAM 5 For longer tool life and best performance Always clean the tile saw after each use Wipe off all exterior surfaces and keep the cutting table clea...

Page 8: ...G Overheating of saw A Turn saw off and let it rest until motor is cool to the touch B Check and clean the ventilation slots removing blockage and dirt The saw does not start A Check that power cord is properly plugged in B No power from outlet C Switch is damaged 120 VOLT MOTOR SPECIFICATIONS Volts 120 V Cycle 60 CYCLE RPM n0 3600 RPM Amps Watts 1 5 Amps ELECTRICAL AND MOTOR SPECIFICATIONS ...

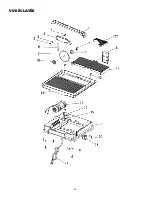
Page 9: ...0084A 8 Outer washer 1 9 6 4003CR Blade 1 10 60084A 10 Inner washer 1 11 60084A 11 Miter support 1 12 60084A 12 Right cutting table 1 13 60084A 13 Screw for cutting table 7 14 60084A 14 Left cutting table 1 15 60084A 15 Capacitor 1 16 60084A 16 Motor 1 17 60084A 17 Frame 1 18 60084A 18 Switch 1 19 60084A 19 Screw for motor 2 20 60084A 20 Rubber stand 4 21 60084A 21 Electrical cord 1 22 60084A 22 4...

Page 10: ... 10 EXPLODED VIEW ...

Page 11: ...RAVAIL SÉCURITAIRE Utilisez si possible des pinces ou un étau plutôt que la main pour retenir le travail Cette précaution vous permet d utiliser correctement l outil avec les deux mains 12 NE VOUS PENCHEZ PAS TROP Gardez les pieds bien au sol et un bon équilibre en tout temps 13 ENTRETENEZ LES OUTILS AVEC SOIN Gardez les outils propres et en bon état pour une performance sécuritaire maximale Suive...

Page 12: ...ordon électrique ou la fiche ne branchez pas le conducteur de terre à une borne sous tension Consultez un électricien ou le personnel d entretien qualifié si vous ne comprenez pas toutes les instructions ou si vous n êtes pas certain que l outil est bien mis à la terre Utilisez seulement les rallonges à 3 fils à fiches à 3 broches et dans des prises à 3 pôles qui conviennent pour la fiche de la sc...

Page 13: ...tre rallonge est en bon état Si vous utilisez une rallonge assurez vous d en utiliser une suffisamment lourde pour transporter le courant que votre produit débite Un cordon sousdimensionné provoquera une chute de tension de ligne menant à une perte de courant et à une surchauffe Le tableau plus bas montre la bonne taille à utiliser selon la longueur du cordon et la valeur nominale d ampères de la ...

Page 14: ...u que vous coupez Laissez toujours la lame couper à sa propre vitesse Ne forcez pas un outil à faire un travail pour lequel il n a pas été conçu Assurez vous d utiliser la bonne lame pour la tâche à accomplir Cette scie est dotée d une fiche électrique à trois broches Ne modifiez pas la fiche et n utilisez pas de prise à deux broches Gardez votre secteur de travail libre de tout débris et sans enc...

Page 15: ...rrez pas trop Installez le protecteur de lame en insérant le bras d acier dans la fente derrière l ouverture de la lame tel qu indiqué dans le diagramme 1 Placez le guide en long sur le dessus de la table de coupe et pliez les leviers de chaque côté jusqu à ce qu elles se mettent en place d un coup sec Le guide a des indications en pouces et en centimètres pour une coupe exacte Le guide en long pe...

Page 16: ... Gardez toujours le niveau d eau au niveau recommandé Ne remplissez pas trop et ne laissez pas la scie tourner à sec Ajoutez de l eau au besoin N essayez jamais de réparer vous même les pièces internes du moteur car cela annulera notre garantie SPÉCIFICATIONS ÉLECTRIQUES ET DU MOTEUR Branchez la scie à carreaux le plus près possible de la source d alimentation POUR ÉVITER TOUT DOMMAGE PERMANENT DU...

Page 17: ...lles 1 8 60084A 8 Rondelle extérieure 1 9 6 4003CR Lame 1 10 60084A 10 Rondelle intérieure 1 11 60084A 11 Support d onglet 1 12 60084A 12 Table de coupe droite 1 13 60084A 13 Vis de table de coupe 7 14 60084A 14 Table de coupe gauche 1 15 60084A 15 Condensateur 1 16 60084A 16 Moteur 1 17 60084A 17 Cadre 1 18 60084A 18 Interrupteur 1 19 60084A 19 Vis du moteur 2 20 60084A 20 Base de caoutchouc 4 21...

Page 18: ... 18 VUE ÉCLATÉE ...

Page 19: ...entes a impactos NO son gafas de seguridad 11 TRABAJO SEGURO Utilice sujetadores o una morsa en lugar de usar las manos para sostener el trabajo cuando sea posible Esta precaución de seguridad permite operar correctamente las herramientas con las dos manos 12 NO SE INCLINE DEMASIADO Manténgase bien afirmado y conserve el equilibrio en todo momento 13 MANTENGA LAS HERRAMIENTAS CON CUIDADO Mantenga ...

Page 20: ...códigos y ordenanzas locales No modifique el enchufe suministrado si no es el que corresponde a la toma de corriente Llame a un electricista calificado para que instale la toma de corriente Conectar el conductor de conexión a tierra del equipo de manera incorrecta puede causar un riesgo de choque eléctrico El conductor con aislamiento exterior de color verde con o sin rayas amarillas es el conduct...

Page 21: ...den desde el adaptador deben conectarse a una conexión a tierra permanente tal como una caja de toma de corriente con la conexión a tierra adecuada SI SE LA USA DE MANERA INCORRECTA PUEDEN PRODUCIRSE LESIONES FÍSICAS Use protección ocular Al cortar utilice la protección de seguridad del disco Desenchufe la sierra antes de hacerle un servicio técnico al cambiar las ruedas de corte y al limpiarla Us...

Page 22: ... de alimentación de su sierra para losetas se encuentre en la posición OFF apagado antes de enchufarla No deje la sierra para losetas encendida sin supervisión Siempre APAGUE la herramienta cuando no esté en uso Use siempre gafas de seguridad tapaboca y protección para los oídos cuando utilice la sierra para losetas Cuando la sierra para losetas esté en uso permanezca siempre alerta La distracción...

Page 23: ...cto Guía para corte en ángulo de 45 Manual del usuario NOTA Se puede retirar la parte superior derecha estrecha de la mesa doblando la lengüeta pivotante ubicada en la parte delantera o trasera Levante la mesa para retirarla ver el Diagrama 2 Ponga el disco en el eje empujándolo contra la arandela interna Asegúrese de que las flechas direccionales en el disco estén orientadas hacia usted Coloque l...

Page 24: ...egúrese de mantener el depósito lleno de agua hasta el nivel recomendado Para que la herramienta tenga una vida útil más larga y un mejor rendimiento Siempre limpie la sierra para losetas luego de cada uso Limpie todas las superficies exteriores y mantenga la mesa de corte limpia de todo residuo Siempre deje que el disco corte a su propia velocidad No fuerce el material que se está cortando Siempr...

Page 25: ...ERÍAS Sobrecalentamiento de la sierra A Apague la sierra eléctrica y déjela en reposo hasta que el motor esté frío al tacto B Verifique y limpie las ranuras de ventilación quite cualquier obstrucción y suciedad La sierra no arranca A Verifique que el cable de alimentación esté enchufado correctamente B No hay energía en la toma de corriente C El interruptor está dañado ESPECIFICACIONES DEL MOTOR V...

Page 26: ... de mariposa 1 8 60084A 8 Arandela externa 1 9 6 4003CR Disco 1 10 60084A 10 Arandela interna 1 11 60084A 11 Soporte para corte a inglete 1 12 60084A 12 Mesa de corte derecha 1 13 60084A 13 Tornillo para mesa de corte 7 14 60084A 14 Mesa de corte izquierda 1 15 60084A 15 Capacitor 1 16 60084A 16 Motor 1 17 60084A 17 Bastidor 1 18 60084A 18 Interruptor 1 19 60084A 19 Tornillo para motor 2 20 60084A...

Page 27: ... 27 DESPIEZADO ...

Page 28: ...Made in Taiwan Fabriqué en Taiwan Hecho en Taiwan Boca Raton FL 33487 www qep com O218 5066 ...

Reviews: