background image

1

2

3

4

6

5

7

8

9

10

11

12

13

14

12

 – 09|2020 – Subject to change. 

Kidgoo 2018

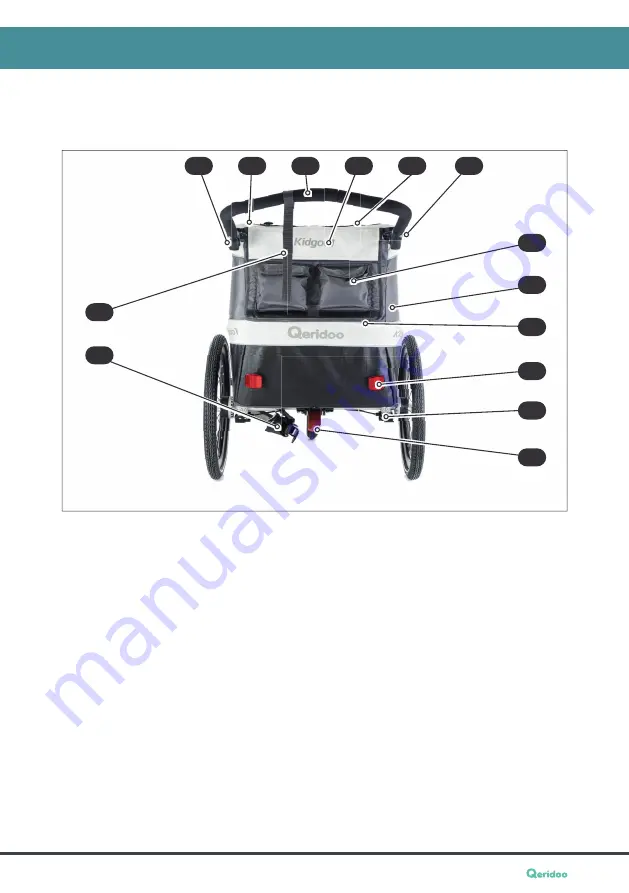
Product overview

Components and control elements

Rear view

1

Pushbutton for adjusting the height of the
push handle (both sides)

2

Pennant pouch for holding the pennant
staff (inside)

3

Push handle with safety function as impact 

protection

4

Ventilation window, can be rolled up

5

Window with smartphone pocket

6

Quick-release clamp for securing the push
handle (2x)

7

Storage space cover with two pouches for
small items

8

Storage space with inside pocket,
accessible from the outside

9

Reflective seams in the fabric cover

10

Rear reflector, red

11

Wheel axle

12

Parking brake brake lever

13

Coupler pocket with cotter pin fastening
and retaining strap for securing the tow
bar on the bicycle frame

14

Hand strap for Buggy and Walker mode

Summary of Contents for Kidgoo1 2018

Page 1: ...VI D E O T UTORIAL This product fulfils all safety requirements of the European standard for bicycles and bicycle trailers DIN EN 15918 EN Kidgoo1 2018 Kidgoo2 2018 USER MANUAL ...

Page 2: ... not to be interpreted as an assurance of particular product properties Despite the greatest care being taken to avoid technical inaccuracies or omissions the possibility of these arising cannot be entirely excluded When necessary individual items of information can be changed quickly and without special notification This documentation can be ordered from Qeridoo GmbH in other languages or is avai...

Page 3: ...the tow bar 18 Mounting the coupler onto a bicycle 19 Installing the rear light 20 Utilisation 21 Applying the parking brake 21 Adjusting the push handle 21 Window with smartphone pocket 21 Setting the mode 22 Adjusting the buggy wheel 22 Insert tow bar 23 Using the pennant 23 Attaching the hand strap 23 Putting on the 5 point safety harness 23 Securing the load 23 Loading the baggage 23 Adjusting...

Page 4: ...ers DIN EN 15918 It also considers the wheeled child conveyanes norm EN 1888 In Trailer mode a rear light must be installed in accordance with the Road Traf fic Licensing Regulations and to be in use in darkness or in conditions of poor visibility Before using the Kidgoo check which local regulations apply and how the product may be used It must not be used on unsurfaced ground to transport baggag...

Page 5: ... instruction for all users f Always keep the user manual close to the Kidgoo The following typographical elements are employed in the user manual to indicate the possible danger sources or special information Danger Identifies notices pertaining to the Danger risk level Indicates possible dangers that can result in injury if the instructions are not followed Caution Identifies notices pertaining t...

Page 6: ...ial or competitive purposes Check the screw connections for tight fit before the first use In particular the tow bar holder the spokes and the thru axles of the wheels must be checked before use Before every journey check that the Kidgoo is in a proper and technically faultless condition Perform a visual inspection and in particular pay attention to the instructions and checklists in the chapter M...

Page 7: ...5 km h or vehicles with a combustion engine The bicycle or the pedelec motorised for speeds up to 25 km h must be technically sound and suitable for towing loads in accordance with the permissible total weight The maximum permissible total weight can be found in chapter Performance limits on page 4 For details read the towing vehicle s manual or consult a specialist dealer for a suitable inspectio...

Page 8: ... or mercury Hg You as consumer are obliged by law to render all kind of batteries both rechargeable as well as non rechargeable inclusive button cells at local places of collection or at the retail market This is at no charge The proper disposal enables the recycling of valuable resources and avoids possible negative effects on humans and the environment Information concerning the disposal of old ...

Page 9: ...ar in mind the additional lane required for the inner wheel of the Kidgoo Additional weight When fully loaded the Kidgoo1 weighs up to 50 kg and the Kidgoo2 weighs up to 60 kg that the bicycle must pull brake and keep on track in addition to its own weight and that of the rider Jerky pulling and braking puts high loads on the coupler and tow bar and thereby increases wear All stopping distances ar...

Page 10: ...ackaging material and all protective caps and dispose of them in accordance with the environmental guidelines that apply in your region f Read the chapter Assembly on page 14 before you assemble parts 1 Cabin with seats back pad and 5 point safety harnesses 2 Wheel guard 2x 3 Head protector Kidgoo2 4 Leaf suspension cover 2 Stück 5 Multiwheel buggy wheel 6 1 head rest Kidgoo1 or 2 head rests Kidgo...

Page 11: ...ric cover 6 20 wheel with push in axle air valve Schrader valve 7 Rubber cap for push in axle release when mounting the wheels 8 Wheel axle with parking brake and suspension 9 Removeable wheel guard for rejection from obstacles 10 Tow bar for Trailer mode in the standby position 11 Tow bar holder with Locking button 12 Buggy wheel for three wheel use in Buggy or Walker mode 13 Wheel mount on the c...

Page 12: ...tection 4 Ventilation window can be rolled up 5 Window with smartphone pocket 6 Quick release clamp for securing the push handle 2x 7 Storage space cover with two pouches for small items 8 Storage space with inside pocket accessible from the outside 9 Reflective seams in the fabric cover 10 Rear reflector red 11 Wheel axle 12 Parking brake brake lever 13 Coupler pocket with cotter pin fastening an...

Page 13: ... vehicle during assembly When handling moving components make sure that your hands or fingers do not get trapped Unfolding the cabin f Place the collapsed cabin in the assembly area f Position yourself behind the cabin f Pull both sides of the rear cabin frame all the way up f Open the cover of the storage compartment f Pull the lower horizontal bar backwards evenly until the two rey locks on the ...

Page 14: ...ong holes which allow a lateral alignment Installing the wheel guard and the leaf spring cover The wheel guard on both sides of the cabin prevents the wheels from getting stuck on pillars or similar obstacles The leaf spring covers serve as protection against bruises f Make sure that the slide covers for the wheel guard and leaf spring cover are fixed and tightened on both sides f Slide the wheel ...

Page 15: ...e push handle completely To do this keep the light grey pushbuttons pressed on both sides see Adjusting the push handle on page 21 f Loosen the two pre assembled quick release clamps and remove them f Hook the upper loops of the canopy into the tube ends at the cabin roof f Insert the two ends of the push handle into the tube ends at the cabin roof f Place the quick release screws from the outside...

Page 16: ...econd wheel in the same way Danger After mounting the wheels secure the Kidgoo whenever you park it so as to prevent it from rolling away see Applying the parking brake on page 21 f Check whether there is sufficient air in the wheels recommended air pressure 2 5 3 5 bar If necessary use an air pump for car valves to top up with air Tightening the backrest The stable backrest is an important safety...

Page 17: ...nnant staff Optional assembly steps Installing the buggy wheel You need the buggy wheel for Buggy and Walker mode The buggy wheel is connected directly with the wheel suspension attached to the frame and is mounted so that it can rotate through 360 f Lift the cabin at the front f Place the buggy wheel into the wheel mount as far as it will go until it engages audibly with a clicking noise f Check ...

Page 18: ...ar is also secured with a cotter pin f Pull the locking knob and turn about 30 so that the button during the release remains in the open position f Push the front button on the tow bar so that the locking bolt unlocks f Keep on pushing down the button and push the tow bar forwards until the mark in the tow bar mount is reached f Release the button so that the locking bolt secures the tow bar in th...

Page 19: ...ng the coupler by undoing the screw connection of the rear wheel axle Quick release axle Open the bracket of the quick release axle and unscrew the cap nut on the other side of the rear wheel axle Full axle Unscrew the nut on the left side of the rear wheel axle f Mount the coupler on the rear wheel axle Place the large hole of the coupler onto the left side of the rear wheel axle so that the coup...

Page 20: ...models If it does not fit your bicycle find a suitable adapter and special couplers in our manuals on the following website www qeridoo de kupplungsleitfaden Caution Do not use a tool that has previously been in contact with conventional steel Smallest steel particles could be transferred that could lead to contact corrosion Installing the rear light In trailer mode a certified rear light must be ...

Page 21: ...These are identified by the word PUSH You can set and engage the push handle at several levels in the 48 104 cm range f Press both pushbuttons and keep them pressed in order to release the height adjustment f Swing the push handle to the desired height f Release the two pushbuttons in order to activate the engagement function f Move the push handle slightly up or down until the height adjustment e...

Page 22: ... Hand strap on the push handle wrapped around a wrist wrapped around a wrist 5 point safety harness must be fastened must be fastened must be fastened Rear light must work in poor visibility or darkness follow the Road Traf fic Licensing Require ments recommended in poor visibility or darkness recommended in poor visibility or darkness Bicycle the correct coupler must be installed Danger Before ev...

Page 23: ...kwards in the standby position Pay attention also to the instructions in the chapter Mounting the tow bar on page 18 Danger Wrap the retaining strap of the tow bar around the tow bar several times to ensure it does not hang down in the standby position Otherwise it could become trapped on obstacles Using the pennant The pennant must be attached in Trailer mode see Inserting the pennant on page 17 ...

Page 24: ... To achieve optimum load distribution it is important for the load s centre of gravity to be approxi mately in the middle of the cabin In the as delivered state the 5 point safety harnesses are pre ad justed for carrying two children If you only want to carry one child you must adjust the safety harnesses so that the child can sit in the middle Tip The optionally available accessories such as the ...

Page 25: ...2 on page 24 f Open the safety harnesses required Release the harness catch by pressing the pushbutton Pull the two tabs out of the belt buckle Loosen the small locks which fix the belt cushions in place Placing the children f Put a suitable bicycle helmet on children or use the optional available head rests f Let the children get in one after the other or lift them into the cabin f If necessary a...

Page 26: ...esses and harness catches are sitting correctly Failure of the restraining function can result in serious or even fatal injuries in the event of an accident Start driving only when all children either wear a cycling helmet or use a head rest and are properly belted Checking the weight distribution and tow bar load An optimum weight distribution is important for safe handling The load s centre of g...

Page 27: ...t too heavy f Reduce the baggage weight in the pouch for small items f Reduce the baggage weight in the storage space f Make sure that the loaded Kidgoo1 weighs less than 50 kg f Make sure that the loaded Kidgoo2 weighs less than 60 kg Connecting the trailer to a bicycle Danger Do not connect the Kidgoo to a bicycle until the following conditions have been fulfilled The trailer is fully loaded The...

Page 28: ...retaining strap with the carabiner hook into the eyelet on the tow bar f Remove the cotter pin from the coupling and pull the tow bar head out of the coupling f Reinsert the cotter pin into the coupling head and lock it in place f Stow the tow bar in the ready position as described in the chapter Mounting the tow bar on page 18 Using the comfort functions Using the climate functions Adjusting the ...

Page 29: ... Velcro fastener of the window film in the cabin and fold it down f To close secure the window film with the Velcro fastener again Rear ventilation window f To open roll up the cover and lock it with the top Velcro fastener f To close secure the cover with the Velcro fastener again Danger Open the ventilation windows on hot days or in heavy traffic in order to dissipate warm air and exhaust fumes ...

Page 30: ...bar forwards Caution Only fold up the cabin after it has been cleaned both inside and outside and is completely dry f Fold up the cabin by pressing both sides of the rear cabin frame all the way down f In order to take up less space you can also fold in the push handle and remove the wheels Caution Despitetheuseofweatherproofmaterial thecorrosioncannotbecompletelyeliminated De icing salts such as ...

Page 31: ...35 If necessary contact our service department or your local specialist dealer see Support information on page 34 Care Caution For cleaning use only water and domestic care agents such as detergents and textile care products soft cloths or impregnation and silicone spray Do not use any sharp edged tools or cleaning agents with a scouring effect Cleaning agents containing acids and solvents are als...

Page 32: ...nts described in the chapter Connecting the trailer to a bicycle on page 27 have been fulfilled Buggy mode Make sure that the buggy wheel can rotate freely Put the hand strap of the push handle around your wrist in order to prevent accidental rolling away Walker mode Make sure that the buggy wheel is secured facing straight ahead Put the hand strap of the push handle around your wrist in order to ...

Page 33: ... height between seat and cabin roof 70 cm 70 cm Legroom max length between backrest and foot rest 52 cm 52 cm Storage space back approx 45 l approx 55 l Weights Kidgoo1 Kidgoo2 Weight trailer mode cabin wheels push handle tow bar 16 2 kg 17 6 kg 1 x 20 wheel 1x buggy wheel 1x tow bar 1 4 kg 1 kg 0 61 kg 1 4 kg 1 kg 0 63 kg Wheels Kidgoo1 and Kidgoo2 Wheel Type 20 spoked wheel push in axle Tyres 20...

Page 34: ...s deemed improper use and is not covered by the warranty at all This warranty applies solely to the first owner and is non transferable Verbal agreements restrictions or reservations that go beyond the terms specified here have no bearing on the validity of this warranty The warranty regulations pertaining to your region also apply Tip You can easily register a warranty case online http service qe...

Page 35: ... Kidgoo1 from 2018 AKG1 18 SET AKG2 18 SET 7 Lower tube Kidgoo folding mechanism from 2018 URKGF 18 SET URKGF 18 SET 8 Upper frame Kidgoo folding mechanism set from 2018 OREKG1F SET OREKG2F SET 9 Joint top fold mechanism Kidgoo from 2018 Y GOFK 18 Y GOFK 18 10 Handlebar Kidgoo set HGKG1 18 SET HGKG2 18 SET 11 Head protector wheel guard 2018 addon KPNS 18 KPNS 18 12 Outer rod Kidgoo Y USKG1 18 Y US...

Page 36: ...hracite Art Nr Y B Q8 18 B Blue Art Nr Y B Q8 18 G Green Kidgoo2 Cover top Art Nr Y B Q9 18 A anthracite Art Nr Y B Q9 18 B Blue Art Nr Y B Q9 18 G Green Back rest from 2018 Art Nr Y KG1SB 18 Kidgoo1 Art Nr Y KG2SB 18 Kidgoo2 Toggle fastener with strap Art Nr KÖRD 55 Harness buckle Art Nr GRT 899 Belt padding from 2018 Art Nr GPMK 18 SET Crotch padding from 2017 Art Nr Z SCHPO 17 Head rest from 20...

Page 37: ...Kidgoo 2018 Subject to change 09 2020 37 ...

Page 38: ...Kidgoo 2018 Rev 210920 1454 Qeridoo GmbH Industriepark Nord 100 53567 Buchholz Germany www qeridoo de info qeridoo de ...

Reviews: