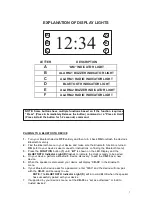
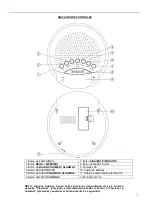
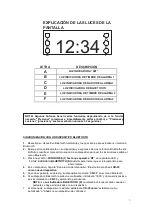
background image


SLEEP FUNCTION


This Alarm Clock can be set to play music for a set amount of time (10-60 minutes)  and 
then automatically  turn OFF using the SLEEP  Timer. 


To turn the SLEEP  Timer function 

ON 

simply press the 

SLEEP 

button 

(4) 

and “

90

” will 

show on the LED Display  indicating  the music will automatically  turn 

OFF 

after 90 minutes. 


To adjust the amount of time before the music will turn OFF, press the 

SLEEP 

button 

(4) 

repeatedly  until the correct amount of time (90 – 80 -70 – 60 – 50 – 40 – 30 – 20 – 

10 minutes)  is shown on the LED Display. 


To turn the SLEEP  Timer OFF continue  pressing  the 

SLEEP 

button 

(4) 

until the LED 

Display shows “

OFF

”. 


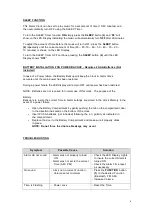
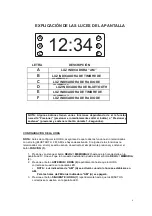
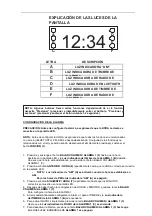
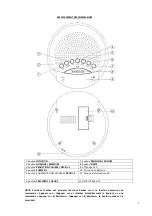
BATTERY  INSTALLATION  FOR POWER  BACKUP  - Requires  2 AAA Batteries  (Not


Included)


In case of a Power failure, the Battery Backup  will keep the Clock & Alarm times 
accurate until the main power has been restored. 

During a power failure the LED display will remain OFF until power has been restored. 

NOTE:   Batteries  are not required  for normal use of this clock.  The purpose  of the 

Battery 
Backup  is to insure the correct Time & Alarm settings  are stored in the Clock Memory  in the 
event of a power failure. 


• 

Open the Battery Compartment  by gently pushing  the tab on the compartment  door 
in the direction  indicated  on the bottom of the clock. 

• 

Insert 2 AAA batteries  (not included)  following  the 

+ / - 

polarity as indicated  in 

the compartment. 

• 

Replace  the door to the Battery Compartment  and make sure it properly  clicks 
in place. 

NOTE: Do not force the door as breakage  may occur.
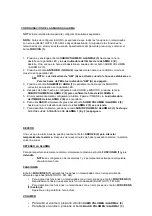
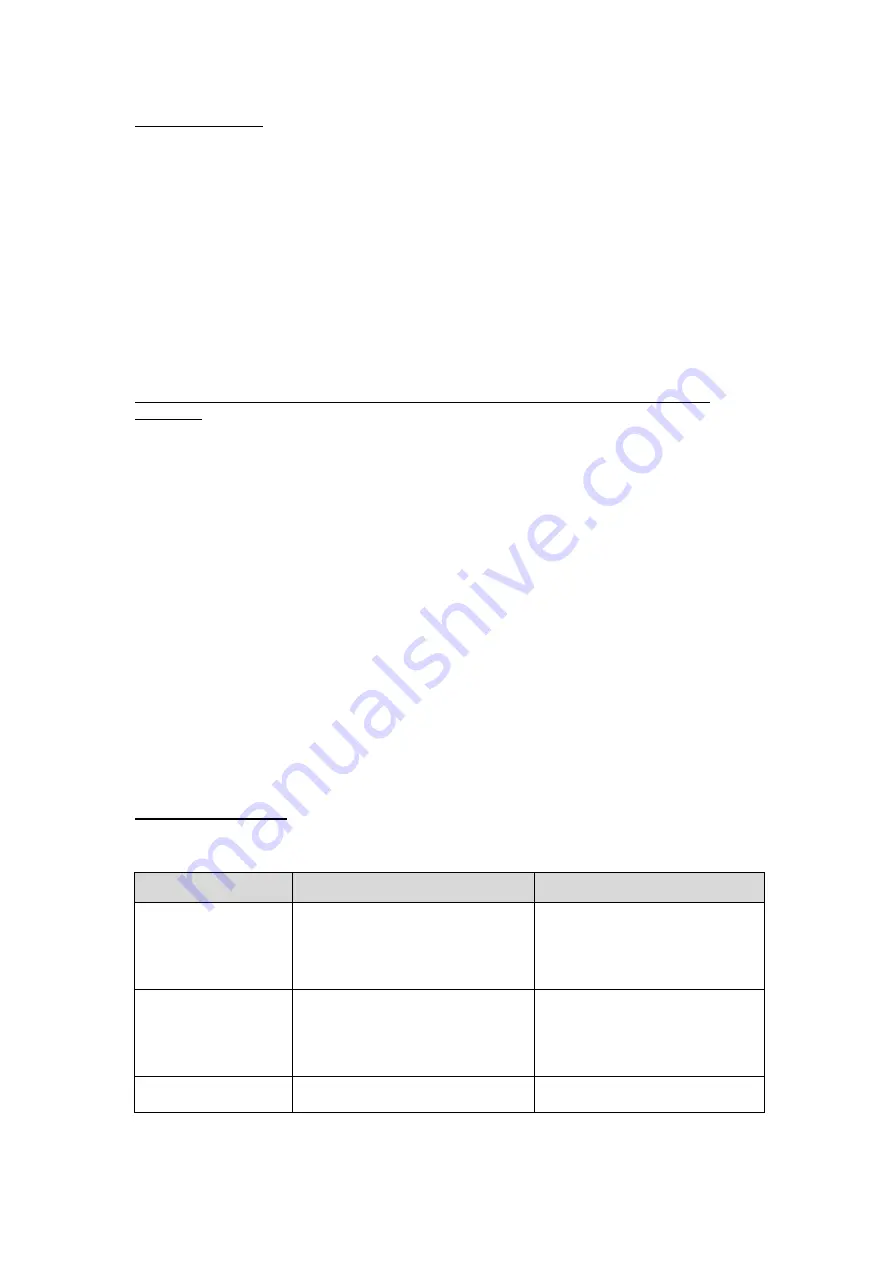


TROUBLESHOOTING


Symptom


Possible  Cause


Solution


Alarm did not sound 

- Alarm was not properly  turned 

ON. 

- Alarm was not set to the correct 

Time (AM / PM) 

- Check the LED Display  Lights 

to insure the correct Alarm is 
turned ON 

- Check the Alarm Time reset 

as necessary 

No sound 

- Clock not in correct Function. 
-   Volume  set at minimum 

- Press the 

FUNCTION 

button 

(1) 

to the desired  Function 

(Bluetooth,  FM, AM). 

- Increase  Volume. 

Time is Flashing 

-   Power Loss 

- Reset the Time 


Summary of Contents for CR-33

Page 1: ...e to radio communications However there is no guarantee that interference will not occur in a particular installation If this equipment does cause harmful interference to radio or television reception...

Page 2: ...tton 9 LED Display 4 SLEEP button 10 Battery Door 5 VOLUME UP ALARM 2 button 11 AC Power Cord 6 PREV HOUR button AC 120V 60Hz 3W NOTE Some buttons have multiple functions based on if the function requ...

Page 3: ...etting the TIME make sure all of the non clock functions BLUETOOTH FM AM are turned OFF If any of the non clock functions are playing turn the function OFF by simply pressing holding the FUNCTION butt...

Page 4: ...old the VOLUME DOWN ALARM 1 button 3 until the time flashes on the LED display and the ALARM 1 BUZZER Indicator Light B flashes Once the time is flashing you can release the VOLUME DOWN ALARM 1 button...

Page 5: ...LARM 2 BUZZER Indicator Light E will turn ON 6 To choose to wake to RADIO simply press the VOLUME UP ALARM 2 button 5 until the ALARM 2 RADIO Indicator Light F turns ON 7 To turn the ALARM OFF press t...

Page 6: ...r device and make sure the Bluetooth function is turned ON refer to your device s user manual for instructions on finding the Bluetooth menu 3 Press the FUNCTION button 1 until BT is shown on the LED...

Page 7: ...INUTE button 7 to tune to a higher numbered station or press the PREV HOUR button 6 to tune to a lower numbered station TIPS FOR BEST RECEPTION o The AM FM antennas are built in to the cabinet of this...

Page 8: ...ill remain OFF until power has been restored NOTE Batteries are not required for normal use of this clock The purpose of the Battery Backup is to insure the correct Time Alarm settings are stored in t...

Page 9: ...ple con los l mites para los dispositivos digitales de clase B de acuerdo con la parte 15 de las reglas de FCC Estos l mites est n dise ados para suministrar protecci n razonable contra interferencia...

Page 10: ...3 Desconecte este aparato durante tormentas el ctricas o cuando no lo use por mucho tiempo S3125A 14 Asigne toda clase de mantenimiento a personal calificado Se le debe hacer mantenimiento al aparato...

Page 11: ...Bot n de SUSPENSI N 10 Puerta de bater as 5 Bot n de SUBIR VOLUMEN ALARMA 2 11 Cable de alimentaci n el ctrica CA 6 Bot n ANTERIOR HORAS 120V 60Hz 3W CA NOTA Algunos botones tienen varias funciones de...

Page 12: ...rese de que todas las funciones no relacionadas con el reloj BLUETOOTH FM AM se hayan desactivado Si alguna de las funciones no relacionadas con el reloj se est usando desact vela al simplemente presi...

Page 13: ...nga el bot n BAJAR VOLUMEN ALARMA 1 3 hasta que la hora destelle en la pantalla LED y la Luz indicadora del timbre de la ALARMA 1 B destelle Una vez que la hora est destellando puede soltar el bot n B...

Page 14: ...te configurar la Alarma 2 para el TIMBRE y la Luz indicadora del TIMBRE de la ALARMA 2 E se encender 6 Para usar RADIO simplemente presionar el bot n SUBIR VOLUMEN ALARMA 2 5 hasta que la Luz indicado...

Page 15: ...6...

Page 16: ...de que la funci n Bluetooth est Activa consulte el manual del usuario de su dispositivo para ver las instrucciones sobre el men Bluetooth 3 Presione el bot n FUNCIONES 1 hasta que aparezca BT en la p...

Page 17: ...una emisora mayor o presione la el bot n ANTERIOR HORA 6 para sintonizar una emisora menor CONSEJOS PARA OBTENER LA MEJOR RECEPCI N o Las antenas de AM FM est n integradas en el gabinete de este repr...

Page 18: ...nerg a se restaure NOTA no se necesitan bater as para el uso normal de este reloj El prop sito de las bater as Sirven como respaldo energ tico con el fin de garantizar la configuraci n de la hora y la...

Page 19: ...munications radio peuvent tre caus es Cependant il n y a aucune garantie que l interf rence ne se produira pas dans une installation particuli re Si cet quipement provoque des interf rences nuisibles...

Page 20: ...0 Porte de la Batterie 5 bouton AUGMENTATION VOLUME R VEIL 2 11 Cordon d alimentation CA 6 bouton PRECEDENT HEURE CA 120V 60Hz 3W NOTE Certaines touches ont plusieurs fonctions bas es sur si la foncti...

Page 21: ...nctions non horloge BLUETOOTH FM AM sont d sactiv es Si l une des fonctions non horloge est en marche d sactiver la fonction en appuyant simplement sur et en maintenant le bouton FONCTION 1 1 Appuyez...

Page 22: ...UCTION VOLUME R VEIL 1 3 jusqu ce que l heure clignote sur l afficheur LED et le voyant BUZZER R VEIL 1 B clignote Une fois que l heure clignote vous pouvez rel cher le bouton REDUCTION VOLUME R VEIL...

Page 23: ...6 jusqu ce que l heure correcte soit affich e sur l afficheur LED NOTE Le Voyant AM A va s allumer quand l heure est r gl e sur AM Pour les heures PM le voyant AM A va s teindre 3 Appuyez sur le bout...

Page 24: ...eure pour le lendemain FONCTION Le bouton FONCTION 1 va activer les fonctions non horloge et faire d filer les diff rentes options de fonction BLUETOOTH FM AM Pour activer les fonctions non horloge ap...

Page 25: ...oth est activ e voir le manuel d utilisation de votre appareil pour obtenir les instructions sur la recherche dans le menu Bluetooth 3 Appuyez sur le bouton FONCTION 1 jusqu ce que BT soit affich sur...

Page 26: ...ion de num ro sup rieur ou appuyez sur le bouton PRECEDENT HEURE 6 pour syntoniser une station de num ro inf rieur CONSEILS POUR LA MEILLEUR RECEPTION Les antennes AM et FM sont int gr es dans le cabi...

Page 27: ...stera OFF jusqu ce que le courant soit restaur NOTE Les piles ne sont pas n cessaires pour une utilisation normale de cette horloge Les piles de secours sont destin es assurer que les r glages Heure R...

Page 28: ......

Reviews: