


FX-180 GUIDE
Questions? Comments? Contact Us Anytime
Preguntas? Comentarios? Contáctenos en cualquier momento
Des questions? Commentaires? Contactez-nous à tout moment
1-800-864-CLUB (2582)
Mon-Fri 9AM - 5PM (PST)
support@qfxusa.com
Mon-Fri 9AM - 5PM (PST)
FOLLOW US @QFXUSA
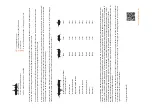
• Conecte el arnés de cableado al puerto de clavijas
múltiples en la parte posterior de la unidad.
• La unidad funciona con altavoces de 4 a 8 ohmios (se
permite un mínimo de 2 ohmios).
• Instale un fusible dentro del portafusibles en línea que sea
del mismo tipo de fusible que se usa en su automóvil.
• Conecte el cable negro a tierra oa la parte metálica de la
carrocería del automóvil.
• Conecte el cable amarillo de la memoria de alimentación a
una alimentación de +12 V CC y luego a otras conexiones
de cable. Luego conecte el cable rojo a ACC.
• Conectar las conexiones de antena de radio, audio y video.
• Asegúrese de que todas las conexiones de cables sean
correctas antes de encender la unidad para asegurarse
de que no haya cables en cortocircuito o conectados a
tierra.
• El cableado inadecuado puede causar daños a la unidad.
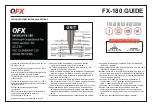
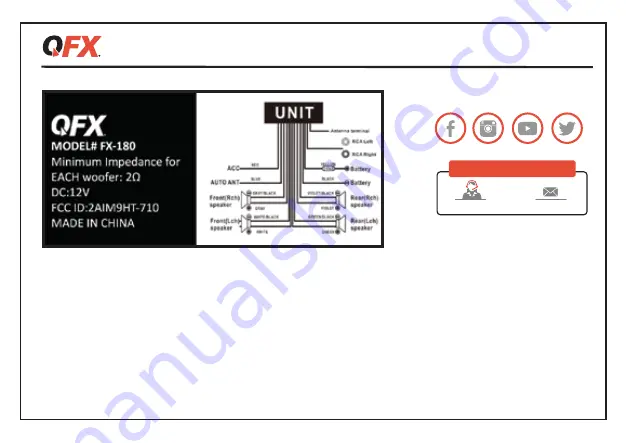
• Connect the wiring harness to the multi-pin port on
the back of the unit.
• The unit operates using speakers from 4 to 8 ohms
(minimum 2 ohms allowed).
• Install a fuse inside the inline fuse holder that is the
same type fuse used in your automobile.
• Connect the black wire to ground or the metal part
of the car body.
• Connect the yellow power memory wire to +12VDC
power then other cable connections. Then connect
the red wire to ACC.
• Connect radio antenna, audio and video
connections.
• Make sure all wire connections are correct before
powering unit on to assure no wires are
short-circuiting or grounding.
• Improper wiring may cause damage to the unit.
• Connectez le faisceau de câbles au port multi-broches à
l'arrière de l'appareil.
• L'appareil fonctionne avec des haut-parleurs de 4 à 8 ohms
(minimum 2 ohms autorisés).
• Installez un fusible à l'intérieur du porte-fusible en ligne qui
est du même type que celui utilisé dans votre automobile.
• Connectez le fil noir à la masse ou à la partie métallique de
la carrosserie de la voiture.
• Connectez le fil jaune de la mémoire d'alimentation à
l'alimen12VDC puis aux autres connexions de
câble. Connectez ensuite le fil rouge à ACC.
• Connectez l'antenne radio, les connexions audio et vidéo.
• Assurez-vous que toutes les connexions de fils sont
correctes avant de mettre l'appareil sous tension pour
vous assurer qu'aucun fil n'est court-circuité ou mis à la
terre.
• Un câblage incorrect peut endommager l'appareil.
AUDIO/VIDEO/POWER/ANTENNA CONNECTIONS


