background image

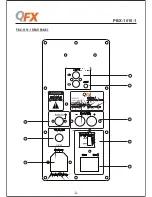
PBX-1010-1 FRONT PANEL

-3-

PBX-1010-1

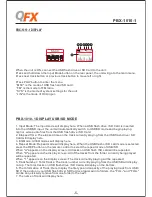
1. LINE1 Input (RCA): The RCA Input is designed to connect directly to a CD/DVD/TV or any 
other stereo level audio device.
Please note that there are two LINE Inputs, RCA and 1/8

. If both the RCA and 1/8

inputs are 

connected the unit is automatically play from the 1/8

 Line input. To play from the RCA Line input, 

please disconnect the 1/8

 connection from the 1/8

 Line Input.

2. LINE2 Input(1/8"): The 1/8

 Line Input is designed to connect directly to a mp3 player or any 

other stereo level audio device. Please note that there are two LINE Inputs, RCA and 1/8

If both the RCA and 1/8

inputs are connected the unit is automatically play from the 1/8


Line input. 
3.DC 12V IN is for connecting to 12V external battery if needed.
4.Voltage Selector 120V-240V. Be sure the unit's voltage in the outlet you are using.
5.Power Supply: The power switch should be set to the off position before the power supply is 
connected.
6. Power Button: Press this button to power the unit on, off or to charge the unit. If the battery 
needs to be charged, set the unit to AC and connect the power cable to the rear of the unit. When 
set to AC, the unit can also be powered by an external power supply (electrical outlet) even if the 
battery is dead. In this case you need to have the unit set to the voltage corresponding to the 
voltage of the outlet. To turn the unit off set the power button to OFF. It is recommended to fully 
charge the battery prior to using the unit for the first time. It is also recommended to charge the 
battery at least every 2-3 months to keep the battery operating to it highest capacity.
7.12V FUSE:Provided battery is damaged or internal short circuit, the fuse will be burnt in order 
to protect the machine &battery. The unit can work well after replace a new fuse.
8.Antenna is for receiving the FM signal. Before use, pull up the telescopic FM antenna. After use,
pack up the FM antenna to better protect it.

Summary of Contents for PBX-1010-1

Page 1: ...www qfxusa com PBX 1010 1 120V 240V 60W RMS User Manual for PBX 1010 1 Portable Speaker...

Page 2: ...e it by holding the plug not by pulling the cord 10 Unplug the unit during lightning storms or when unused for long periods of time 11 When wiring this unit and all other equipment used in connection...

Page 3: ...PBX 1010 1 REAR PANEL 2 PBX 1010 1 1 3 6 7 8 2 4 5...

Page 4: ...tch should be set to the off position before the power supply is connected 6 Power Button Press this button to power the unit on off or to charge the unit If the battery needs to be charged set the un...

Page 5: ...l only work for USB flash drive or SD card inputs 8 Input Mode Button Press this button to toggle between the various inputs LINE USB SD FM 9 Microphone Input 1 4 Connect a microphone to this micropho...

Page 6: ...ash drive SD Card will display here 3 EQ Mode All EQ modes will display here 4 Repeat Mode Repeat mode will display here When the USB flash or SD card mode is selected press the REP button on the remo...

Page 7: ...the unit is ON you can set the alarm after you adjust the correct time of the unit Alarm Cycle You can select the unit s alarm ring once ring daily and ring multi day Alarm Music You can select the t...

Page 8: ...10 1 will play while also charging the battery When the battery is full the charging indicator light on the front panel will OFF 2 Upon completion of the charging Please disconnect the power cable 3 I...

Page 9: ...r volume for USB SD LINE FM 8 REP Press this button to repeat the playing track for USB flash drive or SD card 9 Previous Track Press this button to select the previous track for USB flash drive or SD...

Page 10: ...de la tomacorriente s calo sosteniendo el enchufe sino el cable 10 Desenchufe el aparato cuando encuentra el tiempo de las tormentas o no utilice durante un per odo largo 11 Aseg rese de que todo el...

Page 11: ...PBX 1010 1 VERDADERO PANNEL 10 PBX 1010 1 1 3 6 7 8 2 4 5...

Page 12: ...r en la posici n de Off antes de conectar fuente de alimentaci n de corriente 6 Bot n de encender Pulse este bot n para encender y apagar el aparato o para cargar Si la bater a necesita cargar ajuste...

Page 13: ...ales 7 El bot n del mpdo EQ Click este bot n para seleccionar 5 modos de EQ y s lo entrar el drive USB flash o la tarjeta SD 8 Bot n de Modo entrado Pulse este bot n para cambiar entre las distintas e...

Page 14: ...SD 2 El tiempo el tiempo de la m sica del USB flash la tarjeta SD mostrar aqu 3 El modo de EQ todos los modos de EQ mostrar aqu 4 El modo repito el modo repito se mostrar aqu Si seleccionar el modo de...

Page 15: ...el modo de apagar el monitor Keypad Tones Select ON or OFF for the keypad tone El despertador encenderlo y puede establecer el despertador desp es ajustar la hora correcta El ciclo del despertador Pue...

Page 16: ...conecta a la fuente de corriente Cuando la bater a est completamente cargada la luz del indicador de carga de tablero va a apagar 2 Al terminar la carga desconecte el cable de alimentaci n de corrient...

Page 17: ...se este bot n para descender el volumen general para USB SD LINE FM 8 REP Pulse este bot n para repetir la pista de flash USB o tarjeta SD 9 Pista anterior Pulse este bot n para elegir la pista anteri...

Page 18: ......

Reviews: