background image

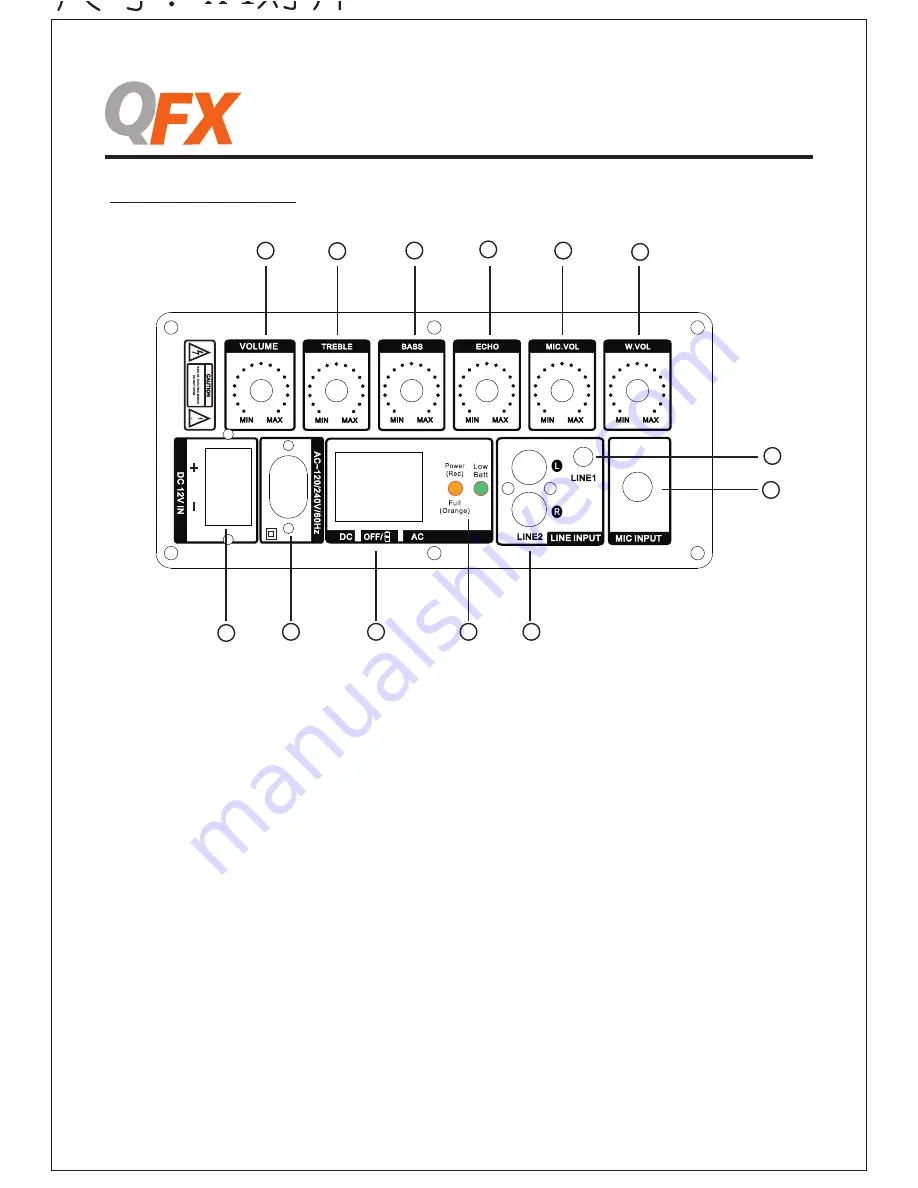
PBX-2008-1 REAR PANEL

-2-

PBX-2008-1

1

3

6

7

8

2

4

5

9

10

11

12

13

1. Master Level Control: Turn this knob to adjust the master volume.
2. Treble adjustment: Turn this knob to increase the treble on the LINE/USB/SD/FM inputs
3. Bass adjustment: Turn this knob to increase the bass on the LINE/USB/SD/FM inputs
4. Microphone Echo Knob: Use this knob to adjust the echo for the microphone input.
5. Microphone Volume Knob: Turn this knob to adjust the microphone volume level of the 
microphone input.
6. Wireless Microphone Volume Knob: Turn this knob to adjust the microphone volume level 
of the wireless microphone input.
7. LINE1 Input (RCA): The RCA Input is designed to connect directly to a CD/DVD/TV or any 
other stereo level audio device.
Please note that there are two LINE Inputs, RCA and 1/8”. If both the RCA and 1/8”inputs are 
connected the unit is automatically play from the 1/8” Line input. To play from the RCA Line 
input, please disconnect the 1/8” connection from the 1/8” Line Input.
8. Microphone Input(1/4"): Connect a  microphone to this microphone input terminal.
9. LINE2 Input(1/8"): The 1/8” Line Input is designed to connect directly to a mp3 player or any 
other stereo level audio device. Please note that there are two LINE Inputs, RCA and 1/8”. If both
the RCA and 1/8”inputs are connected the unit is automatically play from the 1/8” Line input. 
10. Charge Indicator: When you are charging the battery, the charge indicator will illuminate RED. 
Once fully charged the indicator will illuminate orange. The low Battery indicator will illuminate 
GREEN. 
11. Power Switch: There are three possible settings. Setting the unit to DC will allow the unit to 
play using only internal battery. If the unit's battery is not charged, you can set the unit to AC. In 
this setting the unit will still charge, but it will do very slowly. To charge the unit properly, set the 
unit to OFF.
12. Power Supply: The power switch should be set to the off position before the power supply is 
connected.
13. 3.DC 12V IN is for connecting to 12V external battery if needed.

Summary of Contents for PBX-2008-1

Page 1: ...www qfxusa com PBX 2008 1 120V 240V 30W RMS User Manual for PBX 2008 1 Portable Speaker...

Page 2: ...e it by holding the plug not by pulling the cord 10 Unplug the unit during lightning storms or when unused for long periods of time 11 When wiring this unit and all other equipment used in connection...

Page 3: ...nput please disconnect the 1 8 connection from the 1 8 Line Input 8 Microphone Input 1 4 Connect a microphone to this microphone input terminal 9 LINE2 Input 1 8 The 1 8 Line Input is designed to conn...

Page 4: ...08 1 1 2 1 Antenna is for receiving the FM signal Before use pull up the telescopic FM antenna After use pack up the FM antenna to better protect it 2 Voltage Selector 120V 240V Be sure the unit s vol...

Page 5: ...P button on the remote control to select the one repeat for playing track for USB SD Press again to cancel rep eat mode 2 Track Number The track number currently playing from the USB SD will display 3...

Page 6: ...ill play while also charging the battery When the battery is full the charging indicator light on the front panel will illuminate orange 2 Upon completion of the charging Please disconnect the power c...

Page 7: ...ot n para descender el volumen general para USB SD LINE FM 8 REP Pulse este bot n para repetir la pista de flash USB o tarjeta SD 9 Pista anterior Pulse este bot n para elegir la pista anterior de fla...

Page 8: ...aca el cable de la tomacorriente s calo sosteniendo el enchufe sino el cable 10 Desenchufe el aparato cuando encuentra el tiempo de las tormentas o no utilice durante un per odo largo 11 Aseg rese de...

Page 9: ...cr fono a este terminal entrado de micr fono 9 L NEA 2 de entrada 1 8 La entrada 1 8 est dise ado para conectarse directamente a mp3 player o cualquier otro dispositivo est reo Tenga en cuenta que hay...

Page 10: ...2 1 Antena sirve para recibir la se al de FM Antes de usar tire la antena telesc pica de FM despu s de su uso regoge bi n para que no lo da e 2 Elege tenci n 120V 240V Aseg rese de que voltaje de alt...

Page 11: ...el bot n REP de delemando a distancia para repetir la pista de USB SD Pulse de nuevo para cancelar el modo de repetici n 2 N mero de la pista El sistema mostrar la cantidad de las pistas de USB SD que...

Page 12: ...ta a la fuente de corriente Cuando la bater a est completamente cargada la luz del indicador de carga de tablero va a se iluminar de naranja 2 Al terminar la carga desconecte el cable de alimentaci n...

Page 13: ...ot n para descender el volumen general para USB SD LINE FM 8 REP Pulse este bot n para repetir la pista de flash USB o tarjeta SD 9 Pista anterior Pulse este bot n para elegir la pista anterior de fla...

Page 14: ......

Reviews: