background image

23 


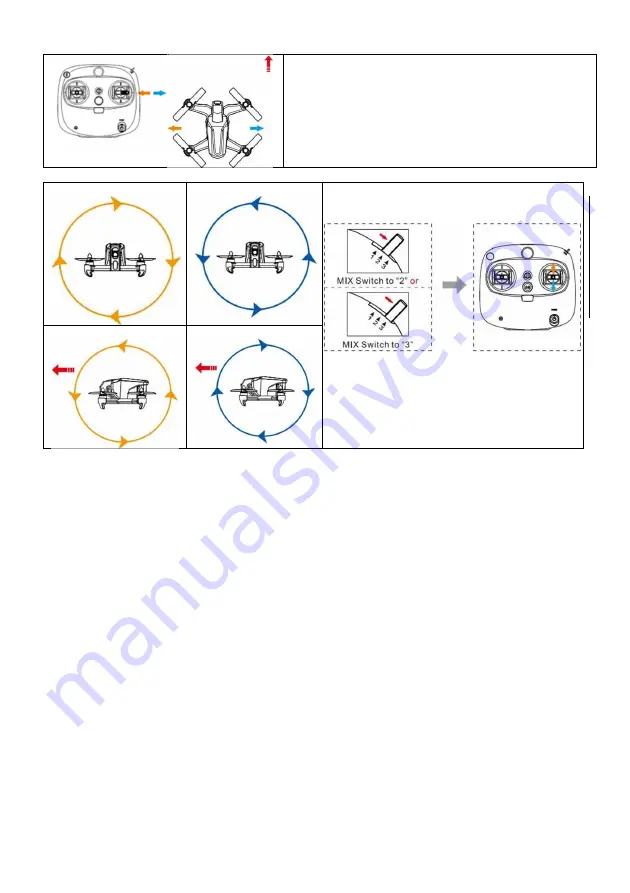
Roll ( lean ) left /right 


Use right stick right or left to control the roll rate ( lean ) of the aircraft


Drone Rolls left 


Drone rolls right


Stunts : flip & roll’s 


Are only available in mode 2 or 3 


Attention : 
- Always select wide open spaces for flying 
- Rolls and flips are best suited for experienced pilots. 
- Match throttle power to carefully manage altitude. 


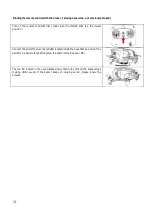
Drone Flips forward 


Drone Flips backward 


7) Flight test 
- Put the aircraft on a leveled placed at 5 meters from any person / obstacle, place mix switch to 1, power on the drone and 
the remote controller, wait until the drone stops beeping. 
- Press the middle button to arm the motors / carefully take off / carefully test any  controls. 
- Land the aircraft / disarm using the middle button / then remove the battery / put the remote controller off / test is over 
- You could use any 5.8Ghz video receiving equipement to get FPV video. 
 
 
Recommendation
 
- Always use flight mode 1 « Stabilized » for take off and first flights. Don’t hesitate to switch to this mode when you encounter 
some difficulties. 
 
Loss of signal 
- As the remote controller signal is loss, the motors speed lowers so the drone loose its altitude slowly, allowing to regain 
control over it in most cases, or allowing him to land on its own. The buzzer might help you to locate it in the forest / grass. 
 
8) Gyroscope and attitude calibration 
When the aircraft deviates with a large range, you need to calibrate the gyroscope and attitude. 
1) Put the aircraft on a horizontal place and power it on 
2) Turn on the remote controller, push the left stick to top right corner and right stick to top left corner at the same time, the 

Summary of Contents for Gimini

Page 1: ...Guide de l utilisateur User guide Manual de usuario Bedienungsanleitung Manuale dell utente Gebruikshandleiding...

Page 2: ......

Page 3: ...de la batterie 4 Animaux domestiques 4 1 Contenu de l emballage 4 2 Familiarisez vous avec votre drone 5 3 T l commande 5 4 Sp cifications 6 5 Pr paration du drone pr alable au vol 6 6 Recharger la ba...

Page 4: ...u lorsque les conditions de visibilit sont insuffisantes ex pendant la nuit Si vous l utiliser dans des conditions humides ex vous ne devez pas le faire atterrir sur l eau ou sur une surface humide du...

Page 5: ...tre appareil sous la pluie ni proximit d une source d humidit Ne mettez pas la batterie dans un four micro ondes ou un r cipient sous pression Ne cherchez pas d monter percer d former couper la batter...

Page 6: ...coller d buter en mode 1 Veuillez rester prudent quand l utilisation du mode 3 Full Acro vous pourrez n importe quel moment revenir en mode 1 stabilis pensez conserver une altitude minimum de 10 m tre...

Page 7: ...rash pouvant tre tr s grave pour le drone Lorsque la tension est inf rieure 7 V les feux avant et arri re se mettent clignoter l alarme se d clenche vous disposez alors d un maximum d une minute pour...

Page 8: ...is locales avant de d coller ne volez jamais moins de 30 m tres de toute personne animal v hicule habitation 6 Recharger la batterie Veuillez user la batterie fournie ou une batterie avec ces sp cific...

Page 9: ...vrir le compartiment 2 Inserez la batterie dans le drone connectez la batterie puis fermez le cache Ajuster l angle de la cam ra Utilisez un tournevis afin de d serrer les vis des deux c t s de la t t...

Page 10: ...La diode rouge du nez de l appareil clignote de plus en plus lentement jusqu disparaitre le buzzer s arr te le drone est associ la t l commande avec succ s Armer D sarmer Maintenez le levier des gazs...

Page 11: ...e drone sera inclin vers l avant et vole vers l avant Abaissez le levier le drone sera inclin vers l arri re et vole vers l arri re Lorsque le levier est au point mort la direction avant et arri re du...

Page 12: ...st termin Consignes de s curit relatives aux vols Utilisez le mode D butant chaque fois que vous utilisez le drone pour le d coller D collage Il faut contr ler la vitesse de d cente lors de l atterris...

Page 13: ...tance en termes de qualit et de port e Commutateurs de fr quence Position on Position off Vous pouvez galement retirer le d trompeur afin d augmenter significativement la puissance de votre metteur vi...

Page 14: ...13 Tableau de correspondance canaux en haut fr quence en Mhz au milieu et position des commutateurs au dessous...

Page 15: ...t susceptibles d tre modifi es tout moment sans pr avis Les explications et les sp cifications contenues dans ce manuel sont consid r es exactes au moment de l impression Le plus grand soin a t pris l...

Page 16: ...17 1 Package contents 17 2 Get to know your aircraft 18 3 Remote controller 18 4 Specifications 19 5 Preparation of the drone before the flight 19 6 Recharge the battery 20 7 Flight test 23 8 Gyrosco...

Page 17: ...ou allow sand or dust to penetrate the Gimini Drone you obstruct the engine s air vents you use spare parts and accessories other than those specified or you use the Gimini Drone near strong magnetic...

Page 18: ...the charger with a solvent denatured alcohol or other inflammable solvents It is essential to avoid short circuits Avoid direct contact with the electrolyte contained within the battery The electroly...

Page 19: ...t modes stabilized intermediate advanced Please always start with mode 1 Be careful with mode 3 full acro you can anytime get back to mode 1 when not feeling confident please keep at least an altitude...

Page 20: ...you must land the drone quickly It is necessary to take this alarm seriously to avoid a crash that can be very serious for the drone When the voltage is less than 7 V the front and rear lights will f...

Page 21: ...rol signal Always check local laws before flying Never fly in public filled with people 6 Recharge the battery Please une the lipo battery EC2 plug 2S 850mAh 25C 8 4V fully charged Dont use any higher...

Page 22: ...e stick is a the lowest position Connect the aircraft power the red LED located inside the nose flashes and put the aircraft on a horizontal position place the buzzer will produce a BB The red led loc...

Page 23: ...d LED turns off Operation Instructions Remote controller Aircraft posture head direction Instructions Throttle up down Use the left throttle stick up and down to gain loose altitude Please use this st...

Page 24: ...ing the middle button then remove the battery put the remote controller off test is over You could use any 5 8Ghz video receiving equipement to get FPV video Recommendation Always use flight mode 1 St...

Page 25: ...tuning There are 40 optional channels please select the best channel according to the image quality on your screen Adjust the dip switch to select the channel as the below diagram Code switch Code Swi...

Page 26: ...25 Table for channel up Frequency in Mhz middle and code switch diagram below...

Page 27: ...ademark of JLCA Holding Modifications The explanations and specifications in this guide are given for information only and may be modified at any time without prior notice The explanations and specifi...

Page 28: ...s dom sticos 29 1 Contenido del paquete 30 2 Conozca su aeroplano 31 3 Mando a distancia 31 4 Especificaciones 32 5 Prepare la aeronave 32 6 Cargar la batar a 33 7 Prueba de vuelo 36 8 Calibracion del...

Page 29: ...ersonas animales y bienes No toque el dron Gimini cuando las h lices est n rotando y espere a que estas se detengan completamente antes de manipular el dron Gimini Deber asegurarse de que nadie est pa...

Page 30: ...rgadas deben retirarse de la unidad Las bater as recargables deben retirarse de la unidad antes de cargarlas No intente recargar las bater as no recargables Cargue la bater a a una temperatura entre 0...

Page 31: ...Utilizar el dron Gimini en compa a de un perro puede ocasionar que este se comporte de forma err tica o tal vez incluso peligrosa 1 Contenido del paquete Imagen Nombre Imagen Nombre 1 dron 1 bater a...

Page 32: ...vanced In cielo siempre en el modo 1 Tenga cuidado con el modo 3 full acro puede volver al modo 1 en cualquier momento si no se siente seguro Mant ngalo a una altura m nima de 10 metros antes de reali...

Page 33: ...o de frecuencias 2408 to 2475 Mhz Mando a distancia 6 channels 2 4 Ghz 20 dbM 80mA 4 AA batteries 600 meters no interferences C mara 600 TVL PAL NTSC format 4 3 FOV H 120 V 100 CMOS 1 4 Alarma de carg...

Page 34: ...vuelo Nunca lo haga volar en p blico con muchas personas 6 Cargar la bater a Se recomienda encarecidamente utilizar una bater a LiPo EC2 plug 2S 850mAh 25C 8 4V cargada completamente No utilice bater...

Page 35: ...timbre emitir un pitido doble El LED rojo situado en la nariz parpadear lentamente y se apagar y el timbre dejar de emitir el pitido doble Si el timbre sigue emitiendo el sonido repita el proceso Blo...

Page 36: ...n el punto medio si no est seguro Desviarse girar hacia la izquierda derecha El eje de desv o se usa para controlar la direcci n del dron Empuje la palanca izquierda hacia izquierda o derecha para aju...

Page 37: ...rueba ha terminado Puede utilizar cualquier equipo receptor de v deo de 5 8 Ghz para recibir el v deo FPV Recomendaci n Utilice siempre el modo de vuelo 1 Estabilizado para despegar y realizar los pri...

Page 38: ...con la calidad de imagen de la pantalla Ajuste el interruptor DIP para seleccionar el canal seg n se muestra en el diagrama siguiente Interruptor de c digo Interruptor de c digo encendido Interruptor...

Page 39: ...38 Tabla de canal arriba frecuencia en Mhz centro y diagrama de interruptor de c digo abajo...

Page 40: ...de Wi Fi Alliance QIMMIQ es una marca registrada de JLCA Holding Modificaciones Las explicaciones y especificaciones contenidas en esta gu a son de car cter meramente informativo y podr n modificarse...

Page 41: ...1 Laden 42 Verwendung und Lagerung 42 Batterien und Akkus entsorgen 42 Haustiere 42 1 Paketinhalt 43 2 Lernen Sie Ihr Flugger t kennen 44 3 Fernsteuerung 44 4 Spezifikationen 45 5 Vorbereitung des Flu...

Page 42: ...Gimini Drohne von Hochspannungsleitungen B umen Geb uden und anderen m glichen Gefahrenbereichen fern Die Leistung der Gimini Drohne kann unter folgenden Umst nden beeintr chtigt oder bedeutend reduzi...

Page 43: ...erhalb des Zugriffs von Kindern auf Setzen Sie den Akku nicht Hitze aus und verbrennen Sie ihn nicht Lassen Sie den Akku nicht in Kontakt mit Fl ssigkeiten kommen Lassen Sie Ihr Ger t nicht im Regen...

Page 44: ...43 1 Paketinhalt Bild Bezeichnung Bild Bezeichnung 1 x Drohne 1 x Akku 1 x Impulsgeber 1 x Ladeger t 8 x 3545 Propeller 1x Werkzeug Set...

Page 45: ...cro Falls Sie sich unsicher f hlen k nnen Sie jederzeit zum Modus 1 zur ckkehren Bitte behalten Sie eine Flugh he von mindestens 10 Metern bei bevor Sie Kunstst cke fliegen Mode 1 hozizon stabilized D...

Page 46: ...zbereich 2408 to 2475 Mhz Fernsteuerung 6 channels 2 4 Ghz 20 dbM 80mA 4 AA batteries 600 meters no interferences Kamera 600 L PAL NTSC format 4 3 FOV H 120 V 100 CMOS 1 4 Alarm f r geringen Ladezusta...

Page 47: ...egen Sie niemals in ffentlichen Bereichen in denen Menschenansammlungen vorkommen 6 Abbildung Laden Sie den Akku auf Es wird dringend empfohlen ausschlie lich LiPo Akkus EC2 plug 2S 850mAh 25C 8 4V vo...

Page 48: ...l che woraufhin der Ortungspiepser einen BB Ton von sich gibt Das Blinken der roten LED wird langsamer erlischt und auch der BB Ton des Ortungspiepsers stoppt Falls der Ortungspiepser noch immer Ger u...

Page 49: ...h unsicher sind bewegen Sie diesen Steuerhebel auf die mittlere Position Nach links rechts gieren drehen Die Gierachse l sst Sie den Kurs der Drohne bestimmen Bewegen Sie den linken Steuerhebel nach l...

Page 50: ...nd schalten Sie die Fernbedienung aus um den Testflug zu beenden Um FPV Videos zu erstellen k nnen Sie ein beliebiges Ger t verwenden das 5 8 Ghz Videosignale empf ngt Empfehlung Verwenden Sie zum Abh...

Page 51: ...Kanal gem der Bildqualit t auf Ihrem Bildschirm F r die Auswahl des Kanals stellen Sie den DIP Schalter wie in folgender Abbildung dargestellt ein Codierschalter Codierschalter an Codierschalter aus...

Page 52: ...51 Tabelle f r den Kanal oben die Frequenz in Mhz mittig und die Abbildung der Codierschalterstellung unten...

Page 53: ...arke von Apple Inc WLAN ist eine Marke der Wi Fi Alliance QIMMIQ ist eine Marke der JLCA Holding Ver nderungen Erkl rungen und Spezifikationen in dieser Bedienungsanleitung dienen nur als Referenz und...

Page 54: ...nto della batteria 55 Animali domestici 55 1 Contenuto della confezione 55 2 Descrizione del drone 56 3 Radiocomando 56 4 Specifiche tecniche 57 5 Preparazione del drone 57 6 Carica della batteria 58...

Page 55: ...ilizza Gimini Drone in condizioni di bagnato es non si deve far atterrare Gimini Drone sull acqua o su superfici bagnate si lascia che sabbia o polvere penetrino in Gimini Drone si ostruiscono le pres...

Page 56: ...e di smontare forare piegare o tagliare la batteria e non tentarne la riparazione Non collocare oggetti pesanti sulla batteria o sul caricabatterie Non far cadere la batteria Non pulire il caricabatte...

Page 57: ...CW 7 ESC CCW 11 Spinotto batteria 4 LED 8 Impostazione frequenza 12 Antenna passiva 2 4 Ghz 3 Radiocomando Il drone Gimini dotato di 3 utili modalit di volo stabilized intermediate advanced Cominciar...

Page 58: ...Base 150mm Eliche 3545 ESC 20A Batteria 7 4V 850Mah 25C 2S lipo Motore senza spazzole 1308 KV4500 Controller di volo SPRacing F3 Trasmissione immagini 5 8Ghz 40 channels Potenza in uscita trasmettito...

Page 59: ...ma di maneggiarlo Non far volare il drone in prossimit di linee dell alta tensione antenne di telefonia mobile o antenne radio in quanto potrebbero disturbare il segnale di controllo Consultare sempre...

Page 60: ...LED rossa sulla punta del drone lampegger poi mettere il drone in posizione orizzontale il cicalino emetter un BB La spia LED rossa sulla punta del drone lampegger lentamente per poi spegnersi e il c...

Page 61: ...stra destra L asse di imbardata utilizzato per controllare la direzione del drone Spostare la leva sinistra verso sinistra o destra per regolare la direzione Inclinazione in avanti all indietro Sposta...

Page 62: ...la ricezione di video a 5 8 Ghz per ottenere un video con visuale in prima persona Suggerimento Utilizzare sempre la modalit di volo 1 stabilizzato per il decollo e i primi voli Passare subito a ques...

Page 63: ...alla qualit dell immagine sullo schermo Regolare il commutatore per selezionare il canale come indicato nello schema qui sotto Interruttore codice Interruttore codice attivo Interruttore codice disatt...

Page 64: ...63 Tabella dei canali alto frequenza in Mhz centro e schema codice basso...

Page 65: ...JLCA Holding Modifiche Le spiegazioni e le specifiche in questa guida sono fornite a puro titolo informativo e possono essere modificate in qualsiasi momento senza preavviso Le spiegazioni e le specif...

Page 66: ...weggooien 67 Huisdieren 67 1 Leveringsomvang 67 2 Leer uw drone kennen 68 3 Afstandsbediening 68 4 Specificaties 69 5 Bereiding van de stand UAV vlucht 70 6 Laad de batterij 70 7 Testvlucht 73 8 Gyros...

Page 67: ...bomen gebouwen en enigerlei andere mogelijke gevaarlijke gebieden De prestatie van uw Gimini Drone kan worden aangetast of ernstig worden gereduceerd en uw Gimini Drone kan onomkeerbaar beschadigd ra...

Page 68: ...t bloot aan hitte en gooi hem niet in het vuur Vermijd dat de accu in contact komt met enigerlei vorm van vloeistof Laat uw apparaat niet in de regen of in de buurt van een bron van vocht liggen Doe d...

Page 69: ...C CCW 11 Batterijstekker 4 Verlichting LED 8 Frequentie instellingen 12 2 4Ghz passieve antenne 3 Afstandsbediening De Gimini drone biedt 3 handige vluchtmodi gestabiliseerd gemiddeld geavanceerd Star...

Page 70: ...to 2475 Mhz Afstandsbediening 6 kanalen 2 4 Ghz 20 dbM 80mA 4 AA batterijen 600 meter zonder interferenties Camera 600 TVL PAL NTSC formaat 4 3 FOV H 120 V 100 CMOS 1 4 Opmerking low voltage alarm He...

Page 71: ...sel wegens de high speed propellers op de grond of tijdens de vlucht te voorkomen Altijd ontwapenen voordat u de drone hanteert Vlieg niet te dicht in de buurt van hoogspanningskabels cellulaire maste...

Page 72: ...D geplaatst op de neus zal traag knipperen en vervolgens uitschakelen terwijl de zoemer stopt met het BB geluid Als de zoemer het geluid blijft maken herhaal het proces a u b De batterij installeren T...

Page 73: ...LED schakelt uit Gebruiksaanwijzingen Afstandsbediening Dronehouding koprichting Instructies Stijgen dalen Trek de linker gasknuppel omhoog en omlaag om te stijgen dalen Gebruik de knuppel a u b voorz...

Page 74: ...tterij schakel de afstandsbediening uit test is voltooid U kunt alle gewenste 5 8Ghz video ontvangstapparatuur gebruiken om FPV video s te krijgen Aanbeveling Gebruik altijd vluchtmodus 1 Gestabilisee...

Page 75: ...beste kanaal op basis van de beeldkwaliteit op uw scherm Pas de DIP schakelaar aan om het kanaal te selecteren volgens het diagram hieronder Codeschakelaar Codeschakelaar aan Codeschakelaar uit Stekke...

Page 76: ...75 Tabel voor kanaal boven frequentie in Mhz midden en codeschakelaardiagram onder...

Page 77: ...ing Aanpassingen De uitleg en specificaties in deze handleiding zijn alleen bedoeld voor informatie en kunnen op elk moment zonder voorafgaande kennisgeving aangepast worden De uitleg en specificaties...

Page 78: ...77...

Reviews: