background image

2

繁體中文

2

將海鷗燈支柱的另一端

 (

無黃色絕緣膠帶的

(A)

)

插入海鷗

燈主體上的支柱安裝孔中。請將海鷗燈支柱傾斜插入安裝孔,
並確認已將支柱完全插到底。

使用包裝內附的

L

型六角扳手旋緊位於海鷗燈主體上的內六

角螺絲,將海鷗燈支柱固定在海鷗燈主體上。請妥善保管

L

型六角扳手,以備日後使用。

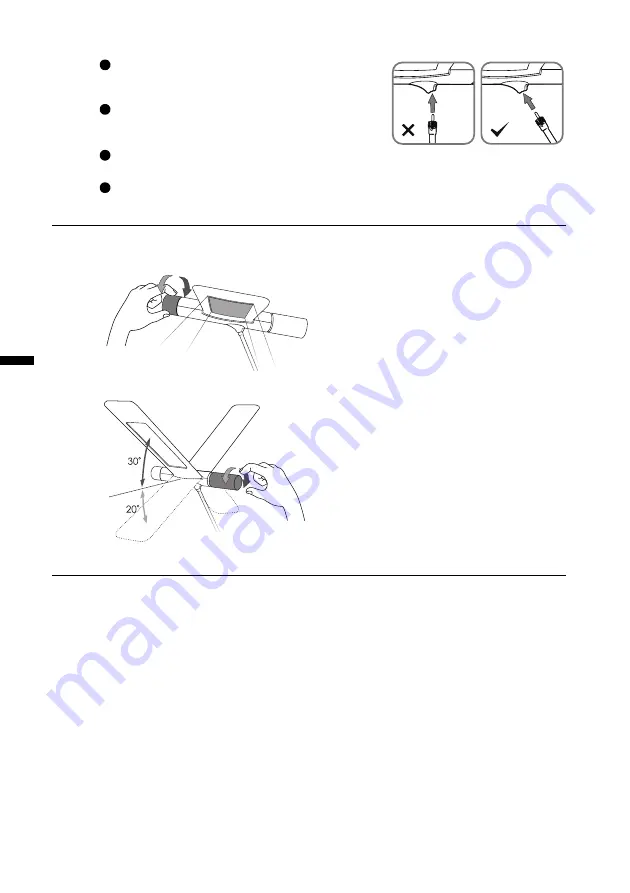
將電源變壓器上的電源線接頭插入位於海鷗燈燈座上的電源
插孔。

將電源變壓器插入電源插座。

使用海鷗燈

/

關燈與調整亮度

調整燈翼角度

清潔維護與故障診斷

清潔海鷗燈本體

請先關閉海鷗燈,然後將電源變壓器從電源插座上取下。使用一塊柔軟、不掉棉絮的布沾上少許稀釋過
的中性清潔劑擦拭海鷗燈本體。切勿使用酒精或任何其它種類的化學溶劑,例如煤油、去漬油等,否則
可能會損壞海鷗燈的外殼。

清潔海鷗燈電源線

• 

請先關閉海鷗燈,然後將電源變壓器從電源插座上取下。使用一塊柔軟、不掉棉絮的布沾上少許稀釋

過的中性清潔劑擦拭海鷗燈的電源線。切勿使用過濕的布擦拭,以免發生觸電意外。

• 

嚴禁使用水或任何液體直接沖洗海鷗燈的本體與部件。

故障診斷

若您在使用海鷗燈時遇到故障情況,請依照下列方式排除:

• 

檢查電源變壓器是否完全插入海鷗燈底座上的電源插孔與牆壁上的電源插座。

• 

檢查海鷗燈的支柱是否完全插入海鷗燈主體與燈座。

• 

檢查海鷗燈的亮度調整旋鈕是否已旋囀至開啟的位置。

如果採取上述方式仍然無法排除問題,請停止使用並洽詢原購買處。

3

4

5

6

面對亮度調整旋鈕,往順時針方向旋轉可開燈並增加亮
度。

若要降低亮度或關燈,請將亮度調整旋鈕往逆時針方向
旋轉。

旋轉燈翼角度調整旋鈕可調整燈翼的角度。角度的調整
範圍為

+30 

 -20 

度。

開燈

/

調亮

關燈

/

調暗

Summary of Contents for Seagull Light

Page 1: ...English Deutsch Fran ais Italiano Seagull Light LED Table Lamp BD10 _D User Guide...

Page 2: ......

Page 3: ...lamp only on a flat and stable surface Otherwise the lamp may topple over and result in damages Installation Insert one end of the lamp pole B the end with yellow insulation tape all the way into the...

Page 4: ...e lamp s casing may become damaged Cleaning the Wiring Turn off the lamp first and unplug the lamp from the power outlet Wipe the lamp s wiring clean using a soft lint free cloth lightly moistened wit...

Page 5: ...www QisDesign com Model BD10 _D DC power input 12V 2A Power consumption 14W Operating temperature 0 C 40 C Dimensions the lamp only width x depth x height 575 x 230 x 630mm lamp wings at 30 575 x 230...

Page 6: ...weck Stellen Sie die Lampe immer nur auf ebene stabile Fl chen Anderenfalls kann die Lampe umkippen und besch digt werden Aufstellen der Lampe Setzen Sie ein Ende des Lampenst nders B das Ende mit dem...

Page 7: ...u da das Geh use der Lampe dadurch besch digt werden kann Reinigen des Kabels Schalten Sie die Lampe aus und trennen Sie die Lampe vom Stromnetz Wischen Sie die Kabel der Lampe mit einem weichen fusse...

Page 8: ...en www QisDesign com Modell BD10 _D DC Leistungsaufnahme 12V 2A Stromverbrauch 14W Temperatur bei Betrieb 0 C 40 C Abmessungen nur Lampe B x T x H 575 x 230 x 630mm Lampenfl gel bei 30 575 x 230 x 480...

Page 9: ...ent sur une surface plane et stable Autrement la lampe pourrait basculer et provoquer des dommages Installation Ins rez une extr mit du m t de lampe B l extr mit comportant le ruban isolant jaune enti...

Page 10: ...la lampe risquerait d tre endommag Nettoyage des fils Eteignez d abord la lampe et d branchez la lampe de la prise de courant Nettoyez les fils de la lampe en les essuyant avec un chiffon doux non pel...

Page 11: ...od le BD10 _D Entr e d alimentation CC 12V 2A Consommation d nergie 14W Temp rature de fonctionnement 0 C 40 C Dimensions la lampe seule largeur x profondeur x hauteur 575 x 230 x 630mm ailes de la la...

Page 12: ...ggetto sulla lampada n utilizzare la lampada per altri scopi La lampada va collocata solo su superfici piane e stabili In caso contrario potrebbe cadere e danneggiarsi Installazione Inserire fino in f...

Page 13: ...della lampada ne verrebbe danneggiato Pulizia dei cavi Come prima cosa spegnere la lampada quindi scollegarla dalla presa di corrente Pulire i cavi della lampada utilizzando un panno morbido e privo...

Page 14: ...sign com Modello BD10 _D Ingresso alimentazione CC 12V 2A Assorbimento 14W Temperatura d esercizio 0 C 40 C Dimensioni solo lampada larghezza x profondit x altezza 575 x 230 x 630mm ali della lampada...

Page 15: ...1 LED LED WA 24E 12FU 100 240V AC 50 60 Hz B 1 L 1 1 1 1 1 1 1 2...

Page 16: ...2 2 A L L 3 4 5 6 30 20...

Page 17: ...3 www QisDesign com BD10 _D DC 12V 2A 14W 0 C 40 C x x 575 x 230 x 630mm 30 575 x 230 x 480mm 20...

Page 18: ...1 LED LED WA 24E 12FU 100 240V AC 50 60 Hz B 1 L 1 1 1 1 1 1 1 2...

Page 19: ...2 A L L 3 4 5 6 30 20...

Page 20: ...3 www QisDesign com BD10 _D DC 12V 2A 14W 0 C 40 C x x 575 x 230 x 630mm 30 575 x 230 x 480mm 20...

Page 21: ...1 LED WA 24E 12FU 100 240V AC 50 60 Hz B x 1 L x 1 x 1 x 1 x 1 x 1 x 1 1 2...

Page 22: ...2 A L L 3 4 5 6 30 20...

Page 23: ...3 www QisDesign com BD10 _D DC 12V 2A 14W 0 C 40 C x x 575 x 230 x 630mm 30 575 x 230 x 480mm 20...

Page 24: ...Memo P N 4J 16K01 001...

Reviews: