3
• First, machine taps or holes on the mounting surface
①
.
•
The mounting hole of this product brackets are 9mm in upper diameter and 8.5mm in lower diameter.
•
When machining taps, fasten the bolt through the mounting hole of the bracket.
•
When machining holes, insert the bolt through the hole of the bracket, and tighten the nut from the opposite side of the mounting surface
※
Solenoid valve box and horn part can be installed separately.
Horn(PC)
Horn Head
Solenoid valve
box(ABS)
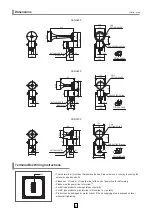
• Machine holes on the mounting surface referring to the diagram below.
■
Mounting Hole Specifications
2-Ø9 HOLES
2-Ø9 HOLES
132
11
8
①
Installation Environment and Protection Rating
• This product is designed for use with protection rating of IP56.
• If the product is installed in locations that subject it to excessive dust or water other than the designated IP protection rating
indicated(IP56), it may cause malfunction or damage to the product.
•
For further information, please visit our website (www.qlight.com).
Parts Definition/ Installation/ Mounting Hole Specifications
■
Parts Definition
/
Installation
Precautions for installation
• In case of outdoor applications, install the product in the upright
position. Do not install the product horizontal or upside-down
positions where water can potentially penetrate into the product
and impact it’s operation.
Left direction
Reverse direction
Right direction
W
ALL
W
ALL
WALL
[Installation]


