background image

P

reli

mi

na

ry

Switch Faceplate Display (Port Display/T_Ports) 

SANbox-8/16 Switch Management

2-62

  SANsurfer Switch Management 

59010-06 Rev. A

User’s Manual

Switch Faceplate Display (Port Display/T_Ports)

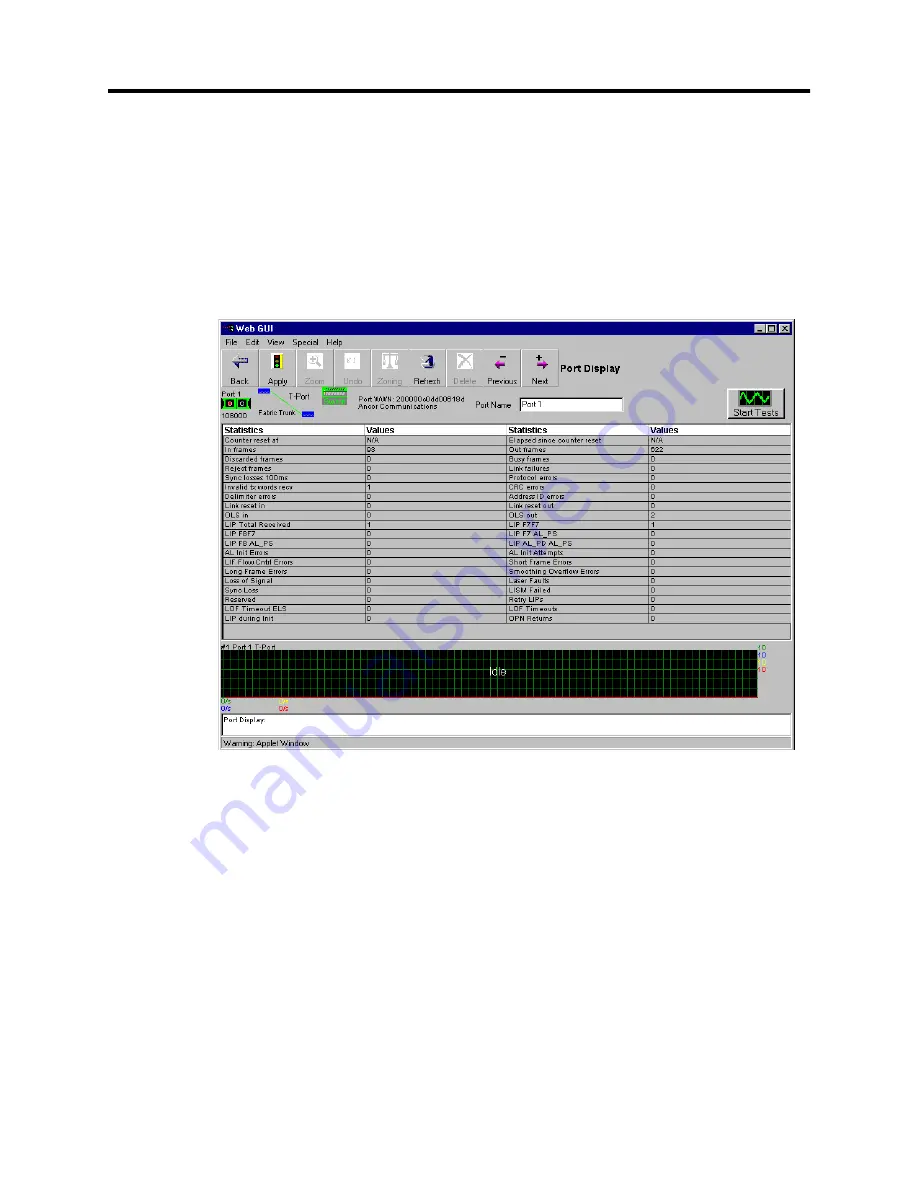
The Port Display window displays statistics for the selected T_Port. 

Figure 2-20


shows the window as it would appear as a T_Port.

The Previous and Next buttons will move through active ports on this switch until 
the first/last port is reached. When the first/last port has been reached, that button 
will no longer function and a warning message is displayed that the port limit has 
been reached.

Figure 2-20   Port Display/T_Port

Entering the Port Display/T_Ports Window         

In the Port Display window, click on the performance chart for the desired T_Port. 
You may also enter this window as the result of using the Previous or Next tool bar 
buttons while viewing other ports on this switch.

Summary of Contents for SANbox-16

Page 1: ...P r e l i m i n a r y SANbox 8 16 SwitchManagement User sManual Publication No 59010 06 Rev A...

Page 2: ...ted in new additions of the publication It is possible that this publication may contain reference to or information about products machines and programs programming or services that are not announced...

Page 3: ...t 1 4 Configuring the Ethernet Port Using SANsurfer 1 5 Configuring the Ethernet Port Using Telnet 1 6 Configuring the Ethernet Port Using TFTP 1 6 2 SANsurfer Switch Management Overview 2 1 Using SAN...

Page 4: ...on 2 20 Main Menu Bar 2 20 File 2 20 Edit 2 21 View 2 21 Special 2 21 Help 2 21 Tool Bar 2 21 Apply Button 2 21 Zoom Button 2 22 Refresh Button 2 22 Delete Button 2 22 Statistics Recording Button 2 22...

Page 5: ...other Rack 2 32 Performing an Archive Restore of a Fabric 2 32 Network Configuration Window 2 36 Entering this Window 2 36 Network Configuration 2 37 Static IP Addr Radio Button 2 37 Set IP Addr via B...

Page 6: ...Previous Button 2 45 Next Button 2 45 Chassis Parameters 2 45 Fabric ID 2 45 Chassis ID Field 2 46 Stage Type 2 46 Admin Mode 2 47 R_T_TOV 2 47 E_D_TOV 2 47 R_A_TOV 2 48 Switch Statistics 2 48 Switch...

Page 7: ...9 2 59 Address 2 59 ALPA 2 59 Port WWN 2 59 Vendor 2 59 Status 2 59 Communicating between Public Initiators to Private Targets 2 60 Communicating between Private Initiators to Private Targets 2 60 Com...

Page 8: ...Read Write Increment Select 2 72 Read Write Select 2 72 Start Address Field 2 72 Length Field 2 72 Memory Data Fields 2 72 Switch Faceplate Display Special Update Flash 2 73 Choosing Update Flash 2 73...

Page 9: ...Delete Button 2 81 Previous Button 2 81 Next Button 2 81 Shelf Name 2 81 Email Contact 2 81 Alert Information 2 81 Device Information 2 81 Icon field 2 81 2 81 Name 2 81 Port 2 81 Address 2 81 World W...

Page 10: ...roup Zoning Method 2 92 Removing a Zone 2 94 Removing a Port from a Zone 2 95 Removing a Device from a Zone 2 95 Adding a Zone No Hard Zones Used 2 96 Adding a Zone Hard Zones Used 2 97 Combining Fabr...

Page 11: ...urity for Telnet Access 3 2 Create a New User Account 3 2 Delete an Existing User Account 3 2 General Commands 3 3 delete user 3 3 exit 3 3 help 3 3 login login_name 3 3 logout 3 4 reset switch 3 4 se...

Page 12: ...on 3 17 4 TFTP Trivial File Transfer Protocol TFTP 4 1 Using TFTP 4 1 Using a Windows Management Station 4 1 Using a Unix Management Station 4 1 Sequence of Events for Replacing Switch Configuration 4...

Page 13: ...06 Rev A xiii 5 SNMP Simple Network Management Protocol SNMP 5 1 Managing the Switch Using the SNMP 5 1 Management Information Base MIB 5 1 Configuring SNMP 5 3 A Technical Support Availability A 1 Tr...

Page 14: ...g Box 2 35 Figure 2 13 Network Configuration Window 2 36 Figure 2 14 Switch Faceplate Display 2 42 Figure 2 15 GBIC Icons 2 49 Figure 2 16 Port Display Loop Devices Window 2 50 Figure 2 17 Port Test P...

Page 15: ...xv List of Tables Table 2 1 Default Username and Password 2 8 Table 2 2 Loop Controls Field Descriptions 2 54 Table 2 3 Loop Display Field Descriptions 2 55 Table B 1 Counter Names and Descriptions p...

Page 16: ...SANbox 8 16 Switch Management List of Tables 59010 06 Rev A User s Manual Notes...

Page 17: ...the management functions available through Telnet Telnet is for the SANbox family of Switches only Section 4 explains the management functions provided by TFTP Section 5 explains the management functi...

Page 18: ...information SANbox 8 Fibre Channel Switch Installer s User s Manual Publication Number 59008 SANbox 16HA Fibre Channel Switch Installer s User s Manual Publication Number 59005 SANbox 16STD Fibre Cha...

Page 19: ...must install the SANsurfer application on your management station prior to performing switch manage ment These installation instructions are located in Section 2 Before managing a fabric with SANsurf...

Page 20: ...telnet application TFTP A TFTP server is embedded in each Switch chassis Before managing a Switch chassis with TFTP you must Connect the Ethernet interface to an Ethernet network and Configure its IP...

Page 21: ...gement connector and the cable wiring The Ethernet connection may be made with power applied to the Switch Figure 1 1 Ethernet Connection 1 8 Switch Management Connector RJ 45 Ethernet Switch Manageme...

Page 22: ...witch To configure the Switch management parameters install the Switch temporarily on an isolated network a network with no other devices on it other than the manage ment station and the Switch with t...

Page 23: ...is is a good way of identifying this chassis when it is part of a multi chassis fabric You may give this chassis a more user friendly name later 5 In the Topology window double click the Ethernet port...

Page 24: ...chassis and will not work for another chassis A typical command for doing this is arp d 10 0 0 1 14 Use File Logout to quit the application For more detailed information refer to Getting Started on p...

Page 25: ...named config 4 Use any text editor to modify the parameters of this configuration file 5 Transfer the configuration file back to the Switch file config 6 The Switch can now be powered down and moved t...

Page 26: ...Configuring the Switch Ethernet Port SANbox 8 16 Switch Management Introduction 59010 06 Rev A User s Manual Notes...

Page 27: ...and firmware version information for the selected chassis View Switch Names and World Wide Names WWNs of all chassis View port addresses on the selected chassis View T_Port interconnections and their...

Page 28: ...lected chassis Update the Flash memory on the selected chassis Divide the fabric ports into zones for more efficient and secure communica tion among functionally grouped nodes There are several types...

Page 29: ...ng but still remain connected to the same physical port Physical devices may be moved from one physical location to another within the fabric without affecting WWN zoning configuration Broadcast Zones...

Page 30: ...s in a fabric Restore all configurable chassis parameters for all chassis in a fabric by using the archived configuration Provide Name Server WWN data fabric wide Create numerous duplicate user define...

Page 31: ...your switch When managing MKII chassis the SANsurfer application must be installed on the management station For installation instructions refer to Installing SANsurfer on a Management Station on page...

Page 32: ...application 1 Move the files from the distribution media CD tape diskette or Internet to your management station You must place these files on the hard drive in a directory that your HTTP server can a...

Page 33: ...is still contains the default IP Address the Management Station must be directly connected to the chassis with an Ethernet cross over cable b Observe that the Login dialog box shown in Figure 2 1 appe...

Page 34: ...e on the management station 3 Set up or open a fabric Set up a fabric if no fabrics have been previously defined Open a fabric if one is already defined Table 2 1 Default Username and Password Set Up...

Page 35: ...from the other switches in the fabric to which it is being added The default value of zero should be changed to a non zero value after connection to ensure that when another switch is added to the fa...

Page 36: ...ic ID is set to 1 Ensure that the Chassis ID is set to 0 Ensure that the Stage type is set to FLS IO Transfer If the timeout values have been altered from the default settings change them back to the...

Page 37: ...o the paragraphs concerning the Topology window for further information For Switches The Switch Faceplate display is composed of a Faceplate portion a Chassis Parameters Switch Statistics portion and...

Page 38: ...le switches into a single rack icon Racks containing multiple switches can be separated into individual racks with a single switch in each rack Rack icons provide access to the Rack Administration win...

Page 39: ...y The application records the screens movements Movement between different screens is accomplished as shown in Figure 2 3 To determine where the application will move when the Back button is pressed r...

Page 40: ...rt Modes Faceplate See page 2 63 View Memory Map window See page 2 71 View Trace window See page 2 69 View Name Server window See page 2 67 View Performance window default See page 2 66 User Administr...

Page 41: ...application loads the default fab file or the file assigned to a user see User Administration Window on page 2 100 for assigning alternate files which contains an entry for the managed fabric if the...

Page 42: ...he current login information portion of the window contains information about the current user their level of authority and the fabric file being used Click on this information to go to the user file...

Page 43: ...cursor is removed from the Fabric Line after completing the IP Address es a Status Icon will appear To delete an existing fabric Select the fabric line on the table Press Delete to remove the existing...

Page 44: ...the IP address not matching the value entered in the list If the IP address is different the entry must be deleted and a new entry created Double click the Topology icon and the application will disp...

Page 45: ...and creation of the new one Press Apply to save the changes Fabric Name The Fabric Name is taken from the SNMP Name field of the Network Configura tion window Edit an existing name by double clicking...

Page 46: ...play a standard dialog box that will ask where to place the generated files The application names the files based on the fabric Switch chassis or port Main Menu Bar There are five menus on the Main Me...

Page 47: ...abric The data is gathered at the rate specified in the Rate field in the selected fabric When you start recording the application displays a dialog box that asks for a file location The application n...

Page 48: ...abric Status field icon accordingly The Refresh button scans all Switch chassis to find all ports that are logged in Then if the fabric has a non zero Rate field setting the application then scans all...

Page 49: ...m the Fabric window Return here from subsequent windows by repeatedly pressing the Back button Topology of Selected Fabric The Topology window displays a diagram of the selected fabric The display sho...

Page 50: ...selection The information display at the left side of the window contains assigned ports for the selected Switch chassis along with their GBIC type if in the port zoning method or connected devices if...

Page 51: ...y position in the window Any T_Port connections to other chassis remain connected Dragging switch icons on top of each other will combine the contents of both switches to reside within a single rack T...

Page 52: ...s the following sub menu User Administration Go to User Administration Window on page 2 100 View The View Menu contains two sub menus Zoom In Same as Zoom Button Zoom Out Same as Back button Special T...

Page 53: ...fabric was not archived before a switch failure within the fabric it will not be possible to restore the fabric with this command Restore opens a standard file dialog box for locating the archive fil...

Page 54: ...mation A dialog box will state that the new information has been saved in the Switch Flash memory Zoom Button Press the Zoom button to jump to the Faceplate window when a Switch Chassis icon is select...

Page 55: ...s is selected Using racks and shelves it is possible to assign names to each device group devices for ease of zoning mix devices from several switches together on a separate shelf combine racks to red...

Page 56: ...ing a Device from One Location to Another Within the Application Moving a device in the application and physically moving a device in the fabric are independent of each other A device may be moved in...

Page 57: ...ch it originated 1 If all devices contained on a shelf are to be returned from the Topology window do one of the following Select the shelf and press the Delete button twice once to delete the shelf a...

Page 58: ...e button The Rack Administration window opens 2 In the Rack Administration window a Click on the line of the table that contains the switch to be separated from this rack The line will be highlighted...

Page 59: ...cord s and turn on one if more than one present power supply 3 Open the Topology window for the fabric The failed switch and the replacement switch will both appear on the topology screen refer to Fi...

Page 60: ...the failed switch Figure 2 9 Fabric with Failed and Replacement Switches NOTE If the fabric has been configured to use the name server WWN group zoning method and the replacement switch is in the por...

Page 61: ...nt User s Manual 59010 06 Rev A SANsurfer Switch Management 2 35 Figure 2 10 Failed Switch Removed Figure 2 11 Restore Dialog Box Figure 2 12 Zoning Method Conflict Dialog Box to Zoning Method Dialog...

Page 62: ...e default IP Address and another switch has been queried and found to have the default address the previous switch had an entry made of its network entries in the ARP table of the management station I...

Page 63: ...emory by pressing the Apply Button The application will ask whether to Reset the Switch If no is chosen the Apply will still write the new address to Flash but will not Reset the Switch The Switch wil...

Page 64: ...ress when it is Reset If yes is chosen to the Reset question the Switch will Reset and start using the new Gateway Address ARP Timeout This value is in hundredths of a second 00 The default set at the...

Page 65: ...ss used by Authentication Traps The default set at the factory is 127 0 0 1 This is the Loopback address the address that the Switch uses to send things to itself therefore if you don t modify this ad...

Page 66: ...View The View Menu contains the following sub menus Zoom In Same as Zoom Button Zoom Out Same as Back button Special No sub menus Help The Help menu contains the following entries About Utility Displ...

Page 67: ...Channel timeouts its Stage Type and the chassis Administrative Mode Using selections in the View menu allow you to use the Chassis Parameters area to view chassis performance and Name Server informat...

Page 68: ...licking the icon field of a listed switch The chassis displayed in the Switch Faceplate display represents the selected chassis The default display is the Port States Faceplate and the Performance inf...

Page 69: ...ge 2 20 Edit The Edit Menu has the following sub menu User Administration Go to the User Administration Window on page 2 100 View The View Menu contains the following sub menus Zoom In Same as Zoom Bu...

Page 70: ...e normal blink rate and blinks at a very fast rate The Heartbeat LED will continue to operate in this state until it is changed back The blink rate is not automatically changed back when the applicati...

Page 71: ...ormation window Undo Press Undo to ignore all changes made to this window since the last Apply opera tion Zoning Button Press the Zoning Button to jump to the Zoning window Refresh Button Press the Re...

Page 72: ...apply the Chassis ID number to the chassis Stage Type Cascade and Mesh Fabrics In a cascade or mesh fabric switch chassis are connected together forming a larger fabric In these fabrics all chassis a...

Page 73: ...Section 5 for multi chassis fabrics of the applicable switch manual for information about the IO T and CC stage types Make the appropriate selection and press the Apply button to apply the new Stage T...

Page 74: ...meout value for all ports on the selected chassis Select the box type the new value The number is in ms 2000 2 seconds The default is 5000 and should not be changed without consulting QLogic Customer...

Page 75: ...the Port Display Loop Devices window or the TL Configuration window if View TL Configura tion has been selected from the port display faceplate for that port Double click the Ethernet port icon to ju...

Page 76: ...allows you to control these devices Figure 2 16 shows the window as it would appear for a loop port If the selected port was not a loop port the application will display only the Switch port statistic...

Page 77: ...he same sub menus as the Fabric window descriptions of these sub menus can be found on page 2 20 Edit The Edit Menu contains the following sub menu Administration Go to the User Administration Window...

Page 78: ...ve seconds or when Refresh is pressed Start Tests Button The Start Tests button opens the window show in Figure 2 17 Enter the desired values for test duration If the parameters entered are achieved t...

Page 79: ...Entering a value that exceeds the allowable range causes the minimum or maximum allowable value to be entered Data Pattern The data pattern is the test value to be used for testing the port The value...

Page 80: ...rivate loop A LIP will cause all devices on the loop to perform a log in with the loop Enable All Press this button to enable all the devices on the loop that can be enabled Mechanical failures would...

Page 81: ...oop Port Address AL_PA Arbitrated Loop ports use the AL_PA to describe the physical address of each port within the loop Port Node WWN This field identifies the World Wide Name of the device connected...

Page 82: ...ected port is not a TL_Port this window is not available Figure 2 18 Port Display TL Configuration Window Entering the Port Display TL Configuration Window In the Port Display window choose View TL Co...

Page 83: ...hey each may contain different sub menus depending on the window they are in File The File Menu contains the same sub menus as the Fabric window descriptions of these sub menus can be found on page 2...

Page 84: ...be 31 or fewer If not limited by the user the switch will limit the number of devices which will cause some devices to be ignored When View TL Configuration is selected and a TL port is selected the...

Page 85: ...window contains an entry for every Public or Private device registered with the Name Server Each device in the list contains the following fields Device The Device field indicates whether or not the d...

Page 86: ...nicating between Private Initiators to Private Targets The switch will bridge all targets to initiators registered with the name server Each TL_port which contains private initiators will require that...

Page 87: ...rgets Initiator bridged on the port display window use View TL Configuration to see the table The initiator item 7 above is bridged to recognize the target item 2 below that was bridged by the switch...

Page 88: ...ious and Next buttons will move through active ports on this switch until the first last port is reached When the first last port has been reached that button will no longer function and a warning mes...

Page 89: ...d saved to non volatile memory within the switch After changing any all port modes click the Apply button for the changes to take effect Exiting the window without pressing the Apply button results in...

Page 90: ...er with tuning To support optimum performance with these HBAs the Switch allows individual ports to be tuned based on the characteristics of a particular HBA Tuning modes supported are Non I Non Inter...

Page 91: ...10 06 Rev A SANsurfer Switch Management 2 65 Frame L Frame Limit This option limits the number of frames that can be transmitted during a single loop tenancy to 32 This option is recommended for JNI H...

Page 92: ...that port disappears When a port is On Line the display creates a graph for that port Each port graph is dynamic updating every two seconds and displays the number of Frames In Frames Out Dropped Fram...

Page 93: ...Service data displayed in the Switch Faceplate display allows viewing the Name Server entry for every device connected to the selected chassis and registered with the Name Server Entering the Name Ser...

Page 94: ...User s Manual Figure 2 25 View Name Service for Private Loop Name Service Data File When a fabric uses the name server WWN zoning method each switch in a fabric contains a name server data file that i...

Page 95: ...of selected operations as they proceed through the Switch If at some point you are experiencing problems a QLogic Support engineer may ask you to perform a Trace operation read the results and send th...

Page 96: ...his point the Switch is logging the progress of the enabled Trace functions into the Trace Buffer The QLogic support engineer may have you perform a specific operation like attempt a login from a node...

Page 97: ...h If you are experiencing problems a support engineer may ask you to perform these operations display the results and send them back to the support facility Therefore use this window only under the di...

Page 98: ...ect Select the type of operation Read or Write Start Address Field Place the cursor in the field and type the Start Address Length Field Place the cursor in the field and type the length in terms of B...

Page 99: ...chassis will disrupt the Switch operation In the event that your Flash memory requires an update QLogic Corporation will supply a binary Flash update file This file is usually available over the Inter...

Page 100: ...he Flash load fails refer to the Flash Load Fails paragraphs Flash Load Fails In the event that the Flash load fails a dialog box asks whether to try again The Switch will still remain operable even a...

Page 101: ...et while in the Switch Faceplate displays The application resets the selected Switch chassis immediately NOTE The SANsurfer application is embedded in the SANbox memory It will not launch from a chass...

Page 102: ...igured in the rack selected Figure 2 29 Rack Administration Window Entering the Rack Administration Window Enter the Rack Administration window by double clicking the rack or switch name area of a rac...

Page 103: ...t Utility Display a screen containing the product name and version level Utility Online Help Display the online help dialogue box Use this dialogue box to search for a topic or term Tool Bar Back Butt...

Page 104: ...izing WWN Groups configuration shelves can be used to group one or more devices which can be physically installed in unconnected mounting units Switch information lines extract information from the fi...

Page 105: ...purpose After making changes to this window press the Apply button for the changes to take effect Figure 2 30 Shelf Administration Window Entering the Shelf Administration Window Enter the Shelf Admi...

Page 106: ...oduct name and version level Utility Online Help Display the online help dialogue box Use this dialogue box to search for a topic or term Tool Bar Back Button Press Back to go to the Rack Administrati...

Page 107: ...mplete email address e g myname mymail com Alert Information Date Time The date and time of when alert s are issued Alert Descriptions A description of each alert that has been generated for this shel...

Page 108: ...nt 59010 06 Rev A User s Manual World Wide Name The WWN for the device attached to this port Double click on this field to go to the Switch Faceplate Display window Company The name of the manufacture...

Page 109: ...re enabled Broadcast Zones and Name Server zones may not cross the defined Hard Zone boundaries Broadcast Zones All Models Broadcast Zones allow the division of the fabric one or more Switch chassis i...

Page 110: ...appear in different hard zones the SL zone will be split When the SL zone is split the zones will have the same identifying values for the SL zone name or number An SL zone may only contain 32 or few...

Page 111: ...nfiguration 4 There is a maximum of 16 Hard Zones independent of other zone types The SANsurfer management application and Utilities NT management appli cation number them 1 through 16 5 A port may be...

Page 112: ...n the Broadcast Zone or zones that the port is defined in 8 All ports not defined as being part of any enabled Broadcast Zone are Broadcast Zone Orphans Broadcast Zone Orphans are all placed in the sa...

Page 113: ...e Stage Switch places devices from Port 4 in one Hard Zone and other devices from Port 4 in another Hard Zone Name Server WWN Zoning must not include all Port 4 devices in the same zone 3 Name Server...

Page 114: ...rlap each other Zoning Window Refer to Figure 2 31 The Zoning window allows configuring ports in the selected fabric into zones for more efficient and secure communication among functionally grouped n...

Page 115: ...oning window with port type or device icons in the left column The port type icons correspond with the defined port mode settings from the Port Mode faceplate display Load Balance Display the Fabric Z...

Page 116: ...alled it will not be displayed unless the GBIC has a cable attaching it to an external device and that device responds to contact made with it Special Condition for Fabrics using the WWN Zoning Method...

Page 117: ...by pressing the Add Zone button To view existing Zones of the type selected press the Left or Right Arrow buttons in the Tool Bar 3 Note If configuring a Hard Zone proceed to the next step Choose a H...

Page 118: ...t column of the zoning window b Modify the description Press the Return key to force a new line c When finished click on the Done button at the bottom of the column d Press the Apply button to save th...

Page 119: ...the port number b To deselect any all of the ports click to the right of the port number to be deselected Hold the Ctrl key to only deselect the current choice If the Ctrl key is not held clicking to...

Page 120: ...nly zone that any particular port or device is assigned it will appear in the orphan zone for zone types that do not allow unassigned ports or will remain visible and available for all other zones def...

Page 121: ...4 After all desired ports have been selected press the Apply button Observe a message about the possibility that modifying switch zoning may disrupt traffic on an active zone Click on Yes to continue...

Page 122: ...old the Ctrl key and click each additional port When a port is selected the port number will change to yellow and the word add is placed behind the port number b To deselect any all of the ports click...

Page 123: ...elect any all of the ports click to the right of the port number to be deselected Hold the Ctrl key to only deselect the current choice If the Ctrl key is not held clicking to the right of any port wi...

Page 124: ...remove the zone itself When a zone is deleted the subsequent zones will be renumbered so they remain in sequential order For example if fabric A is using zones 1 and 2 and fabric B is using zones 1 2...

Page 125: ...xtended credits are requested For an additional 8 credit value to add to the current port select the F_Ext16 selection For 16 additional credits select F_Ext24 For an additional 24 credits select F_Ex...

Page 126: ...will use to communicate with the management station monitor screen Any user can open this window but only the Super User can save changes to it Entering the Administration Window Enter the User Admin...

Page 127: ...y a screen containing the product name and version level Utility Online Help Display the online help dialogue box Use this dialogue box to search for a topic or term Tool Bar Back Button Press Back to...

Page 128: ...rd field contains the user password The default is su Modify this field by selecting the field content and typing new infor mation The maximum password length is 64 characters The password is visible...

Page 129: ...contains the date that the user account expires The user will not be able to log in after that date Modify this field by selecting the field content and typing new information The dates must be in the...

Page 130: ...e TFTP commands that transfer each SANsurfer file to the Switch 3 To verify that the installation was successful point your Web browser to the Switch Enter the IP Address of the Switch on the Address...

Page 131: ...ox are based on a three level keyword syntax The general syntax is as follows Note All text is case insensitive Prompt Command Command Type Field Data The first word on the command line is the command...

Page 132: ...Sign into a telnet session with Superuser authority 2 Using the desired user name type login username Enter 3 The application will ask for a password Type the desired password followed by the Enter k...

Page 133: ...le for general commands type help command e g help show would provide a list of command types available for use with the show command login login_name Log in as a different user or create new user acc...

Page 134: ...mand type Enter new values into the switch for the command type selected Refer to page 3 4 show command type Display switch settings for the command type selected Refer to page 3 9 whoami Obtain the l...

Page 135: ...imeout value in ms arb_loop enable disable mfs normal non interleaved minimize interleave frame limit If no field entry is included in the command the command returns a display similar to the followin...

Page 136: ...the desired value for port 0x Where the x indicates the actual port selected Making a selection or pressing the enter key to exit this menu results in returning to the main set config menu config tim...

Page 137: ...ameter For byte sets value is from 0016 to FF16 For word sets value is from 0016 to FFFF16 For long sets value is from 0016 to FFFFFFFF16 If the length parameter byte word long is not specified the de...

Page 138: ...number of lines in the viewable window the specified number of lines will be displayed and a statement will appear at the bottom of the display stating how to view additional lines of informa tion por...

Page 139: ...lowing first_port_addr 0010C000 num_of_ports 8 power supply OK in_order_delivery ON board_heat_status OK board_temp 30 0 c Fan 1 Status Absent OK Fan 2 Status Absent OK Port Information 01 GBIC 07 FC...

Page 140: ...5000 Switch Resets 5000 Port Admin State AL Enabled MFS_MODE 1 Online True Normal 2 Online False Normal 3 Online True Normal 4 Online True Normal 5 Online True Normal 6 Online True Normal 7 Online Tru...

Page 141: ...s 00000000 fcFPortInvalidCrcs 00000000 fcFPortDelimiterErrors 00000000 fcFPortAddressIdErrors 00000000 fcFPortLinkResetIns 00000000 fcFPortLinkResetOuts 00000000 fcFPortOlsIns 00000000 fcFPortOlsOuts...

Page 142: ...0000002 00099E40 0000002A 0000000A 00000080 0000002B 0000000A 00000080 0000002C 0000000A 00000080 0000002D 0000000A 00000080 0000002E 0000000A 00000080 0000002F 0000000A 00000080 00000030 0000000A 000...

Page 143: ...Open_Seq 00000000 Class1_param reserved 00000000 Class2_param Initiator_ctl 00000000 Class2_param Recipient_ctl 00000000 Class2_param Rcv_Data_Size 00000000 Class2_param Concurrent_Seq 00000000 Class...

Page 144: ...ed If no show memory commands have been received and the word size is not speci fied then the default size is byte start_address The hexadecimal address to read memory from The range is from zero 0 to...

Page 145: ...meout in milliseconds When no field value is used the command returns a display similar to the following IP Address 10 0 1 1 Netmask 255 0 0 0 Broadcast 0 0 0 0 Gateway 0 0 0 0 Bootp Enabled NO ARP Ti...

Page 146: ...Offline TL_Port Not logged in YES 02 Offline F_Port Not logged in NO 03 Offline F_Port Not logged in YES 04 Offline TL_Port Not logged in YES 05 Offline F_Port Not logged in YES 06 Offline F_Port Not...

Page 147: ...YSDESCR HP A5666A S N 11223344 version Displays version information The command returns a display similar to the following Msg Version 00000001 Utility message version Flash SW Type 80000A08 Flash SW...

Page 148: ...show command type SANbox 8 16 Switch Management Telnet 59010 06 Rev A User s Manual Notes...

Page 149: ...in most Unix and Windows NT workstations Versions for other platforms can be purchased from other vendors Because TFTP has no passwords user authentication or other security only trusted users should...

Page 150: ...ation The steps necessary to replace the switch configuration using TFTP are as follows 1 Retrieve get a copy of the index file from the switch See page 4 3 2 Retrieve get a copy of the config file Se...

Page 151: ...address the actual TFTP Session closed address of the switch being accessed d temp type index R F W Version 3 02 10 config mgmt CPU configuration rw text index this list of files r text load I O CPU l...

Page 152: ...g sequence of events d temp tftp IP address get config R Where IP address the actual TFTP Session closed address of the switch being accessed d temp type config R netAddress 10 0 0 1 These lines omitt...

Page 153: ...set to 30000 about 8 hours snmpReadCommunity The SNMP community name to be recognized for SNMP Get and GetNext requests By default this is the string public snmpWriteCommunity The SNMP community name...

Page 154: ...tch TFTP Session closed d temp Unix Perform the following sequence of events tftp R tftp connect IP address R Where IP address the actual address of the switch being accessed tftp text R Enter the tex...

Page 155: ...tch is reset with an invalid control code in the Switch flash it will automatically enter PROM mode In PROM mode the Switch will not switch data traffic through the Fibre Channel ports until a valid e...

Page 156: ...ed reset will cause the Switch to reset itself To reset the Switch using TFTP 1 Connect to the Switch using TFTP 2 Select either binary or text file transfer mode Unix only 3 Attempt either to upload...

Page 157: ...ng Accounting Each group has one or more tables associated with it The Switch does not support the Accounting Group of the draft standard Fibre Channel MIB Instead it supports the QLogic enterprise ac...

Page 158: ...mentName Element Name a fabric unique name for this switch element fcFeModuleCapacity Module Capacity the number of modules in this switch element fcFeModuleTable Module Table a table of information a...

Page 159: ...nel port Capability Group Tables Port CapabilitiesTable a table of configuration parameters supported by each pot in the switch element Configuring SNMP SNMP configuration parameters are specified in...

Page 160: ...Configuring SNMP SANbox 8 16 Switch Management SNMP 59010 06 Rev A User s Manual Notes...

Page 161: ...ys Training QLogic offers the following technical training courses Switch Certification Director Certification HBA Certification Each course is available at the training facility in Eden Prairie MN or...

Page 162: ...P r e l i m i n a r y SANbox 8 16 Switch Management A 2 Technical Support 59010 06 Rev A User s Manual...

Page 163: ...ation state AL Init Errors N A Number of times the port entered initialization and the initialization failed Busy frames fcFPortC23FbsyFrames Number of class 2 and class 3 fabric busy F_BSY frames gen...

Page 164: ...a link failure is counted A link reset is performed after a link failure Link reset in fcFPortLinkResetIns Number of link reset primatives received from an attached device Link reset out fcFPortLinkRe...

Page 165: ...by this port An OLS is issued for link initialization a Receive Recognize Not_Operational NOS state or to enter the offline state The switch may issue an OLS to perform offline diagnostics or to powe...

Page 166: ...between frames Sync Loss N A Number of synchronization losses Loss of sy nchronization is detected through reception of invalid transmission words on the port Sync losses 100 ms fcFPortSyncLosses Num...

Page 167: ...ternal problem with the switch COF Parity ASIC 1 COF Parity ASIC 2 COF Parity ASIC 3 Frame bus Errs ASIC 0 Port 1 Errors detected in the data being sent over the frame bus between ASICs A non zero val...

Page 168: ...2 Port 2 Internal Parity ASIC 2 Port 3 Internal Parity ASIC 2 Port 4 Internal Parity ASIC 3 Port 1 Internal Parity ASIC 3 Port 2 Internal Parity ASIC 3 Port 3 Internal Parity ASIC 3 Port 4 Intr low Bu...

Page 169: ...e which multiplexes frames at frame bound aries to or from one or more N_Ports with acknowl edgment provided Class 3 Service A service which multiplexes frames at frame bound aries to or from one or m...

Page 170: ...that initiates a data exchange with a target device In Order Delivery A feature that requires that frames be received in the same order in which they were sent Input Output Transfer A switch stage typ...

Page 171: ...ir connected devices that behave as a single private loop SL Private Loop A stage type that defines all ports on a switch as SL_Ports and groups them together in a segmented loop zone SNMP Simple Netw...

Page 172: ...i n a r y Glossary SANbox 8 16 Switch Management 4 Glossary 59010 06 Rev A User s Manual WWN World Wide Name Zone A set of ports or devices that have been grouped together to control the exchange of...

Page 173: ...oning 2 9 beacon toggling 2 26 2 44 blink rate heartbeat LED 2 26 2 44 BootP for IP address 2 37 bridge icon loop devices 2 56 broadcast address 4 5 broadcast zones orphans 2 86 rules 2 86 selecting t...

Page 174: ...E_D_TOV configure 2 47 3 6 ecounts show 3 11 email address for alerts 2 78 2 81 Enable All button loop devices 2 54 Enable button loop devices 2 54 equipment as management station 2 4 error counters f...

Page 175: ...n colors topology window 2 23 icon types fabric window 2 18 icon device 2 29 index file on switch getting 4 3 Internet Explorer running SANsurfer 2 4 IO T chassis icon color 2 23 IP configure address...

Page 176: ...2 37 Netscape running SANsurfer 2 4 network showing 3 15 network address IP 4 5 network configuration 2 37 window 2 36 network setting 3 7 non interleaved tuning 2 64 O orphans broadcast zone 2 86 har...

Page 177: ...management tool 2 29 delete device 2 31 remove from rack 2 30 shelf administration 2 79 shelf information 2 78 shelf name 2 81 show chassis 3 9 show chassis mode 3 10 show command 3 9 show command te...

Page 178: ...mand 3 3 login 3 3 logout current user 3 4 overview 3 1 screen length 3 8 security 3 2 send LIP command 3 4 set command 3 4 show command 3 4 3 9 switch reset 3 4 user creating 3 2 whoami 3 4 telnet co...

Page 179: ...103 security level 2 102 3 2 super user 2 103 3 2 using this manual 1 1 V version show 3 17 W warning checksum error during flash update 2 73 Web based switch management 2 4 whoami 3 4 width monitor...

Page 180: ...SANbox 8 16 Switch Management Index 59010 06 Rev A User s Manual Notes...

Reviews: