Preliminar
y
Chassis Configuration Process
SANbox-16HA Fibre Channel Switch
5-20
Multi-Chassis Fabrics
59005-03 Rev. A
Installer’s/User’s Manual
c.
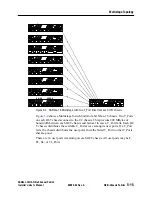
The Fabric Topology window will display all the Switch chassis in the
fabric and show the T_Port interconnections. Initially, all chassis will
be IO/T chassis. Double click a chassis that you want to configure. The
application will jump to the Switch Faceplate display for the selected
Switch chassis.
d.
Just below the faceplate is the Chassis Parameters/Switch Statistics
area. Change the Stage Type to FLS-Cross-Connect (if it is a CC
chassis), assign the chassis a Chassis Number (unique within each
Stage Type), and press Apply. Chassis Numbers are in the range of 0 to
63 and must be unique within each Stage Type. The Default is zero.
e.
Press the Back button to return to the Fabric Topology window. The
application will poll the fabric for its new configuration (it takes about
15 seconds to poll the fabric). The Topology window will use the switch
color to show that the chassis you changed is now a CC.
f.
Repeat steps
c
,
d
, and
e
for each chassis in the fabric.
NOTE:
•
If two switches of the same stage type have the same chassis number,
the switch with the higher world wide name will be disabled. In
addition, the affected Logged-In LEDs on both chassis will blink to
indicate that a conflict exists.
•
When adding a switch to an active fabric, be sure that the new switch
has a unique chassis number. A chassis number conflict could disable a
single IO/T chassis or, in the case of a CC chassis, an entire fabric.
NOTE:
The fabric is now a multi-chassis fabric and you may proceed to configuring
the user ports if necessary. Configure user ports and zones with the Switch
management application.

