


2 – Using SANsurfer Switch Manager
Exiting SANsurfer Switch Manager
59056-03 C
2-11
A
Click the
Open Existing Fabric
radio button to open the Add a New Fabric
dialog, which prompts you for a fabric name, IP address, account name, and
password. Refer to
”Adding a Fabric” on page 3-22
.
Click the
Open Existing Fabric View File
radio button to open the Open
View dialog which prompts you to specify a fabric view file that you saved
earlier. Refer to
”Opening a Fabric View File” on page 3-23
.
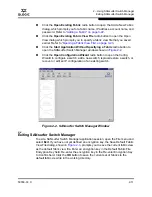
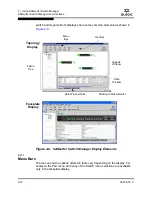
Click the
Start Application Without Specifying a Fabric
radio button to
open the SANsurfer Switch Manager window shown in
Figure 2-2
.
Click the
Open Configuration Wizard
radio button to open the Config
Wizard to configure a switch, add a new switch, replace/restore a switch, or
recover or edit an IP configuration of an existing switch.
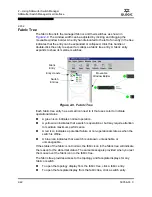
Figure 2-2. SANsurfer Switch Manager Window
2.4
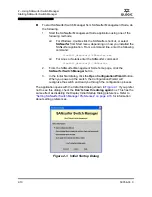
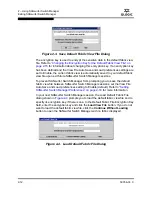
Exiting SANsurfer Switch Manager
To exit a SANsurfer Switch Manager application session, open the File menu and
select
Exit
. If you have not yet defined an encryption key, the Save Default Fabric
View File dialog, shown in
Figure 2-3
, prompts you to save the current fabric view
as the default fabric view file. Enter an encryption key in the Default Fabric File
Encryption Key field. Re-enter the encryption key in the Re-enter Encryption Key
to Confirm field. Click the
OK
button to save the current set of fabrics to the
default fabric view file in the working directory.
Summary of Contents for SANbox 5200 Series
Page 48: ...2 Using SANsurfer Switch Manager Using the Faceplate Display 2 30 59056 03 C A Notes...
Page 152: ...4 Managing Switches Displaying Hardware Status 4 46 59056 03 C A Notes...
Page 180: ...5 Managing Ports Graphing Port Performance 5 28 59056 03 C A...
Page 318: ...A Command Line Interface Zoning Command A 138 59056 03 C A Notes...


