background image

'XSOH[HU

'RFXPHQW)LQLVKLQJ2SWLRQV

8

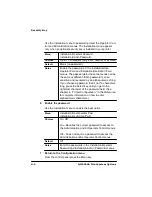
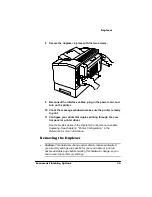
Secure the duplexer in place with the two screws.

9

Reconnect the interface cables, plug in the power cord, and 
turn on the printer.

10 Check the message window to make sure the printer is ready 

to print.

11 Configure your printer for duplex printing through the con-

trol panel or printer driver. 

Use the Duplex option in the Operator Control menu to enable 
duplexing. See chapter 4, “Printer Configuration,” in the
Reference for more information.

5HPRYLQJWKH'XSOH[HU

s

Caution: This hardware change automatically restores defaults. If 
your memory settings are specific for your environment, print an 
advanced status page before making this hardware change, so you 
can recover these memory settings. 

Summary of Contents for 2060

Page 1: ...406 3ULQW 6 VWHP 2SWLRQV...

Page 2: ...lTalk Macintosh TrueType Apple Computer Inc Banyan VINES Banyan Centronics Centronics Data Computer Corporation CompuServe H R Block DEC DECnet LN03 VMS Digital Equipment Corporation PhoneNET Farallon...

Page 3: ...RQWHQWV RQWHQWV QWURGXFWLRQ Introduction 1 2 About This Manual 1 2 Typographic Conventions 1 3 0HPRU DQG 6 VWHP 6RIWZDUH Introduction 2 2 Removing the Controller Board 2 2 Procedure 2 2...

Page 4: ...DXJKWHUERDUGV Introduction 3 2 Network Interface 3 2 Optional Network Interface Assembly Kit 3 2 Installing an Optional Network Interface 3 3 Using a Network Interface 3 5 LocalTalk Interface 3 5 Opt...

Page 5: ...etting Serial Interface Parameters 3 19 Installing a Multi Res Daughterboard 3 26 What s in the Kit 3 26 Procedure 3 26 6RIWZDUH Introduction 4 2 Emulations 4 2 Downloading an Emulation 4 2 Font SIMMS...

Page 6: ...2 Internal Hard Disks 5 2 External Hard Disks 5 7 Identifying Hard Disks 5 7 Turning on an External Hard Disk 5 8 Configuring Hard Disks 5 9 Using Jaz and Zip Drives 5 9 Formatting a Hard Disk 5 10 B...

Page 7: ...CrownCopy Menu 5 30 Menu Settings 5 30 Maintenance 5 37 Cleaning the Scanner 5 37 Replacing the Lamp 5 39 Technical Specifications 5 45 Scanner 5 45 Automatic Document Feeder ADF 5 46 Troubleshooting...

Page 8: ...7 7 Optional Feeder 7 8 Unpacking the Optional Feeder 7 9 Installing the Optional Feeder 7 9 Loading the Optional Media Cassette 7 11 406 XVWRPHU 6XSSRUW Sources of Support A 2 Your QMS Vendor A 2 You...

Page 9: ...QWURGXFWLRQ Q 7KLV KDSWHU About This Manual on page 1 2 Typographic Conventions on page 1 3...

Page 10: ...ion This chapter gives you a brief overview of this manual ERXW 7KLV 0DQXDO Introduction Provides an overview of the manual Memory Describes how to install printer memory SIMMs and update the system s...

Page 11: ...ns Describes how to install the duplexer and the optional feeder A QMS Customer Support Provides world wide product sales and support telephone numbers and describes how to communicate with QMS throug...

Page 12: ...o avoid equipment damage process failure or extreme annoyance 0 WARNING Warnings indicate the possibility of personal injury if a specific procedure is not performed exactly as described in the manual...

Page 13: ...0HPRU DQG 6 VWHP 6RIWZDUH Q 7KLV KDSWHU Single In Line Memory Modules on page 2 6 Updating System Software on page 2 12...

Page 14: ...M upgrade an internal hard disk a Kanji font SIMM an optional network LocalTalk or serial interface or a 1200x1200 dpi Multi Res daughterboard 0 WARNING The options which require access to the control...

Page 15: ...hes first Plastic rubber wood painted metal surfaces and telephones are not acceptable grounding points The printer isn t an acceptable grounding point either because it must be unplugged before you p...

Page 16: ...isk a Kanji font SIMM an optional network LocalTalk or serial interface and a 1200x1200 dpi Multi Res daughterboard M WARNING The options which require access to the controller board should be perform...

Page 17: ...rails inside the printer Note Align the controller board with both guide rails before sliding it in the printer 2 Slide the controller board in until it is firmly seated in the printer 3 Tighten the...

Page 18: ...more fonts and increase the printer s buffer area where data sent from the computer is stored while it s waiting to be printed See FAQ 7191 for a list of each QMS approved SIMM its manufactur ers and...

Page 19: ...very important to protect the printer controller board from electrostatic damage while performing this SIMM installation Please review the anti static caution in Removing the Controller Board on page...

Page 20: ...the SIMM connector Hold the SIMM at a 45 angle to the controller board with the notch on the right side and the bottom edge in the connector Note You can insert a SIMM in any SIMM connector as long as...

Page 21: ...irmly in place If you cannot snap the SIMM into place do not force it Reposition it making sure that the bottom of the SIMM is seated completely in the connector 6 Repeat steps 3 5 for each additional...

Page 22: ...l IDE Hard Disk section for details 0 WARNING Turn off the printer and unplug the power cord ACHTUNG Bitte schalten Sie den Drucker aus und ziehen Sie den Netzstecker heraus V Caution Any change in sy...

Page 23: ...backwards to a 45 angle away from the SIMM con nector and then lift it out 5 If you want to install a SIMM refer to Installing a SIMM on page 2 6 Otherwise continue at step 6 6 Reinstall the controlle...

Page 24: ...eded to download sys tem software to your QMS 2060 via a Macintosh parallel port serial port or Ethernet port 0DFLQWRVK A minimum of 1 5 MB of free disk space on the Macintosh Connection from the Maci...

Page 25: ...HP RDGHU SSOLFDWLRQ The SystemLoader application is used to download printer system software from a Macintosh to the printer It must be decompressed from two Macintosh disks onto your Macintosh s hard...

Page 26: ...settings so you can verify that they are the same or recover your settings after the system software has been updated 3 Access the Administration Miscellaneous New Flash Image menu 4 Select Yes in the...

Page 27: ...re disk in your PC s 3 5 disk drive 4 Type x pkunzip x system zip where x is the name of the disk drive in which you inserted the system software disk 5 Follow the prompts They instruct you to insert...

Page 28: ...ing copy b dl lpt where is 1 to 3 b refers to binary files 4 While the system software is loading the Ready LED will blink off and on The display will show Downloading image via parallel port 5 After...

Page 29: ...d d Terminate the connection 3 Type hibaud 4 Set the PC s baud rate to 38400 by typing the following modex exe modex 38400 n 8 where is 1 to 4 See the MODEX DOC file for more information on this progr...

Page 30: ...verifies that the new image is valid 11 The printer automatically restarts to activate the new system software 12 Print another advanced status page and verify that the con figuration settings are th...

Page 31: ...inter s hard disk by typing put filename ps where filename is the name of the installation file The printer s message window reads 1 Active Job and the Disk light flashes to indicate that the emulatio...

Page 32: ...pgrade system release number Error message Possible problem Unable to replace FLASH image due to insufficient memory System cannot use 8 MB you need to add more memory Unable to reprogram FLASH to rep...

Page 33: ...QWHUIDFHV DQG DXJKWHUERDUGV Q 7KLV KDSWHU Network Interface on page 3 2 LocalTalk Interface on page 3 5 Serial Interface on page 3 15 Installing a Multi Res Daughterboard on page 3 26...

Page 34: ...a Serial Interface on page 3 17 An optional network interface is installed in the optional interface opening on the back of the printer This opening is to the left of the other interface ports and it...

Page 35: ...ircuit boards such as SIMMs and the 1200x1200 dpi daughterboard and so on from electrostatic damage while performing this task Review the anti static guidelines in the Removing the Controller Board se...

Page 36: ...board c Press down on the board gently until it is secured by the 80 pin connector and by the plastic standoff post 5 Replace the controller board Use the instructions in the Reinstalling the Controll...

Page 37: ...ions Networkx CrownNet menu For DECnet TCP IP interface information see the QMS DECnet TCP IP Setup Guide and the TCP IP Protocol Option User s Guide which are included in the interface shipment Your...

Page 38: ...troller board and other circuit boards such as SIMMs and the 1200x1200 dpi Multi Res daughterboard from electrostatic damage while performing this task Review the anti static guidelines in the Removin...

Page 39: ...ctor on the controller board c Press down on the board gently until it is secured by the 80 pin connector and by the plastic standoff post 5 Replace the controller board Use the instructions in the Re...

Page 40: ...ion minicomputer or mainframe computer that connects through a print network such as AppleShare using LocalTalk type con nectors and boxes If you re connecting to a host such as one of these you may n...

Page 41: ...connect your printer to a Macintosh V Caution Turn off both the printer and the Macintosh before making the connection 1 Plug the connector from one transformer box into the printer s LocalTalk port 2...

Page 42: ...nting or if you ve never printed to a Post Script printer before you need to take a few minutes to make sure you have the following printing software installed The QMS 2060 PPD file Application specif...

Page 43: ...IRU 8VHUV RI OGXV SSOLFDWLRQV If you use an Aldus application or one that used to be owned by Aldus such as Adobe PageMaker or MacroMedia FreeHand when you want to print hold down the Option key whil...

Page 44: ...ause the REBOOT NOW prompt to appear Your can either choose to restart the printer now and this change takes effect immediately or you can manually restart the printer and have this change take effect...

Page 45: ...two users send print jobs to the printer the workstation belonging to the first user is unavailable until the first job has been printed and the workstation belonging to the second user is unavailabl...

Page 46: ...tocol Data is sent and received in ASCII format This mode is recommended if you do not print binary data It was designed for data in the printable ASCII range Print jobs can change this setting throug...

Page 47: ...the power cord ACHTUNG Bitte schalten Sie den Drucker aus und ziehen Sie den Netzstecker heraus s Caution It s very important to protect the printer controller board and other circuit boards such as S...

Page 48: ...the optional interface card You can either save or discard the plate 4 Attach the serial interface a Position the serial connectors directly over the serial connector pins on the controller board b Sn...

Page 49: ...llow the manu facturer s instructions for setting up the PC and installing if neces sary any operating system software such as DOS and or Windows What You Need for a Serial Interface Interface cables...

Page 50: ...a the serial interface turn off both systems first 2 Serial cable a Connect the serial cable with the null modem adapter attached to the PC s 9 pin or 25 pin male serial port b Connect the other end o...

Page 51: ...you want to be able to use all your printer s special fea tures like collation 600x600 dpi and 1200x1200 dpi printing or if you ve never printed to a PostScript printer before we recommend you take a...

Page 52: ...the printer Disabled Turn off serial communication with the host The printer stops accepting print jobs over the serial interface Default Disabled Notes The printer must be restarted for changes to t...

Page 53: ...the printer calculates the Min K Spool automatically at initialization The printer must be restarted for changes to the Min K Spool menu to take effect You can either let the printer restart automatic...

Page 54: ...bit used to identify data transmission errors Default None Notes See chapter 5 Additional Technical Information in the Reference manual for details on how to implement this feature on your QMS 2060 P...

Page 55: ...tration Communications Serial Ignore Parity menu to specify how the printer handles parity errors Menu Administration Communications Serial Ignore Parity Choices Off Ignore parity errors The printer p...

Page 56: ...Stop Bits Choices 1 Bit 2 Bits Default 1 Bit Menu Administration Communications Serial Hdwe Flow Ctl Choices DSR POL DSR DTR POL DTR RTS CTS Normal reverse Off on Normal reverse Off on Off on Off on...

Page 57: ...s can change this setting through PostScript operators Normal Fixed Enables standard ASCII 7 bit hex protocol Print jobs cannot change this setting through PostScript operators Binary Enables binary c...

Page 58: ...cards from electrostatic damage while performing this task Review the anti static guidelines in the Removing the Controller Board section of chapter 2 Memory and System Software 1 Verify that your pr...

Page 59: ...ler board making sure that all other pins are correctly aligned Then gently press down on the daughterboard until the pins are firmly seated V Caution Make sure that the 60 pin connector on the daught...

Page 60: ...JKWHUERDUG 406 3ULQW 6 VWHP 2SWLRQV 8 Check that the indicator for Multi Res shows up on the start up page in the list under Options If not you may have to repeat these procedures to make sure the boa...

Page 61: ...UH Q 7KLV KDSWHU Emulations on page 4 2 Font SIMMS on page 4 5 Disk Fonts on page 4 7 Kanji SIMM Kit on page 4 8 Kanji Internal Hard Disk Kit on page 4 14 Image printing on page 4 17 Forms printing pa...

Page 62: ...t files on floppy disks for your PC See your QMS vendor for a complete list of the available optional emulations This section describes how to download an optional emulation from a floppy disk to the...

Page 63: ...b refers to binary files 5 When the downloading is complete reboot the printer The emulation is ready to be used 9LD DQ WKHUQHW QWHUIDFH Note Before you begin this procedure your printer and PC or UN...

Page 64: ...the Disk light flashes to indicate that the emulation is being down loaded to the hard disk The ftp prompt returns when the emu lation has finished loading 9 At the ftp prompt end the ftp session by t...

Page 65: ...Turn off the printer and unplug the power cord ACHTUNG Bitte schalten Sie den Drucker aus und ziehen Sie den Netzstecker heraus s Caution It s very important to protect the printer controller board an...

Page 66: ...MM into place When seated the SIMM stands upright firmly in place If you cannot snap the SIMM into place do not force it Reposition it making sure that the bottom of the SIMM is seated completely in t...

Page 67: ...or for the available optional fonts This section describes how to download an optional font from a floppy disk to the printer s hard disk Note At least one hard disk internal or external must be insta...

Page 68: ...contains a Kanji SIMM with Kanji fonts and other files These fonts can be printed at a variety of point sizes and in different styles and resolutions Once the SIMM is installed on your QMS 2060 Print...

Page 69: ...supports both the Kanji fonts and PostScript printing The following system software is also required 0DFLQWRVK 6 VWHP 6RIWZDUH KanjiTalk version J1 6 0 7 or later System File version J1 6 0 7 or later...

Page 70: ...as other SIMMs and the 1200x1200 dpi Multi Res daughterboard from electrostatic damage while performing this task Review the anti static guidelines in the Removing the Controller Board section of cha...

Page 71: ...into place do not force it Reposition it making sure that the bottom of the SIMM is seated completely in the connector 5HLQVWDOOLQJ WKH RQWUROOHU RDUG 1 Insert the controller board in the printer Use...

Page 72: ...h using the following procedure Note Make sure that the bitmapped screen fonts disk is copied only to the KanjiTalk System Folder If bitmapped fonts are installed in another folder they will not appea...

Page 73: ...option kit You must download this file before you download any Kanji fonts to your print system 1 Access the Administration Emulation PostScript menu and select the Emulation Level Level 2 option 2 O...

Page 74: ...DME TXT file I RX UH 8VLQJ 26 To run a Japanese application in the DOS environment you need MS DOS V 5 0J Most major Japanese word processing applications are available for the DOS V environment Note...

Page 75: ...our QMS Kanji internal hard disk fonts you need A QMS Kanji Internal Hard Disk Kit A Macintosh IBM PC or compatible computer with a Kanji operating system and a Kanji application See the following sec...

Page 76: ...RFHGXUH The following steps are involved in setting up and using the Kanji fonts 1 Installing the IDE Kanji hard disk 2 Configuring the printer for Kanji 3 Accessing the Kanji fonts QVWDOOLQJ WKH QWHU...

Page 77: ...includes products that raise image printing performance and enhance print functionality to a level com parable to that of the document imaging system as a whole Typically print performance in a non I...

Page 78: ...disk and fill those forms with your applica tion s ASCII print stream Features include definition of page formatting and fonts duplexing with binding margin offsets two sided forms with text fill in...

Page 79: ...6WRUDJH DQG 6FDQQLQJ HYLFHV Q 7KLV KDSWHU Internal Hard Disks on page 5 2 External Hard Disks on page 5 7 CrownCopy on page 5 15 Automatic Document Feeder ADF Scanning on page 5 24...

Page 80: ...n Use the printer control panel to do this Information on using the con trol panel is in chapter 4 Printer Configuration in the Reference guide Choose Yes in the Administration Memory Enable Disk Swap...

Page 81: ...und ziehen Sie den Netzstecker heraus V Caution It s very important to protect the printer controller board and other circuit boards such as SIMMs and the 1200x1200 dpi Multi Res daughterboard from e...

Page 82: ...the four standoffs face the controller board the colored stripe on the ribbon cable faces away from you and the connector is down 6 Insert ribbon cable connector pin 1 colored stripe side of cable in...

Page 83: ...Sie den Drucker aus und ziehen Sie den Netzstecker heraus V Caution It s very important to protect the printer controller board and other circuit boards such as SIMMs and the 1200x1200 dpi Multi Res d...

Page 84: ...irmly on the hard disk The disk is firmly seated so it may take several tries to remove it 4 Pull the ribbon cable connector away from the connector pins V Caution Do not push or pull from the ribbon...

Page 85: ...ote FAQ numbers may be subject to change so you may want to obtain a directory of Q FAX documents before requesting a specific document GHQWLI LQJ DUG LVNV Hard disks Jaz drives and Zip drives are ide...

Page 86: ...e reorganization process could cause all files on the hard disk to be lost 7XUQLQJ RQ DQ WHUQDO DUG LVN For the printer to recognize one or more external hard disks each hard disk must be turned on be...

Page 87: ...se the Disk Cache size to 256 KB See chapter 4 Printer Con figuration of the Reference manual for more information on increas ing the disk cache client s size 8VLQJ D DQG LS ULYHV Keep the following i...

Page 88: ...ance through the list of selections or options Press this key to and the message window reads Select Access the Disk Operations Format Disk menu FORMAT DISK Select Access the Format Disk Dsk menu DSK...

Page 89: ...e Administration Disk Operations menu and then press the control panel keys in the order shown in the following table The printer responds by displaying a status message in the message window DSK refe...

Page 90: ...ess the DSK x Incremental menu DSK x INCREMENTAL Select Select Begin the backup process The printer creates a Backup directory on the Jaz or Zip drive to which you re backing data up and stores the da...

Page 91: ...ing a status message in the message window DSK refers to the device and is the device number Note You may need to press the Next key one or more times to advance through the list of selections or opti...

Page 92: ...one Jaz or Zip drive the message display prompts you Be sure to insert the drives in the proper sequence INSERT MEDIA x x is the disk number You re prompted when the backup process has finished RESTO...

Page 93: ...der ADF provides automatic copying of up to 50 sheets 3ULQW 6 VWHP 5HTXLUHPHQWV To use CrownCopy your printer must have An internal IDE hard disk 80 MB or larger Note The printer s hard disk is used f...

Page 94: ...URZQ RS 406 3ULQW 6 VWHP 2SWLRQV 6FDQQHU ZLWK 2XWSXW 3DSHU 6WDFNHU DLV KDLQ RQQHFWRU 7HUPLQDWRU 6 6 QWHUIDFH DEOH 3RZHU RUG RS H RFXPHQWDWLRQ...

Page 95: ...er Remove all packing material and shipping tape Store the packing material in a safe place in case you need to move the unit 2 Place the scanner on a flat work surface 3 Remove the shipping bracket T...

Page 96: ...on its bottom again V Caution To avoid scanner damage place the shipping bracket in the Shipping Position whenever you ship the scanner 4 Attach the output paper stacker a Slide the three notches into...

Page 97: ...he input paper chute extension 6 Make sure the power is off to both the printer and the scanner 7 Plug the power cord into the scanner and a power source 8 Set the SCSI ID setting Using a small flat h...

Page 98: ...he printer Connect the printer and scanner and daisy chain other external SCSI devices a Plug the daisy chain connector into the scanner b Attach one end of the SCSI cable to the daisy chain connector...

Page 99: ...the printer on the side with the interface ports You can t access the CrownCopy menu unless the Copy key is inserted It can be inserted with the printer power either on or off 11 Turn on the scanner...

Page 100: ...e left on the scanner glass If necessary flatten out any curls or folds in the document The left side and top edge of the document should be aligned with the reference frame in the rear left corner of...

Page 101: ...n line V Caution Do not press on or open the scanner cover during the copy process 5 On the printer s display panel you should see COPIER MENU COPY 6 Press the Select key and you should see COPY READY...

Page 102: ...e on the hard disk at least 15 MB to store the largest size scanned image The size of this image depends on the paper size and the printer resolution This section identifies the amount of Display List...

Page 103: ...per such as transparencies metal sheets or cloth Important documents that cannot be damaged 1 If necessary turn on the scanner and then the printer The power switch is located on the right side of the...

Page 104: ...Move the paper feed guides on the ADF so that they are approximately 0 25 5 mm wider than the document 9 Place the document to be copied face down in the input paper chute putting the ends of the bot...

Page 105: ...the copy process 13 On the printer s message window you should see COPIER MENU COPY 14 You must set the scan size of the document through the con figuration menu before copying through the ADF See the...

Page 106: ...y Key must be inserted before you can access the menu Copy Number of Copies Copy Mode Brightness Select Mode Scan Resolution D L Gray Custom 100 150 200 300 Threshold Gray Binary B W Halftone B W Half...

Page 107: ...that can be used to improve output quality You re copying a newsletter with text and halftone photos Use Custom Gray in Photographic mode for best quality You may get faster output using Halftone B W...

Page 108: ...ing the Menu key Error messages that normally occur such as jams will not appear on the display until you exit the CrownCopy menu Copy menu changes stay in effect only for the next scan executed The n...

Page 109: ...ion to set the number of copies you want Choices 1 the default to 999 Each digit is set individually Use the Select key to move the cursor to the digit you want to change and then use the Next key to...

Page 110: ...Best quality output for images Custom Gray Allows you to adjust grayscale values Note In order to change the default grayscale value you must choose the Custom Gray option in this menu Binary B W Allo...

Page 111: ...l as the flatbed for copying The more you crop out of a scan the less time it takes to process and print For example if you need to copy a photograph you can get faster copies by placing it at the upp...

Page 112: ...Mode Custom Config Scan Resolution Purpose Use this menu to specify what resolution the scanner should use for custom scan settings Choices 100 150 200 or 300 dpi Choose a scan resolution that is at m...

Page 113: ...otes Use the Previous key to move the message window cursor from the center towards the left to a darker less bright D setting or use the Next key to move the cursor towards the right to a lighter bri...

Page 114: ...ow cursor from the center the default position towards the left to a D Darker less bright setting or use the Next key to move the cursor towards the right to a Lighter L brighter setting Increasing th...

Page 115: ...Use a clean soft cloth moistened with a non corrosion solvent like alcohol purity above 99 5 to wipe the document cover and flat bed document glass OHDQLQJ WKH XWRPDWLF RFXPHQW HHGHU Clean the ADF wh...

Page 116: ...tton and open the ADF mod ule 2 Use a clean soft cloth moistened with non corrosion sol vent like alcohol purity above 99 5 to wipe the labelled parts 3 Push the ADF module securely back into place 6F...

Page 117: ...lace it 5HPRYLQJ WKH 2OG DPS 1 Turn off the scanner and unplug it from the power source 2 Raise the document cover 3 Turn on the scanner 4 Watch the lamp When it is positioned at the dot between the 1...

Page 118: ...er 6 Pull the spare lamp holder to the right and then towards you 7 Remove the new lamp 8 Replace the spare lamp holder and fasten with the screw that you removed 9 Close the document cover 10 Turn th...

Page 119: ...ent cover and remove the plastic plate located above the signal connector 13 Turn the knurled thumbscrew counterclockwise to remove it from the scanner V Caution Do not remove the Phillips screw on th...

Page 120: ...0DLQWHQDQFH 406 3ULQW 6 VWHP 2SWLRQV 14 Remove the metal plate 15 Remove the lamp from the scanner by pulling it straight out Note If the lamp is difficult to remove use pliers...

Page 121: ...ner The lamp can be seen through the document glass Make sure to position the lamp so the two pins are vertical 2 Use the small window on the top cover towards the front to check the pin position as y...

Page 122: ...e lamp 5 Screw the knurled thumbscrew back into place 6 Lift the rear side of the document cover again 7 Place the plastic plate vertically over the lamp unit and use the screw you removed earlier to...

Page 123: ...gal ADF Maximum Reproducible Area 8 11 x 10 61 Letter 200 mm x 287 mm A4 centered on the page This is the printer s maximum imageable area Resolution 60 300 dpi in 1 dpi increments Noise 54dB Scanner...

Page 124: ...60 C 40 140 F Gradient 10 C hr 50 F hr Relative Humidity Operating 10 90 RH non condensing Non operating 10 90 RH non condensing Vibration Operating 0 25 Hz Non operating 1 00 Hz Safety UL 478 4th CS...

Page 125: ...or mation on troubleshooting CrownCopy Paper condition Should not contain ink that can be transferred to rollers Do not scan documents with tears holes wrinkles carbon or adhesives with paper clips or...

Page 126: ......

Page 127: ...6HFXULW H DQG DUQLQJ X HU Q 7KLV KDSWHU Security Key on page 6 2 BuzzBox Lite on page 6 6...

Page 128: ...y is available to password protect the Operator Control and the Administration menus When a security key is installed the Installation menu appears in the printer s menu struc ture KDW V LQ WKH LW A s...

Page 129: ...displays for 1 5 seconds then the Administration menu displays b Press the Previous or Next key to display the Installation menu c Press the Select key and the first Installation menu option displays...

Page 130: ...ion Use Admin Pwd menus The passwords for these two menus can be the same or different Each password is case sensitive and is entered as an alphanumeric string If you choose a password that is not 16...

Page 131: ...you cannot enter the menus or make changes in it until you enter a valid password You ll know whether or not the menu is password protected when you press the Select key when trying to enter the menu...

Page 132: ...u dis plays Note If you forget a password you can recover it or set a new password by repeating the Enabling Passwords procedure on page 6 2 X R LWH BuzzBox Lite is a printer accessory that warns you...

Page 133: ...se isn t going to Interfere with paper exiting the printer Cover any vents doors connectors or labels 4 Use the Velcro provided to mount BuzzBox Lite where the printer operator can see and or hear it...

Page 134: ...printer is placed back on line or until the light and or buzzer switches are turned off 8VLQJ X R LWH When BuzzBox lights or buzzes check the printer message win dow to find out what has interrupted...

Page 135: ...RFXPHQW LQLVKLQJ 2SWLRQV Q 7KLV KDSWHU Duplexer on page 7 2 Additional Media Cassettes on page 7 7 Optional Feeder on page 7 8...

Page 136: ...chapter 3 Advanced Printing Features of the Operation manual for each resolution media size memory require ment s Caution Due to the curved path of the duplexer only paper between 17 and 28 lbs 63 92...

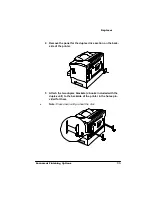
Page 137: ...he panel for the duplex drive section on the back side of the printer 5 Attach the two duplex brackets J hooks included with the duplex unit to the backside of the printer in the holes pro vided for t...

Page 138: ...XSOH HU 406 3ULQW 6 VWHP 2SWLRQV 6 Hook the duplex unit onto the brackets 7 Position the duplexer in place over the panel and the bracket...

Page 139: ...r for duplex printing through the con trol panel or printer driver Use the Duplex option in the Operator Control menu to enable duplexing See chapter 4 Printer Configuration in the Reference for more...

Page 140: ...XSOH HU 406 3ULQW 6 VWHP 2SWLRQV Follow these steps when removing the duplexer 1 Turn the power to the printer off 2 Remove the two screws...

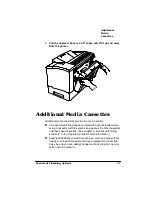
Page 141: ...ed capacity Install the optional feeder and a second cassette with the same size paper as the other cassette and then chain cassettes See chapter 3 Advanced Printing Features in the Operation guide fo...

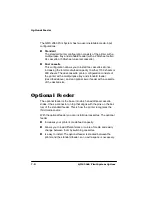
Page 142: ...with a multipurpose tray and standard feeder described above and an optional lower feeder with a cassette of the desired size 2SWLRQDO HHGHU The optional feeder is the base into which an additional c...

Page 143: ...material in case you ever have to move or ship the feeder to a new location QVWDOOLQJ WKH 2SWLRQDO HHGHU s Caution Turn off the printer before installing the optional feeder Install the optional feede...

Page 144: ...inter over the pins on the optional feeder and set the printer down on the optional feeder so that the three positioning posts on the optional feeder fit into the holes on the printer s bottom Ensure...

Page 145: ...FXPHQW LQLVKLQJ 2SWLRQV RDGLQJ WKH 2SWLRQDO 0HGLD DVVHWWH Follow the directions in the Loading the 500 Sheet Cassette section or Loading the 250 Sheet Cassette section in chapter 2 Consum ables of the...

Page 146: ......

Page 147: ...406 XVWRPHU 6XSSRUW Q 7KLV KDSWHU Sources of Support on page A 2 QMS World wide Offices on page A 5...

Page 148: ...facturer is the best source of help 4 Q FAX a QMS information retrieval service provides application notes technical support notes on common printing problems and information about printer specificati...

Page 149: ...nse Center CRC for more information about the bulletin board RPSX6HUYH Through CompuServe you ask general non technical questions share information with other users and access printing information and...

Page 150: ...n of the problem The printer model The type of host computer you re using The type and version of operating system you re using The interface you re using and if serial the protocol for example XON XO...

Page 151: ...ulletin Board Service 1 334 633 3632 Latin America Fax 1 334 639 3347 National Service Service Information Installation and Maintenance Pricing 1 800 762 8894 On Site Service and Depot Repair Informat...

Page 152: ...Tech Centre 52 2 Railway Parade 2141 Lidcombe NSW Australia 61 2 9901 3235 Fax 61 2 9901 3273 406 HQHOX Belgium Nether lands and all unlisted countries Planetenbaan 60 Corner Plaza 3606 AK Maarssen Th...

Page 153: ...av gen 41 6th floor 121 77 Johanneshov Sweden 46 8 600 01 30 Fax 46 8 600 01 33 406 6RXWK IULFD Saskay House Unit 24 Sunninghill Business Park Peltier Road Sunninghill Johannesburg Republic of South A...

Page 154: ......

Page 155: ...also LocalTalk Testing communication 3 10 Automatic Document Feeder 5 25 Cautions 5 25 Backing up Jaz drive to 5 11 Zip drive to 5 11 Brightness option 5 36 Bulletin board QMS A 3 Cabling LocalTalk 3...

Page 156: ...ns 5 45 custom mode 5 32 Customer Response Center CRC QMS A 4 Customer support QMS A 2 Dark adjustment 5 36 Data Bits menu serial 3 24 Device numbers hard disks 5 7 Documentation Overview of this manu...

Page 157: ...4 9 4 10 Interface Serial parameters setting 3 19 Internet A 3 Jaz drive Backing up to 5 11 Restoring from 5 13 Using 5 9 Kanji fonts and related files Kanji fonts 4 9 4 14 4 15 Kanji option kit Acce...

Page 158: ...controller board 2 2 Printer driver Macintosh 3 10 PC 3 19 Printer options 4 8 Cassette 7 7 Kanji 4 8 Product registration 4 9 4 15 PS Protocol menu Serial 3 25 4 Q FAX A 2 QMS Customer Response Cent...

Page 159: ...Receive 3 23 Transmit 3 23 Software requirements 4 9 4 15 Macintosh system software 4 9 4 15 PC system software 4 9 4 15 Specifications ADF 5 46 Spool Timeout menu serial 3 21 Spooling Memory 3 20 Tim...

Page 160: ......

Reviews: