background image

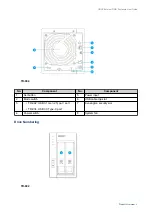
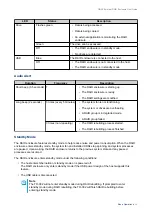
• Observe electrostatic discharge (ESD) procedures to avoid damage to components.

1.

Power off the RAID enclosure.
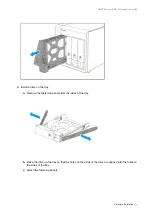
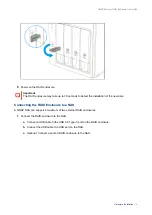
2.

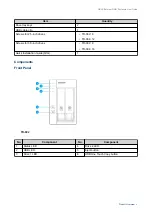
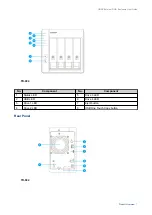
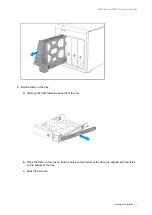
Remove a drive tray.
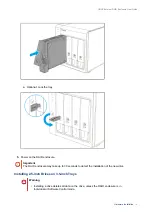
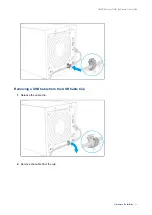
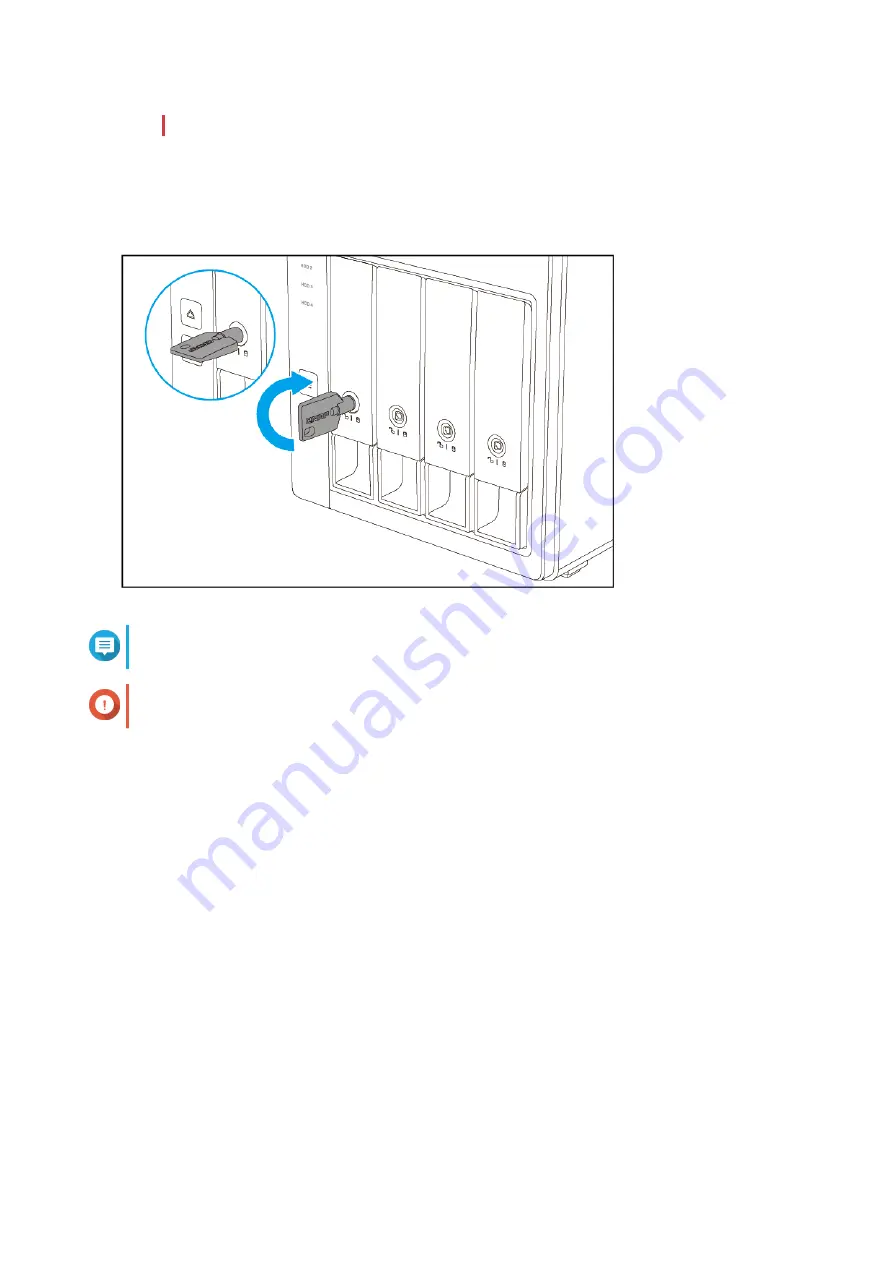
a.

Optional: Unlock the tray. 

Note

The preinstalled drive trays come unlocked.

Important

Ensure that the drive tray keys are stored in a safe place.
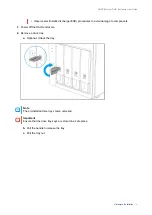
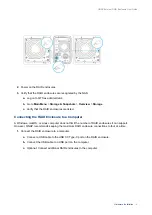
b.

Pull the handle to release the tray.
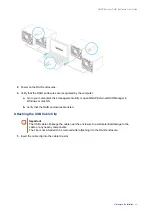
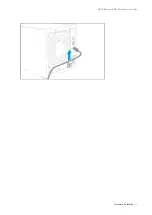
c.

Pull the tray out. 

QNAP External RAID Enclosure User Guide

Hardware Installation   

15

Summary of Contents for TR-002

Page 1: ...External RAID Enclosure TR 002 TR 004 User Guide Document Version 1 25 02 2019 ...

Page 2: ...ting the RAID Enclosure to a Computer 19 Attaching the USB Cable Clip 20 Removing a USB Cable from the USB Cable Clip 22 4 RAID Configuration Supported RAID Types 24 Storage Modes 26 Storage Modes and Platform Support 26 Mode Switch 26 Configuring RAID Settings Using the Mode Switch 27 5 Basic Operations Eject Button 29 USB One Touch Copy Button 29 Set Button 29 LEDs 29 Audio Alert 30 Standby Mode...

Page 3: ...8 Notices Limited Warranty 34 Disclaimer 34 GNU Public License 34 FCC Notice 42 CE Notice 42 SJ T 11364 2006 43 VCCI Notice 43 BSMI Notice 44 2 ...

Page 4: ...ssumes that the user has a basic understanding of storage and backup concepts Document Conventions Symbol Description Notes provide default configuration settings and other supplementary information Important notes provide information on required configuration settings and other critical information Tips provide recommendations or alternative methods of performing tasks or configuring settings War...

Page 5: ...enance procedures on the product by you or an unauthorized third party invalidates the warranty QNAP is not responsible for any damage or data loss caused by unauthorized modifications and installation of unsupported third party applications For details see the QNAP Warranty Terms and Conditions Component TR 002 TR 004 Ordering Information Ordering P N TR 002 TR 004 Storage Drive bays 2 x 3 5 inch...

Page 6: ...r position which is within one meter of the RAID enclosure The test device operated at low speed with the maximum number of drives installed Fans System 1 x 7 cm 12V DC smart fan System 1 x 12 cm 12V DC smart fan Warning To avoid potential injury or damage to the components do not touch the fans while the device is connected to a power source Operating temperature 0 C to 40 C 32 F to 104 F Relativ...

Page 7: ...04 12 Screws for 3 5 inch drives TR 002 8 TR 004 16 Quick Installation Guide QIG 1 Components Front Panel TR 002 No Component No Component 1 Status LED 4 Drive 2 LED 2 USB LED 5 Eject button 3 Drive 1 LED 6 USB One Touch Copy button QNAP External RAID Enclosure User Guide Product Overview 6 ...

Page 8: ...nent No Component 1 Status LED 5 Drive 3 LED 2 USB LED 6 Drive 4 LED 3 Drive 1 LED 7 Eject button 4 Drive 2 LED 8 USB One Touch Copy button Rear Panel TR 002 QNAP External RAID Enclosure User Guide Product Overview 7 ...

Page 9: ...5 Power input 2 Mode switch 6 USB cable clip slot 3 TR 002 USB 3 1 Gen 2 Type C port TR 004 USB 3 0 Type C port 7 Kensington security slot 4 Power switch 8 System fan Drive Numbering TR 002 QNAP External RAID Enclosure User Guide Product Overview 8 ...

Page 10: ...drives For details on compatible drives go to https www qnap com compatibility USB connector cable Tools Phillips 1 or 2 screwdriver Anti static wrist strap Setting Up the RAID Enclosure 1 Place the RAID enclosure in an environment that meets the requirements For details see Installation Requirements 2 Install the drives For details see the following topics Installing 3 5 inch Drives on 3 5 inch T...

Page 11: ...r details see the following topics Connecting the RAID Enclosure to a NAS Connecting the RAID Enclosure to a Computer 5 Power on the RAID enclosure 6 Optional Configure the RAID settings For details see RAID Configuration QNAP External RAID Enclosure User Guide Product Overview 10 ...

Page 12: ... inch Trays Warning Installing a drive deletes all data on the drive unless the RAID enclosure is in Individual or Software Control mode Observe electrostatic discharge ESD procedures to avoid damage to components 1 Power off the RAID enclosure 2 Remove a drive tray a Optional Unlock the tray Note The preinstalled drive trays come unlocked Important Ensure that the drive tray keys are stored in a ...

Page 13: ...panels from the sides of the tray b Place the drive on the tray so that the holes on the sides of the drive are aligned with the holes on the sides of the tray c Attach the fastening panels QNAP External RAID Enclosure User Guide Hardware Installation 12 ...

Page 14: ...ure the drive Important QNAP recommends attaching the screws to the drive trays during transport 4 Load the tray into the drive bay a Insert the tray into the bay b Push the handle QNAP External RAID Enclosure User Guide Hardware Installation 13 ...

Page 15: ...up to 30 seconds to detect the installation of the new drive Installing 2 5 inch Drives on 3 5 inch Trays Warning Installing a drive deletes all data on the drive unless the RAID enclosure is in Individual or Software Control mode QNAP External RAID Enclosure User Guide Hardware Installation 14 ...

Page 16: ... enclosure 2 Remove a drive tray a Optional Unlock the tray Note The preinstalled drive trays come unlocked Important Ensure that the drive tray keys are stored in a safe place b Pull the handle to release the tray c Pull the tray out QNAP External RAID Enclosure User Guide Hardware Installation 15 ...

Page 17: ...ght fastening panel from the tray b Place the drive on the tray so that the holes on the bottom of the drive are aligned with the holes on the bottom of the tray c Attach the screws QNAP External RAID Enclosure User Guide Hardware Installation 16 ...

Page 18: ...4 Load the tray into the drive bay a Insert the tray into the bay b Push the handle c Optional Lock the tray QNAP External RAID Enclosure User Guide Hardware Installation 17 ...

Page 19: ...ure to a NAS A QNAP NAS can support a maximum of two external RAID enclosures 1 Connect the RAID enclosure to the NAS a Connect a USB cable to the USB 3 0 Type C port on the RAID enclosure b Connect the USB cable to a USB port on the NAS c Optional Connect a second RAID enclosure to the NAS QNAP External RAID Enclosure User Guide Hardware Installation 18 ...

Page 20: ...dows macOS or Linux computer does not limit the number of RAID enclosures it can support However QNAP recommends keeping the maximum RAID enclosure connections to four at a time 1 Connect the RAID enclosure to a computer a Connect a USB cable to the USB 3 0 Type C port on the RAID enclosure b Connect the USB cable to a USB port on the computer c Optional Connect additional RAID enclosures to the c...

Page 21: ...OS b Verify that the RAID enclosures are listed Attaching the USB Cable Clip Important The USB cable clip keeps the cable near the enclosure to avoid potential damage to the cable or any nearby components The clip is not intended to be removed after attaching it to the RAID enclosure 1 Insert the cable clip into the cable clip slot QNAP External RAID Enclosure User Guide Hardware Installation 20 ...

Page 22: ...2 Insert the cable into the clip 3 Fasten the clip to secure the cable QNAP External RAID Enclosure User Guide Hardware Installation 21 ...

Page 23: ...Removing a USB Cable from the USB Cable Clip 1 Release the cable clip 2 Remove the cable from the clip QNAP External RAID Enclosure User Guide Hardware Installation 22 ...

Page 24: ...QNAP External RAID Enclosure User Guide Hardware Installation 23 ...

Page 25: ...l disks function according to the capacity of the smallest disk For example if a RAID group contains five 2 TB disks and one 1 TB disk the total capacity will be 6 TB You can only use one disk type HDD or SSD in a RAID group Combining different types of disk in one RAID group is not supported QNAP recommends creating separate RAID groups for each capacity and type of disk Note The RAID enclosure d...

Page 26: ... you have two disks Important Deleting a RAID 1 group does not format the drives TR 002 TR 004 RAID 5 3 or more Data and parity information are striped across all disks The capacity of one disk is lost for parity This means that if any one disk fails it can be replaced and the data on it can be restored Striping means read speeds are increased with each additional disk RAID 5 is recommended for a ...

Page 27: ...static volume External Storage Use the RAID enclosure as an external hardware RAID device with a NAS or a Windows macOS or Linux based computer Storage Modes and Platform Support Configuration NAS Storage Mode External Storage Mode Software Control Required Yes Individual No Yes JBOD Yes Yes RAID 0 1 5 10 Yes Yes Multiple RAID Groups No Yes Mode Switch You can configure RAID settings manually usin...

Page 28: ...ve must be installed in the RAID enclosure for it to be recognized by QNAP External RAID Manager Do not use QNAP External RAID Manager at the same time as any other RAID management software Doing so may affect the response time of QNAP External RAID Manager Configuring RAID Settings Using the Mode Switch Switching From Individual Mode to a RAID Mode or Software Control Mode Warning Configuring RAI...

Page 29: ...enclosure beeps once Tip Stop here if you want to keep the RAID enclosure in Individual mode 4 Set the Mode switch to Software Control or the desired RAID setting 5 Press and hold the Set button for three seconds The expansion enclosure beeps once Note Pressing the Set button is not necessary when switching to Software Control mode 6 Verify that the settings have been applied a Open QNAP External ...

Page 30: ...unning QTS 4 4 1 or later that has a USB One Touch Copy button Set Button The Set button is used for configuring the RAID settings from the rear panel of the external RAID enclosure For details see Mode Switch LEDs LEDs indicate system status and related information when the external RAID enclosure is powered on The following LED information applies only when the drive is correctly installed and w...

Page 31: ... repeating The RAID rebuilding process started The RAID rebuilding process finished Standby Mode The RAID enclosure features standby mode to help reduce noise and power consumption When the RAID enclosure enters standby mode the system fan and installed HDDs stop spinning and system processes are paused Upon waking the RAID enclosure returns to the previous system state and any paused processes ar...

Page 32: ...uations RAID 1 One member drive fails RAID 5 One member drive fails RAID 10 One member drive fails Two member drives fail one in bay 1 or 2 and one in bay 3 or 4 1 Log on to QTS 2 Go to Main Menu Storage Snapshots Storage External Storage 3 Locate the failed drive 4 Prepare a new hard drive with a capacity that is the same as or larger than the failed hard drive 5 Remove the failed drive from the ...

Page 33: ...s Rebuilding Support and Other Resources QNAP provides the following resources Resource URL Documentation http docs qnap com Helpdesk http helpdesk qnap com Downloads http download qnap com Community Forum http forum qnap com QNAP External RAID Enclosure User Guide Troubleshooting 32 ...

Page 34: ... Windows and macOS utility that allows you to view and configure QNAP external RAID enclosures Storage Snapshots QTS utility that allows you to view and configure QNAP external RAID enclosures connected to a QNAP NAS QNAP External RAID Enclosure User Guide Glossary 33 ...

Page 35: ...es no warranty or representation expressed implied or statutory with respect to its products or the contents or use of this documentation and all accompanying software and specifically disclaims its quality performance merchantability or fitness for any particular purpose QNAP reserves the right to revise or update its products software or documentation without obligation to notify any individual ...

Page 36: ...ion of the GPL to prohibit the practice for those products If such problems arise substantially in other domains we stand ready to extend this provision to those domains in future versions of the GPL as needed to protect the freedom of users Finally every program is threatened constantly by software patents States should not allow patents to restrict development and use of software on general purp...

Page 37: ...he Corresponding Source need not include anything that users can regenerate automatically from other parts of the Corresponding Source The Corresponding Source for a work in source code form is that same work 3 Basic Permissions All rights granted under this License are granted for the term of copyright on the Program and are irrevocable provided the stated conditions are met This License explicit...

Page 38: ...ined with it such as to form a larger program in or on a volume of a storage or distribution medium is called an aggregate if the compilation and its resulting copyright are not used to limit the access or legal rights of the compilation s users beyond what the individual works permit Inclusion of a covered work in an aggregate does not cause this License to apply to the other parts of the aggrega...

Page 39: ...art of a transaction in which the right of possession and use of the User Product is transferred to the recipient in perpetuity or for a fixed term regardless of how the transaction is characterized the Corresponding Source conveyed under this section must be accompanied by the Installation Information But this requirement does not apply if neither you nor any third party retains the ability to in...

Page 40: ...rk except as expressly provided under this License Any attempt otherwise to propagate or modify it is void and will automatically terminate your rights under this License including any patent licenses granted under the third paragraph of section 11 However if you cease all violation of this License then your license from a particular copyright holder is reinstated a provisionally unless and until ...

Page 41: ...greement or commitment not to enforce a patent against the party If you convey a covered work knowingly relying on a patent license and the Corresponding Source of the work is not available for anyone to copy free of charge and under the terms of this License through a publicly available network server or other readily accessible means then you must either 1 cause the Corresponding Source to be so...

Page 42: ... by the Free Software Foundation If the Program specifies that a proxy can decide which future versions of the GNU General Public License can be used that proxy s public statement of acceptance of a version permanently authorizes you to choose that version for the Program Later license versions may give you additional or different permissions However no additional obligations are imposed on any au...

Page 43: ...interference to radio communications However there is no guarantee that interference will not occur in a particular installation If this equipment does cause harmful interference to radio or television reception which can be determined by turning the equipment off and on the user is encouraged to try to correct the interference by one or more of the following measures Reorient or relocate the rece...

Page 44: ... 有毒有害物质或元素 铅 Pb 汞 Hg 镉 Cd 六价铬 CR VI 多溴联苯 PBB 多溴二苯醚 PBDE 壳体 0 0 0 0 0 0 显示 0 0 0 0 0 0 印刷电路板 0 0 0 0 0 0 金属螺帽 0 0 0 0 0 0 电缆组装 0 0 0 0 0 0 风扇组装 0 0 0 0 0 0 电力供应组装 0 0 0 0 0 0 电池 0 0 0 0 0 0 O 表示该有毒有害物质在该部件所有物质材料中的含量均在 SJ T11363 2006 标准规定的限量要求以下 X 表示该有毒有害物质至少在该部件的某一均质材料中的含量超出 SJ T11363 2006 标准规定的限量要求 VCCI Notice VCCI B QNAP External RAID Enclosure User Guide Notices 43 ...

Page 45: ...BSMI Notice QNAP External RAID Enclosure User Guide Notices 44 ...

Reviews: