background image

 172 

 
2.


By Web File Manager of the NAS. 
a.


Go to the NAS administration page and click “Web File Manager”. Enter user 
name and password to login the NAS. 


b.


Click “FTP”. 


Summary of Contents for TS-639 Pro Turbo NAS

Page 1: ...TS 639 Pro Turbo NAS User Manual Version 2 1 0 Copyright 2008 QNAP Systems Inc All Rights Reserved ...

Page 2: ... the price paid for the product from direct indirect special incidental or consequential software or its documentation QNAP makes no warranty or representation expressed implied or statutory with respect to its products or the contents or use of this documentation and all accompanying software and specifically disclaims its quality performance merchantability or fitness for any particular purpose ...

Page 3: ... 2 4 2 Mac Users 27 CHAPTER 3 ENJOY THE POWERFUL SERVICES OF THE NAS 30 3 1 SERVER ADMINISTRATION 36 3 2 QUICK CONFIGURATION 37 3 3 SYSTEM SETTINGS 42 3 3 1 Server Name 42 3 3 2 Date Time 43 3 3 3 Filename Encoding Setting 44 3 3 4 Configure SMTP Server 44 3 3 5 Configure SMSC Server 45 3 3 6 View System Settings 46 3 4 NETWORK SETTINGS 47 3 4 1 TCP IP Configuration 47 3 4 2 Microsoft Networking 5...

Page 4: ... 1 Windows Users 79 3 5 6 2 Mac Users 82 3 5 7 eSATA Disk 86 3 6 USER MANAGEMENT 87 3 6 1 Users 87 3 6 1 1 Create user 89 3 6 1 2 Create Multiple Users 90 3 6 2 User Groups 92 3 6 3 Quota 99 3 7 NETWORK SHARE MANAGEMENT 101 3 7 1 Network Share Management 101 3 7 1 1 Create 101 3 7 1 2 Property 103 3 7 1 3 Access Control 104 3 7 1 4 Delete 105 3 7 1 5 Restore 106 3 7 1 6 NFS Access Control 107 3 7 ...

Page 5: ...stem Information 136 3 9 5 Syslog Settings 137 CHAPTER 4 USE FRONT USB BACKUP BUTTON 138 CHAPTER 5 MULTIMEDIA STATION 139 5 1 SHARE PHOTOS AND MULTIMEDIA FILES VIA WEB INTERFACE 139 5 2 ENABLE ITUNES SERVICE 149 5 3 USE UPNP MEDIA SERVER 152 CHAPTER 6 DOWNLOAD STATION 155 6 1 USE DOWNLOAD SOFTWARE QGET 165 CHAPTER 7 WEB SERVER 167 CHAPTER 8 FTP SERVER 171 CHAPTER 9 WEB FILE MANAGER 174 CHAPTER 10 ...

Page 6: ...TDOWN 201 13 5 ABNORMAL OPERATION OF SYSTEM SOFTWARE 201 13 6 SYSTEM TEMPERATURE PROTECTION 201 CHAPTER 14 RAID ABNORMAL OPERATION TROUBLESHOOTING 202 APPENDIX A USE THE LCD PANEL 204 TECHNICAL SUPPORT 210 GNU GENERAL PUBLIC LICENSE 211 ...

Page 7: ... the NAS 5 Do not place any objects on the NAS for the server s normal operation and to avoid overheat 6 Use the flat head screws in the product package to lock the hard disks in the NAS when installing hard disks for proper operation 7 Do not place the NAS near any liquid 8 Do not place the NAS on any uneven surface to avoid falling off and damage 9 Make sure the voltage is correct in your locati...

Page 8: ... True Image CA Brightstor ARCserve Backup EMC Retrospect Symantec Backup Exec LaCie Silverkeeper RAID Station y Advanced disk configurations RAID 0 1 5 6 5 spare single and JBOD y Intelligent on line RAID capacity expansion and RAID level migration Printer Server y Network printer sharing via USB support Windows Mac platform y Support all in one printer max 3 sets Remote Replication y Data on the ...

Page 9: ...imedia files video and audio local playing y Automatic file categorization Download Station y Support PC less BitTorrent FTP HTTP download y QNAP remote download control software QGet Windows based application allows you to control the download tasks of multiple Turbo NAS on one PC via LAN WAN y BitTorrent download supports TCP UDP DHT y BT schedule download supported y Support BT tasks download u...

Page 10: ...ackage contains 9 TS 639 Pro Turbo NAS 9 Power cord 9 CD ROM user manual QNAP Finder utility inclusive 9 Quick Installation Guide 9 Flat head screw x 24 9 Ethernet cable x 2 9 Hard disk lock 9 Quick Installation Guide RAID configuration ...

Page 11: ...n 2 USB 2 0 3 LED indicators Status LAN USB HDD1 HDD2 HDD3 HDD4 HDD5 HDD6 4 Power button 5 Select button 6 Enter button 7 Power connector 8 Giga LAN x 2 9 USB 2 0 x 4 10 eSATA x 2 11 VGA 12 Password network settings reset button 13 K lock security slot ...

Page 12: ...apter 2 Install NAS 2 1 Install Hard Disk 1 Take out the disk trays 2 Install a hard disk on each tray Make sure the disk holes match the holes at the base of the disk tray and lock the disk with four screws ...

Page 13: ...13 3 Insert the disk trays to NAS Push the disk trays to the end 4 Connect the network cable 5 Connect the power cord to the NAS and plug in the power cord to the wall socket ...

Page 14: ... E7K500 HDS725050KLA360 SATA II 7200 500 16 Hitachi Deskstar T7K500 HDT725025VLA380 SATA II 7200 500 8 Hitachi Deskstar T7K500 HDT725040VLA360 SATA II 7200 400 16 Hitachi Deskstar T7K500 HDT725040VLA380 SATA II 7200 400 8 Hitachi Deskstar T7K500 HDT725032VLA360 SATA II 7200 320 16 Hitachi Deskstar T7K500 HDT725032VLA380 SATA II 7200 320 8 Hitachi Deskstar T7K500 HDT725025VLA360 SATA II 7200 250 16...

Page 15: ... ST3750330AS SATA II 7200 750 32 Seagate Barracuda 7200 11 ST3750630AS SATA II 7200 750 16 Seagate Barracuda 7200 11 ST3500320AS SATA II 7200 500 32 Seagate Barracuda 7200 11 ST3500620AS SATA II 7200 500 16 Seagate Barracuda 7200 11 ST3320613AS SATA II 7200 320 16 Seagate Barracuda 7200 10 ST3250620AS SATA II 7200 250 16 Seagate Barracuda 7200 10 ST3250410AS SATA II 7200 250 16 Seagate Barracuda 7...

Page 16: ...00 750 16 WD WD RE2 GP WD5000ABPS SATA II 7200 500 16 WD WD Caviar Green WD10EACS SATA II 7200 1000 16 WD WD Caviar Green WD7500AACS SATA II 7200 750 16 WD WD Caviar Green WD5000AACS SATA II 7200 500 16 WD WD Caviar SE16 WD7500AAKS SATA II 7200 750 16 WD WD Caviar SE16 WD6400AAKS SATA II 7200 640 16 WD WD Caviar SE16 WD5000AAKS SATA II 7200 500 16 WD WD Caviar SE16 WD4000AAKS SATA II 7200 400 16 W...

Page 17: ...ation easily When the NAS is turned on please check the following items to make sure the system status is normal Note that the following LED information is applicable only when you have properly installed HDD and connected the NAS to the network and power 1 Status 2 LAN 3 USB 4 eSATA 5 HDD1 HDD6 ...

Page 18: ...g updated 3 RAID rebuilding 4 RAID capacity expansion 5 RAID level migration Red ON 1 HDD invalid 2 Volume is full 3 Volume is going to be full 4 Fan out of function 5 HDD read write error 6 HDD bad sector 7 RAID degraded mode read only 8 Hardware self test error Flashes red every 0 5 sec Degraded mode Flashes green every 0 5 sec 1 System booting 2 System is not configured 3 HDD is not formatted G...

Page 19: ...et 4 Firmware is completely updated Short beep 0 5 sec 3 Front USB copy button cannot copy when backup to external disk is in process available in v2 0 firmware version Short beep 0 5 sec long beep 1 5 sec 3 every 5 min Fan out of function 2 1 HDD volume is going to be full 2 HDD is full 3 HDD in degraded mode 4 HDD starts rebuilding Long beep 1 5 sec 1 1 Hardware shutdown 2 System is ready ...

Page 20: ...the steps below to configure the software settings of the NAS The configuration procedure of Windows and Mac users are different Please select the appropriate procedure according to your OS 2 4 1 Windows Users 1 Execute the product CD a menu is shown Select your NAS model to continue ...

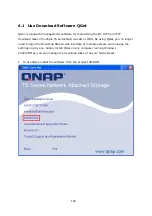
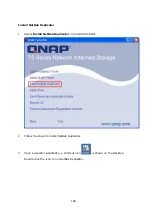
Page 21: ...21 2 The following menu is shown Select Install QNAP Finder to continue ...

Page 22: ...22 3 Follow the instructions to install QNAP Finder QNAP Finder will run automatically If you are using Windows XP SP2 the following screen will be shown Please select Unblock ...

Page 23: ...AS available in the network and ask if you want to perform quick setup Click Yes to continue Note If the server is not found click Refresh to try again 5 Enter the default user name and password Default user name admin Password admin ...

Page 24: ...s to finish the configuration For further information please refer to Chapter 3 2 Note 1 It is recommended to use Internet Explorer 6 0 or above to access the NAS If the OS of your PC is Windows 98 the NAS supports Internet Explorer 6 0 or above only 2 The NAS also supports Mozilla Firefox ...

Page 25: ...25 7 Click Start installation to execute the quick configuration ...

Page 26: ...26 8 Congratulations You have finished the quick configuration Click Return to the system administration page to return to the login page of the NAS ...

Page 27: ...27 2 4 2 Mac Users 1 Insert the NAS CD ROM in your Mac and find the directory MacWizard Then run MacWizard dmg 2 Run Quick Install Wizard ...

Page 28: ... Quick Install Wizard will find the NAS available in the network and ask if you want to perform quick setup Click OK to continue 4 Enter the default user name and password Default user name admin Password admin ...

Page 29: ...instructions to finish the configuration For further information please refer to Chapter 3 2 Note 1 Mac Quick Install Wizard does not support mapping network drive 2 It is recommended to access the NAS by Mozilla Firefox in Mac Safari does not support Download Station of the NAS ...

Page 30: ... find the server please browse the whole network to search for the NAS Double click the name of the NAS for connection b Use Run function in Windows Enter NAS name or NAS IP to access share folder on the NAS c Windows users can use the Finder to find the NAS When the administration page is shown click Web File Manager Enter the user name and password and then start to manage the NAS 2 You can uplo...

Page 31: ...C is Windows 98 the NAS supports Internet Explorer 6 0 only 2 Please use Mozilla Firefox to access the NAS in Mac The user name here should be the same as the server name you enter in Chapter 2 4 Configure Software Settings The IP address here should be the same as the IP address you enter in Chapter 2 4 Configure Software Settings If you are using DHCP a connect the PC to the NAS directly please ...

Page 32: ...en the administration page of the NAS is shown you can start to use the services To modify system settings click Administration Enter the user name and password to login Default user name admin Password admin ...

Page 33: ...ed transfer To use this function check the box SSL login on the administration page and login the server Note If your NAS is placed behind an NAT gateway and you want to access the NAS by secure login from the Internet you must open the port 443 on your NAT and forward this port to the LAN IP of the NAS ...

Page 34: ...3 5 1 Disaster Recovery The NAS supports remote share folder backup via the network In case of data damage in PC you can restore all backup data Please refer to Chapter 3 8 10 Web Server The NAS enables you to create your own website easily It also supports Joomla PHP and SQLite to establish interactive websites Please refer to Chapter 7 Printer Server The NAS supports network printer sharing func...

Page 35: ...erver The NAS provides convenient and secure file server functions that support central data management Users can be granted with the right to access network share and share important files Please refer to Chapter 3 7 and Chapter 9 ...

Page 36: ...36 3 1 Server Administration There are 8 main sections in server administration ...

Page 37: ...ion to complete the settings of the NAS If you have any questions during web administration please click the help button on the top right hand corner of the page Other buttons are described as below Return to previous page Return to home page Logout system Step 1 Enter the server name ...

Page 38: ...38 Step 2 Change the administrator password or select to use the original password Step 3 Enter the date time and select the time zone for the server ...

Page 39: ...S plays the role as a terminal and needs to perform independent connection e g BT download you must enter at least one DNS server IP for proper URL connection Otherwise the function may not work properly 2 If you select to obtain IP address via DHCP there is no need to configure the primary and secondary DNS servers You can enter 0 0 0 0 in the settings Step 5 Select the services to enable on the ...

Page 40: ...n password for the disk volume The password should be 8 16 characters long Use Default Value Check this option to use the default password The default password is admin Save Encryption Key Check this option and the encryption key is saved on the system The server will use the key to unlock the disk volume after system startup and mount the disk automatically If you select not to save the key you n...

Page 41: ...41 Finished The basic system settings are shown Click Start Installation to begin system installation ...

Page 42: ...3 1 Server Name Please assign a unique name for this server for ease of identification within the local network The length of server name can be up to 14 characters which can be a combination of alphabetical letters A Z or a z numbers 0 9 and hyphens The server will not accept spaces period or other symbols ...

Page 43: ...t with the actual time when an action occurs 9 Synchronize with an Internet time server automatically You can enable this option to update the date and time of the system automatically with an NTP Network Time Protocol server Enter the IP address or domain name of the NTP server e g time nist gov time windows com Then enter the time interval when the server time should be updated Note The first ti...

Page 44: ...ur FTP clients or the OS of your PC does not support Unicode e g Windows 95 98 ME select the language the same as your OS here in order to view the files and directories on the server properly 3 3 4 Configure SMTP Server Configure the SMTP server for outgoing mails of this server If your mail server requires SMTP authentication please enter the user name and password for the mail server ...

Page 45: ...l You may also add your own SMS service provider by selecting Add SMS Provider on the drop down menu When you select Add SMS service provider you need to enter the name of the SMS provider and the URL template text Note You will not be able to receive the SMS properly if the URL template text entered does not follow your SMS service provider s standard ...

Page 46: ...46 3 3 6 View System Settings You can view all current system settings e g server name on this page ...

Page 47: ...powerful applications of the NAS e g Multimedia Station Download Station and Web Server 3 4 1 TCP IP Configuration The NAS provides two ports that you can configure failover load balancing or standalone functions When you use these functions make sure both LAN ports are connected to the network ...

Page 48: ...y of switching over the network transfer port to the redundant port automatically when the primary one fails due to hardware or connection error to avoid network disconnection When the primary network port resumes to work the network transfer will be switched back to that port automatically ...

Page 49: ...s on layer 3 protocol IP NCP IPX only Multicast broadcast and other non routable protocols e g NetBEUI can only be transferred via the main network port Note To optimize the network transfer speed of the NAS in load balancing mode please use a managed Ethernet switch and enable 802 3ad or link aggregation on the ports of the switch that the Giga LAN ports of the NAS are connected to ...

Page 50: ...elect auto negotiation default 1000 Mbps or 100 Mbps It is recommended to use the default setting that the server will determine network speed automatically Obtain IP address settings automatically via DHCP If your network supports DHCP the NAS will use DHCP protocol to retrieve the IP address and related information automatically Use static IP address To use fixed IP address for network connectio...

Page 51: ...r If no DHCP is available in the LAN where the NAS locates you can enable this function to enable the NAS as a DHCP server and allocate dynamic IP address to DHCP clients in LAN You can set the range of IP addresses allocated by DHCP server and the lease time Lease time refers to time that IP address is leased to the clients by DHCP server When the time expires the client has to acquire an IP addr...

Page 52: ...fers to the size in bytes of the largest packet that a given layer of a communications protocol can transmit The NAS uses standard Ethernet frames 1500 bytes by default If your network appliances support Jumbo Frame setting select the appropriate MTU value for your network environment The NAS supports 4074 7418 and 9000 bytes for MTU Note Jumbo Frame setting is valid in Gigabit network environment...

Page 53: ...ber The NAS supports Windows 2003 AD Active Directory to provide quick and direct import of user accounts to the existing AD server available in your network This function helps you to save time and effort on creating user accounts and passwords and lowers IT maintenance cost by automatic configuration procedure Server Description Describe the NAS for users to identify the server To use the NAS on...

Page 54: ... will automatically register its name and IP address with WINS service If you have a WINS server in your network and want to use this server enter the WINS server IP 9 Domain Master There is a unique Domain Master Browser for collecting and recording resources and services available for each PC in the network or workgroup of Windows When you find the waiting time for accessing Network Neighborhood...

Page 55: ...ss authority to configure the settings For detailed configuration please refer to Chapter 3 7 1 6 For the information of connecting to the NAS via NFS on Linux please refer to Chapter 12 3 4 5 Web File Manager To access files on the NAS via web browser enable Web File Manager If the NAS is connected to the Internet and uses a valid IP address you can access files on the server by web browser from ...

Page 56: ...s connected to the FTP at the same time 9 Select Protocol Type Select to use standard FTP connection or SSL TLS encrypted FTP Select the corresponding protocol type in your client FTP software to ensure successful connection 9 Unicode Support Select to enable or disable Unicode Support The default setting is No Since most ...

Page 57: ...ss If this option is disabled users must enter an authorized user name and password to access the server 9 Passive FTP Port Range You can use the default port range 55536 56559 or define a port range larger than 1024 When using this function please make sure you have opened the configured port range on your router or firewall 9 Respond with external IP address for passive FTP connection request Wh...

Page 58: ...58 9 FTP Transfer Limitation You can configure the maximum number of all FTP connections maximum connections of a single account and the maximum upload download rates of a single connection ...

Page 59: ...tation iTunes service and UPnP Media Server please refer to Chapter 5 3 4 8 iTunes Service By enabling the iTunes service the NAS shares the mp3 files in the Qmultimedia folder to all the iTunes clients available in the same subnet The clients can automatically detect browse and play the music files in the NAS For further details please refer to Chapter 5 2 ...

Page 60: ... please refer to Chapter 6 Warning Please be warned against illegal downloading of copyrighted materials The Download Station functionality is provided for downloading authorized files only Downloading or distribution of unauthorized materials may result in severe civil and criminal penalty Users are subject to the restrictions of the copyright laws and should accept all the consequences ...

Page 61: ...please refer to Chapter 7 Configure register_globals Select to enable or disable register_globals The setting is disabled by default When the web program asks to enable php register_globals please enable this option However for system security concerns it is recommended to disable this option php ini Maintenance Check the box php ini Maintenance to select to upload edit or restore php ini ...

Page 62: ...ile Upload Upload a new php ini file to replace the current file Restore Restore the php ini file to system default Note To use PHP mail function you can go to System Settings Configure SMTP Server to configure the SMTP server settings ...

Page 63: ...is changed the NAS will notify DDNS provider immediately to record the new IP address When the user tries to connect the NAS via the host name DDNS will transfer the recorded IP address to the user Enable and configure DDNS of the NAS Before using DDNS service please register a host name from the DDNS provider The NAS supports the 5 DDNS providers members dyndns org update ods org members dhs org ...

Page 64: ...n When you disable this option your MySQL Server will only be configured as local database server for NAS s web server After enabling remote connection please assign a port for the remote connection service of MySQL server The default port is 3306 After the first time installation of the NAS a folder phpMyAdmin is created in the Qweb network folder You can enter http NAS IP phpMyAdmin in the web b...

Page 65: ...web browser 2 The phpMyAdmin folder is created after the first time installation When you update the firmware the folder remains unchanged Database Maintenance Check the box Database Maintenance to reset the database password or initialize the database Reset root password Execute this function to reset the password of MySQL root as admin Re initialize database Execute this function to delete all t...

Page 66: ...ork Share Management 2 Enter the network share name and select Enter path manually Then click Browse 3 Select mysql and click OK After the network share is created configure the access right The network share name configured in the above step is the file location of MySQL database ...

Page 67: ...ent The default port is 8080 The services of this port include System Management Web File Manager Multimedia Station and Download Station The system will restart after clicking Apply Please wait The website will automatically change to the homepage of the new protocol system ...

Page 68: ...68 3 4 14 View Network Settings You can view current network settings and status of the NAS in this section ...

Page 69: ...69 ...

Page 70: ...70 3 5 Device Configuration You can configure SATA disk USB disk eSATA disk and USB printer settings in this section ...

Page 71: ...matted the NAS will create the following default share folders 9 Public Network share for file sharing 9 Qdownload Network share for Download Station 9 Qmultimedia Network share for Multimedia Station 9 Qusb Network share for data copy function via USB ports 9 Qweb Network share for Web Server You can create the following disk volumes by clicking on the corresponding icon on the SATA Disk page ...

Page 72: ...oring important data Linear Disk Volume You can combine two or more disks into one larger disk Files are saved on the physical disks sequentially The overall capacity of linear disk is the sum of all disks Linear disk is generally used for storing large size of data and is not appropriate for protection of sensitive data RAID 5 Disk Volume RAID 5 disk volume is ideal for organizations running data...

Page 73: ...ideal for important data protection To create a RAID 6 disk volume a minimum of 4 hard disks are required The total capacity of RAID 6 disk volume the size of the smallest capacity disk in the array x no of hard disk 2 It s recommended that you use same brand and same capacity hard drive to establish the most efficient hard drive capacity RAID 6 can survive 2 drives failure and system can still op...

Page 74: ...ew drive member to a drive configuration It is supported for the following drive configurations RAID 5 expansion Migrate This function enables a drive configuration to be migrated to a different RAID configuration It is supported for the following drive configurations Migrate single drive to RAID 1 5 or 6 Migrate RAID 1 to RAID 5 or 6 Migrate RAID 5 to RAID 6 Configure spare drive This function en...

Page 75: ...le to the server to unlock the disk volume The key can be downloaded from Encryption Key Management page after you have unlocked the disk volume successfully Locked Disk Volume If a disk volume is locked the disk status is shown as Unmounted on Device Configuration page and the users are unable to access the disk volume You can unlock the disk volume by entering the encryption password or uploadin...

Page 76: ...t to manage the disk volume On this page you can change the encryption password save the encryption key on the system or download the encryption key to your computer When you select to save the encryption key the server will use this key to unlock and mount the disk volume automatically when it is started up ...

Page 77: ...r Windows PC Mac or Linux 2 Enable iSCSI Target Service on the NAS and create a new iSCSI target 3 Run the iSCSI initiator and connect to the iSCSI target NAS 4 After successful logon format the iSCSI target disk volume You can start to use the disk volume on the NAS as a virtual drive on your computer Note The NAS supports 8 iSCSI devices at maximum ...

Page 78: ... drives for extended storage Connect the USB device to the USB port of the NAS when the device is successfully detected the details are shown on this page It may take tens of seconds for the NAS server to detect the external USB device successfully Please wait patiently ...

Page 79: ... USB port of the NAS The NAS will detect the printer automatically This function supports up to 3 printers Note Please connect a USB printer to the server after the software configuration is completed 3 5 6 1 Windows Users Method 1 1 A printer icon should be shown in the share folder of the server Double click the icon ...

Page 80: ...80 2 Install the printer driver 3 When finished you can start to use network printer service of the NAS ...

Page 81: ...elete the ports configured for the previous network printer if any 9 Restart your PC 10 Open Printers and Faxes 11 Click Add a printer and click Next 12 Select Local printer attached to this computer Click Next 13 Click Create a new port and select Local Port from the drop down menu Click Next 14 Enter the port name The format is NAS IP NAS namepr e g NAS IP 192 168 1 1 NAS name myNAS the link is ...

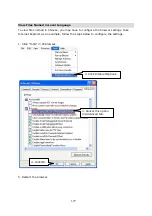
Page 82: ...82 3 5 6 2 Mac Users 1 On the toolbar click Go Utilities 2 Click Printer Setup Utility ...

Page 83: ...83 3 Click Add 4 Press and hold the alt key on the keyboard and click More Printers concurrently ...

Page 84: ...r URI the format is smb NAS IP printer name The printer name is found on the Device Configuration USB Printer page e Select Generic for Printer Model f Click Add Note that you must hold and press the alt key and click More Printers at the same time to view the Advanced printer settings Otherwise this option does not appear ...

Page 85: ...inter appears on the printer list It is ready to use Note 1 The NAS network printer service supports Postscript printer on Mac OS only 2 For the latest USB printer compatibility list please visit http www qnap com ...

Page 86: ...ed storage Connect the eSATA disk to the eSATA port of the NAS when the device is successfully detected the details will be shown on this page You can format the eSATA disk as EXT3 FAT or NTFS format You will find the network share eSATA Disk 1 when it is ready ...

Page 87: ...s access to system administration and cannot be deleted guest This is a built in user and will not be displayed on User Management page When you use a non registered user name to login the server will recognize the user as a guest and will allow limited access A guest does not belong to any user group The login password for guest is guest Anonymous This is a built in user and will not be displayed...

Page 88: ...new user 9 User name The user name must not exceed 32 characters It is case insensitive and supports double byte characters such as Chinese Japanese and Korean excluding 9 Password The password is case sensitive and can be 16 characters long at maximum It is recommended to use a password of at least 6 characters You can perform the following actions for user management ...

Page 89: ...89 3 6 1 1 Create user To create a user click Create and enter the user name and password You can continue to assign the user groups that the user belongs to Click Close to exit ...

Page 90: ...ser Enter the name prefix e g test Enter the start number for the user name e g 0001 and the number of users to be created e g 10 The NAS creates ten users named test0001 test0002 test0003 test0010 The password entered here is the same for all new users You can change the password in the User Management Users page ...

Page 91: ...91 Note When you check the option Create Private Network Share for creating multiple users a network share named in the user name is created for each newly created user ...

Page 92: ...oup have administration right You cannot delete this group y Everyone All registered users belong to everyone group You cannot delete this group You can manage user groups with the following options 1024 groups can be created at maximum A group name must not exceed 256 characters It is case insensitive and supports double byte characters such as Chinese Japanese and Korean except the following one...

Page 93: ... users to a user group ABC Co has recently recruited two employees Mr Jones Lee for Administration Department and Ms Jane Wu for Sales Department The IT Department therefore needs to create two user accounts for them to access company data on the NAS i To create a user account go to User Management Users Click Create ...

Page 94: ...94 ii Enter the user name Jones Lee Jane Wu and password Check the box Continue to set the user groups to which this user belongs and click OK ...

Page 95: ...95 iii Select the user groups the users belong to on the right list i e Mr Jones Lee for Administration Dept and Ms Jane Wu for Sales Dept and click Add Then click Close ...

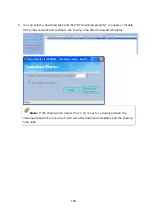
Page 96: ...96 iv The user names will appear on the list on Create User page ...

Page 97: ... Administration Department only please go to User Management User Groups page Select the user group Administration Dept and click Create Private Network Share on the right 2 Enter the network share name media Select the disk volume that the share will be created in and specify the path automatically or manually Enter the comment for the network share e g media folder for Admin Dept and click Apply...

Page 98: ...98 3 You can see the folder media in Network Share Management page 4 Enter Access Control You can see that only Administration Dept has full access right to the folder ...

Page 99: ...uota size on each disk volume Please refer to the following example to configure the quota setting of users The IT department is planning to set the disk quota of Mr Jones Lee from Administration Department and Ms Jane Wu from Sales Department on the NAS The disk quota is 2000MB for Mr Jones Lee and 4000MB for Ms Jane Wu 1 Please go to Quota page in User Management to enable quota for all users En...

Page 100: ...Lee on User page and click Quota Settings on the right 3 Enter the quota size 2000MB and click OK 4 Follow the same steps and enter the quota size 4000MB for Jane Wu and click OK The quota setting is successfully applied ...

Page 101: ...wing characters 9 Hide network drive Select to show or hide the network in My Network Places Note that the drive can still be shown by entering the directory manually in My Network Places 9 Lock file oplocks When Yes is selected the oplock value of the network share in smb conf is yes If a user with write access opens a file in the network share by Microsoft network samba connection and another us...

Page 102: ...ically or assign a path manually The path cannot exceed 256 characters and cannot contain the characters below 9 Comment Enter a brief description for the share folder The comment cannot exceed 128 characters Note When you select to enter the path manually click Browse and the mysql directory will be shown This is the file location of MySQL database ...

Page 103: ...103 3 7 1 2 Property To edit the property of an existing network share select a share and click Property You can then edit the content of that share ...

Page 104: ...ork share 9 Full access Users can read write create or delete files and folders on the network share 9 Enable write only access on FTP connection When you enable this option only the administration admin has read and write access to the share folder Other users who have full access full access to the share folder will only be able to upload files to the folder via FTP connection but are unable to ...

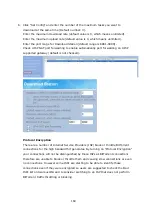
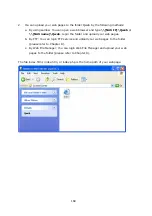
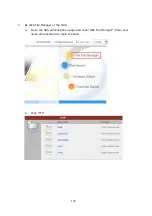
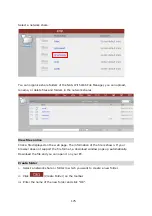
Page 105: ...105 3 7 1 4 Delete Select a share and click Delete Click OK to confirm ...

Page 106: ...6 3 7 1 5 Restore If the default network shares of the NAS are not created successfully you can use the Restore function to restore the network shares To do so click Restore and the shares will be created ...

Page 107: ...u can set the NFS access right of the network share The Public folder is for open access while access is denied for other default network shares For detailed configuration please click the link Click here for more detailed description ...

Page 108: ... of folders and files etc You can click on Name Size No of Folders No of Files or Hidden to sort the contents in ascending or descending order To refresh the status report of a network share folder click the icon at the end of row The time for updating the information depends on the number of folders and files in the network share folder ...

Page 109: ...109 3 8 System Tools The System Tools enable you to optimize the maintenance and management of the NAS ...

Page 110: ...email alert when a system error or warning occurs Enter the email address and mobile phone number to receive the alerts Make sure you have entered the correct SMTP server and the SMSC server settings If you do not want to receive any alerts select No alert for both settings ...

Page 111: ...LAN You can also configure the option the server should do when the AC power resumes after an abnormal power failure e g the power cord is unplugged You can select every day weekdays weekend or any days of the week and set the time for automatic system power on power off or restart Weekdays stand for Monday to Friday weekend stands for Saturday and Sunday Up to 15 schedules can be set ...

Page 112: ...ou to power on the NAS remotely To use this function follow the steps below Make sure this option is enabled in System Tools Auto Power on off management page on the NAS 1 Run QNAP Finder Click Tools on the menu and select Remote Wake Up Wake On LAN ...

Page 113: ...113 2 A list of supported NAS models detected in the LAN will be shown Select the server you want to wake up or enter the MAC address of the NAS server and click Wake up ...

Page 114: ...114 3 After sending the command click Close to exit Refresh the Finder to search for the server If the NAS is found it has been turned on successfully ...

Page 115: ...tatus LED will be off in hard disk standby mode iii Enable light signal alert when the free size of SATA disk is less than the value The Status LED flashes red and green when this function is enabled and the free space of the SATA disk is less than the value The range of the value is 1 51200 MB iv Enable alarm buzzer Enable this option The system will sound when an error occurs v Smart Fan configu...

Page 116: ...em detects the AC power is abnormal In general the UPS can keep supplying the power for the system for about 5 10 minutes depending on the maximum load of the UPS and the number of the loads connected to it You may also configure the system to enter standby mode in case of abnormal AC power supply 9 UPS Model Select the UPS model from the list If the UPS model you are using is not available on the...

Page 117: ...t Hard disk information Displays the hard drive details e g model serial number drive capacity etc SMART information Displays the hard drive SMART Any items that the values are lower than the threshold are regarded as abnormal Test To perform quick or complete hard drive SMART test and display the results Settings To configure temperature alarm When the hard drive temperature is over the preset va...

Page 118: ...www qnap com Read the release notes carefully to make sure you need to upgrade the firmware Step 2 Before upgrading system firmware back up all disk data on the server to avoid any potential data loss during system update Step 3 Click Browse to select the correct firmware image for system update Click Update System to update the firmware Note System update may take tens of seconds to several minut...

Page 119: ...USB one touch copy button in this page The following three functions are available Copy from the front USB storage to a directory of the internal drive of the NAS Copy to the front USB storage from a directory of the internal drive of the NAS Disable the one touch copy button ...

Page 120: ...120 3 8 8 Change Logo You can choose your own picture to display on the login page of the NAS The size of the picture cannot exceed 20K bytes ...

Page 121: ... Schedule Backup To back up data by schedule You can select the week day and time to execute the backup Auto backup To execute the backup automatically once the storage device is connected to the NAS Copy Options Select Copy or Synchronize for the copy options When you select Copy files are copied from the NAS to the external device By selecting Synchronize the data on the internal drives of the N...

Page 122: ...izing process if the identical files exist on both sides the files are not copied If there are files in the same name but different in size or modified dates on NAS and the external device the files on the external device are overwritten ...

Page 123: ...ls 9 Port Number Specify a port number for remote replication The default port number is 873 Note If this server connects to the Internet via a router make sure the specified port for remote replication is opened on the router 9 Enable backup from a remote server to the local host Check this option to allow the remote server to back up data to the local host via remote replication 9 Allow remote R...

Page 124: ... name if any of the remote server the port number of the remote server for remote backup the destination path and the user name and password with write access to the remote server Click Test to check if the connection is successful or not Note To use remote replication enable Microsoft Networking service make sure the destination network share and directory have been created and the user name and ...

Page 125: ...up the whole network share and a folder in the share Then select to replicate data now or set a replication schedule d Set up other options for the remote replication job Then click OK You can view the backup status or edit or delete the replication job ...

Page 126: ...estore all settings click Browse to select a previously saved setting file and click Restore to confirm To reset all settings to default click Reset Caution When you press Reset on this page all drive data user accounts network shares and system settings are cleared and restored to default Please make sure you have backed up all the important data and system settings before resetting the NAS ...

Page 127: ...e allowed or rejected When the connection of a host server is denied all protocols of that server are not allowed to access the local server After changing the settings click Apply to save the changes The network services will be restarted and current connections to the server will be disconnected ...

Page 128: ...s protection enhances the security of the system and prevents unwanted intrusion You can select to block the IP for a certain period of time or forever if the IP fails to login the server from a particular connection method ...

Page 129: ... be removed to Network Recycle Bin to reserve the files temporarily To enable this function check the box Enable Network Recycle Bin and click Apply The system creates a network share Network Recycle Bin automatically To delete all the files in network recycle bin click Clean Network Recycle Bin ...

Page 130: ... server via Telnet or SSH encrypted connection only the account admin can login remotely You can use certain Telnet or SSH connection clients for connection e g putty Please make sure you have opened the configured ports on your router or firewall when using this function ...

Page 131: ...dd more functions to NAS Click Get QPKG Before you install the packages make sure the files are correct read the instructions carefully and back up all important data on the NAS Download the software package you want to install on NAS to your computer ...

Page 132: ...KG browse to select the correct qpkg file and click Upload After uploading the QPKG packages the details are shown on the QPKG page Click the link to access the web page of the installed software package and start to configure the settings To remove the package from the NAS click Remove ...

Page 133: ...servers and browsers for secure data transfer You can upload a secure certificate issued by a trusted provider After you have uploaded a secure certificate you can access the administration interface by SSL connection and there will not be any alert or error message The system supports X 509 certificate and private key only ...

Page 134: ...vent Logs 3 9 1 System Event Logs The NAS can store 10 000 recent event logs including warning error and information messages In case of system malfunction you can refer to the event logs to analyze the problems ...

Page 135: ...be slightly affected by enabling the event logging Tip You can right click the log on the list of connection logs and select to delete the record or add the IP to banned list and select how long the IP should be banned Archive logs Enable this option to archive the connection logs The system generates a csv file automatically and saves it to a specified folder when the number of logs reaches the u...

Page 136: ... line Users The information of the on line users accessing the system via networking services is shown on this page 3 9 4 System Information You can view the system information e g CPU usage and memory on this page ...

Page 137: ...137 3 9 5 Syslog Settings Syslog is a standard for forwarding log messages in an IP network You can enable this option to save the event logs and connection logs to a remote syslog server ...

Page 138: ...USB devices e g digital camera flash external USB drive to the front USB port of the NAS 5 Press the copy button on the NAS The data is copied according to your settings in System Tools USB one touch copy backup Intelligent one touch copy button The NAS detects the data in the connected source automatically The first time a USB device is connected press the button and the NAS copies all data in th...

Page 139: ...ums easily You can view the images and the multimedia files or browse the photos by thumbnails preview A Upload photos by web administration 1 To use Multimedia Station make sure a SATA disk is installed correctly according to the instructions in Chapter 2 1 A share folder Qmultimedia will be created after the disk is initialized Enable Multimedia function in Network Settings ...

Page 140: ... option Display service link on the login page 3 Click or Login on the top right hand corner Login with the administrator name and password to manage Multimedia Station Users without administration right can view the photos and multimedia files on Multimedia Station but they do not have the right to modify the files When logging in as Multimedia Station user you can access the files and folders th...

Page 141: ...141 4 Click Browse to select the multimedia file and then click Upload to upload the file to the folder 5 You can also create folders by clicking ...

Page 142: ...wing steps 1 Use Run function in Windows Enter server name or server IP to access share folder on the NAS 2 Open the folder Qmultimedia Enter the user name and password to login 3 Drag the files and folders to the folder directly Please wait patiently when the NAS is generating thumbnails for images during uploading ...

Page 143: ...iles by date Return to previous page Return to Home Create folder Rename file or folder Select all Select none Delete Support file format list Type File format Picture jpg bmp gif Video wmx wvx avi mpeg mpg mpe m1v mp2 mpv2 mp2v mpa dvr ms asf asx wpl wm wmx wmd wmz Audio wma wax cda wav mp3 m3u mid midi rmi aif aifc aiff au snd Others Other formats not mentioned above ...

Page 144: ...e thumbnail of the picture 2 The information of the photo e g file name resolution size camera producer is shown on the right You can enter a description for the picture in the box below the photo and click Submit To reset the description to previously saved version click Reset ...

Page 145: ... Back to previous level Previous image Next image Rotate image anticlockwise Rotate image clockwise Zoom in Zoom out Play slideshow Select the time interval in seconds Click play to play slide show To stop playing click stop Print the image Save the picture Set the picture as album cover ...

Page 146: ...eo files on Multimedia Station you can click the thumbnail of the file displayed on the page The file is played by the default music or video playing program of your PC It is recommended to use Media Player 10 0 or above as the default playing program ...

Page 147: ...er logging in as administrator admin click to enter the configuration page for album authority 2 You can view add delete and edit users For any inquiries when using these functions click the help button on the top right corner of the page ...

Page 148: ...148 3 You can edit user profile and album access authority on this page For any inquiries when using these functions click the help button on the top right corner of the page ...

Page 149: ... browse and play the music files on the NAS To use the iTunes service make sure you have installed the iTunes program on your computer Go to Network Settings iTunes Service and enable the service Then upload the music files to the Qmultimedia folder of NAS Password required To allow the users to access the data only by entering the correct password check this option and enter the password ...

Page 150: ...orize the songs into different playlists If there is no song that matches the rules in the playlist the iTunes client will not show the playlist For detailed operation please refer to the online help When you open iTunes it detects the NAS automatically All the songs on the Qmultimedia folder will be shown ...

Page 151: ...name The smart playlists defined earlier will be shown The songs are categorized accordingly You can start to use iTunes to play the music on your NAS Note You can download the latest iTunes software from official Apple website http www apple com ...

Page 152: ...AS shares particular music photos or video files to DLNA network You can use DLNA compatible digital media player DMP to play the multimedia files on the NAS on TV or acoustic sound system To use UPnP Media Server enable this function and click the following link http NAS IP 9000 to enter the configuration page of UPnP Media Server ...

Page 153: ...The default folder is Qmultimedia You can add more than one share folder Click Save Changes to save the settings After configuring the settings you can upload mp3 photos or video files to Qmultimedia folder or other specified folders on the NAS Note If you upload multimedia files to the default share folder but the files are not shown on Media Player you can click Rescan content directories or Res...

Page 154: ...leaned from Plug and play a technology for dynamically attaching devices to a computer directly The Digital Living Network Alliance DLNA is an alliance of a number of consumer electronics mobile and personal computer manufacturers Its aim is to establish a home network in which the electronic devices from all companies are compatible with each other under an open standard The alliance also tries t...

Page 155: ...unctionality is provided for downloading authorized files only Downloading or distribution of unauthorized materials may result in severe civil and criminal penalty Users are subject to the restrictions of the copyright laws and should accept all the consequences 1 To use Download Station make sure one or two SATA disks are installed correctly in the NAS according to the instructions in Chapter 2 ...

Page 156: ...wnload on Download Station page or click Download Station on the login page of the NAS to access Download Station Note To display the Download Station link on the login page please enable the option Display service link on the login page ...

Page 157: ...new BT task on the left and upload a torrent file You can download legal torrent files by searching on the Internet There are websites that provide legally sharing torrents e g www legaltorrents com Please download the torrent files to your local disk and then upload them to the NAS ...

Page 158: ...the files Enter the user name and password to login the FTP server if necessary Then click OK to start downloading To run an HTTP download task click Add new FTP HTTP task Enter the HTTP URL of the download task and select the share folder to save the files Then click OK to start downloading 4 After uploading a download task the task appears on View Run List ...

Page 159: ...rty to enable or disable DHT public network and configure the sharing time after download completes Note If the sharing time larger than 0 hr is set for a download task the download task will be moved to Finish List after download completes and the sharing time ends ...

Page 160: ...not checked Protocol Encryption There are a number of Internet Service Providers ISP block or throttle BitTorrent connections for the high bandwidth it generates By turning on Protocol Encryption your connections will not be distinguished by these ISPs as BitTorrent connections therefore are unable to block or throttle them and causing slow connections or even no connections However some ISPs are ...

Page 161: ...d as the time on the next day 7 To pause a running download task select the task in View Run list and click Pause Restart download task You can view the tasks that are paused or finished in View Pause List and View Finish List respectively To restart a paused task select the task in View Pause List and click Pause Restart download task 8 You can also increase or decrease task priority by clicking ...

Page 162: ...oad task You can select to remove the download task only and retain the downloaded files or remove the task and downloaded files 10 To logout Download Station click on the top right hand corner 11 To access the folders you have downloaded please go to the share folder Qdownload of the NAS ...

Page 163: ...163 Dump Diagnostic Information To view the diagnostic details of a download task select a task on the list and click Dump Diagnostic Information ...

Page 164: ...us downloads as 3 5 for the best download rate 4 The NAS is located behind NAT router The port settings have led to slow BT download rate or no response You may try the following means to solve the problem a Open the BitTorrent port range on NAT router manually Forward these ports to the LAN IP of the NAS b The new NAS firmware supports UPnP NAT port forwarding If your NAT router supports UPnP ena...

Page 165: ...S series NAS via LAN or WAN By using QGet you no longer need to login the Download Station web interface of multiple servers and manage the settings one by one Simply install QGet on any computer running Windows 2000 XP Mac you can manage the download tasks of all your NAS servers 1 To use QGet install the software from the product CD ROM ...

Page 166: ...166 2 Follow the instructions to install QGet 3 Run QGet from the installed location 4 For the details of using QGet please refer to the online help of the software ...

Page 167: ...r function It supports Joomla PHP and SQLite for you to establish an interactive website 1 To use Web Server make sure a SATA disk is installed correctly in the NAS according to the instructions in Chapter 2 1 A share folder Qweb is created Enable Web Server function and enter the port number in Network Settings ...

Page 168: ...AS name Qweb Login the folder and upload your web pages b By FTP You can login FTP service and upload your web pages to the folder please refer to Chapter 8 c By Web File Manager You can login Web File Manager and upload your web pages to the folder please refer to Chapter 9 The file index html index htm or index php is the home path of your webpage ...

Page 169: ...n Web Server page or click Web Server on the login page of the NAS to access the web page you upload Note that when Web Server is enabled you have to enter http NAS IP address 8080 in your web browser to access the login page of the NAS ...

Page 170: ...rface is not changed Note The default user name of MySQL is root The password is admin Please change your root password immediately after logging in to the phpMyAdmin management interface SQLite Management SQLiteManager is a multilingual web based tool to manage SQLite databases and can be downloaded from http www sqlitemanager org Please follow the steps below or refer to the INSTALL file in the ...

Page 171: ...171 Chapter 8 FTP Server The NAS supports FTP service To use FTP service enable this function in Network Settings and follow the steps below 1 Open an IE browser and enter ftp NAS IP or ftp NAS name OR ...

Page 172: ...172 2 By Web File Manager of the NAS a Go to the NAS administration page and click Web File Manager Enter user name and password to login the NAS b Click FTP ...

Page 173: ...173 c Enter the user name and password to login FTP service d You can start to use the FTP service ...

Page 174: ...unch the web browser and go to the NAS administration page Select Web File Manager and enter the correct login name and password You can login as guest to access the network shares open to guest access on the NAS The login password of guest is guest Note Make sure a network share is created before using Web File Manager ...

Page 175: ...k a file displayed on the web page The information of the file is shown If your browser does not support the file format a download window pops up automatically Download the file and you can open it on your PC Create folder i Select a network share or folder in which you want to create a new folder ii Click Create Folder on the toolbar iii Enter the name of the new folder and click OK ...

Page 176: ...which the selected files or folders are moved or copied Delete file or folder i Select a file or folder to delete ii Click Delete on the toolbar iii Confirm to delete the file or folder To delete all files and folders click Select All and Delete Upload file i Open the folder to upload file to ii Click Browse to select the file iii Click Upload Download file i Select a file to download ii Right cli...

Page 177: ...Chinese you may have to configure the browser settings Take Internet Explorer as an example follow the steps below to configure the settings 1 Click Tools in IE browser 5 Restart the browser 2 Click Internet Options 3 Cancel this option in Advanced tab 4 Click OK ...

Page 178: ...resh the current page Return to network share list home page Create folder Rename file or folder Move copy files or folders Delete file or folder Select all Cancel selection Logout Full access network share folder Read only network share folder Malfunction network share folder ...

Page 179: ...r file types to be excluded from backup The system filters all files belonging to these file types when backing up data Schedule Specify a schedule for backing up data with this option e g 12 00 every day or 05 00 every Saturday Monitor When this option is enabled the system uploads all files or folders to the server instantly for backup when the files or folders are modified 2 Restore Select this...

Page 180: ...icator 1 Select Install NetBak Replicator in the NAS CD ROM 2 Follow the steps to install NetBak Replicator 3 Upon successful installation a shortcut icon is shown on the Desktop Double click the icon to run NetBak Replicator ...

Page 181: ...etwork Share Management to create a share folder for backup Make sure the share folder is open for everyone access or you login the share folder with an authorized account or administrator by NetBak Replicator 2 Run NetBak Replicator Click All the NAS and their share folders within the network are displayed ...

Page 182: ...nd a share folder on the right NetBak Replicator also supports backup over WAN you can enter the IP address of the NAS for data backup directly and select a share folder Then click OK 4 Enter the user name and password to login the server 5 You can start the backup procedure upon successful connection to the NAS ...

Page 183: ... file is named as rpr Select All Select all items in the window Clear All Clear selection Select My Document Select all folders in My Document Open NAS Backup Folder This button allows users to find out where the files were backed up and check or manage the archived files manually Advanced Backup Advanced Backup allows power user to back up a single folder with more advanced options ...

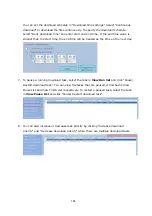
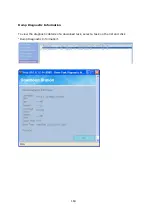
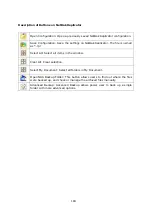
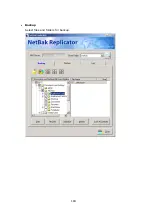
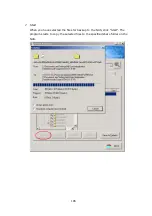
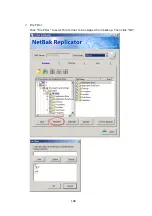
Page 184: ...184 Backup Select files and folders for backup ...

Page 185: ...185 9 Start When you have selected the files for backup to the NAS click Start The program starts to copy the selected files to the specified share folder on the NAS ...

Page 186: ...186 9 File Filter Click File Filter to select file format to be skipped from backup Then click OK ...

Page 187: ...187 9 Schedule Click Schedule Then check the box Enable Backup Schedule and select the frequency and time for backup Click OK to confirm ...

Page 188: ...ion is enabled the files or folders are copied to the NAS instantly when they are modified Other files are gray and cannot be selected Click Monitor again to enable or disable monitoring An icon appears on the task bar of Windows when monitoring is in process ...

Page 189: ... this function NetBak Replicator records all current settings of the user including whether or not monitor function is enabled When the user login again this program loads the previous recorded settings for users to manage data backup ...

Page 190: ...riginal position Select the location that the data is restored to b Select new restore position Click to select the directory to restore data to or select a previously chosen location from the drop down menu c Select the folder s and sub folder s for restoring data on the right list and click Start ...

Page 191: ...tion If the restoring file existed NetBak Replicator will 9 Overwrite all the files 9 Ask first 9 Skip this file If an error happens in the process of file restoring NetBak Replicator will 9 Stop the restoring 9 Ask first 9 Ignore this error message ...

Page 192: ...save all logs on NetBak Replicator click this button All logs are saved as text file b Clear All Click this button to clear all logs c Option Select the type of logs to be recorded Record all logs or Record error logs only ...

Page 193: ...er accounts from Windows AD domain to the NAS This saves your time to create users one by one The example below demonstrates how to use this service We have two domains qatest com tw and sub2 qatest com tw controlled by Windows 2003 server and a domain sub1 qatest com tw controlled by Windows 2000 server ...

Page 194: ...y Network Neighborhood z It is suggested to use Windows 2000 Service Pack 4 or Windows 2003 Service Pack 1 z When the NAS is added to AD domain the authority of everyone does not work everyone is the default account of the NAS but is not supported in AD domain Therefore the authority has to be reset z The IP address of the AD server should be recorded in the DNS settings on the AD server z You mus...

Page 195: ...server as the primary DNS Server IP 2 Go to Microsoft Networking of Network Settings Enable AD Domain Member and enter the domain name and the user name with administrator access right to that domain Note a Make sure that a fully qualified domain name such as AD local is filled in b The user name must have administrator access right to that domain ...

Page 196: ...AD server is less than 5 minutes If the time difference is larger than 5 minutes you will not be able to add the domain member 4 Upon successful adding of domain member you can view the list of domain users and local users in User Management 5 Go to Access Control in Network Share Management to configure the access control right of AD users to the NAS shares ...

Page 197: ...197 Using AD users to access services To access services like FTP Network Neighborhood or Apple Talk with an AD user account add DomainName in front of the user name when logging in ...

Page 198: ...ctory to Mount For example if the IP address of your NAS is 192 168 0 1 and you want to link the network share folder public under the mnt pub directory use the following command mount t nfs 192 168 0 1 public mnt pub Note You must login as root user to initiate the above command 2 Login as the user ID you define you can use the mounted directory to access your network share files ...

Page 199: ...he steps below to restart or shut down the NAS 1 Login the administration page and go to System Tools Auto Power on off Management 2 Click Restart to reboot the server or Shut Down to turn off the server To force shut down the NAS server press the power button for more than 10 seconds After a long beep the NAS shuts down immediately ...

Page 200: ...onfiguration Obtain IP address settings automatically via DHCP c Network Settings TCP IP Configuration Disable Jumbo Frame d Network Setting System Port Management 8080 system service port e System Tools IP Filter Allow all connections f LCD panel password blank After the reset you can login the NAS with the default user name and password Default user name admin Password admin Note To reset the sy...

Page 201: ... system configuration is lost configure the system again 2 If the server does not function properly contact your dealer or technical support To avoid the above situations please back up your data periodically and make sure you have done the following Follow the instructions described in Chapter 13 1 to restart or shut down the server If there is an anticipated power outage back up all important da...

Page 202: ...an go to System Logs System Event Logs to search for the following error message and find out which hard drive s causes the error Error occurred while accessing Drive X Drive X has been removed X refers to the number of the hard drive slot 3 Troubleshooting After plugging in the new hard drive e g HDD 1 drive rebuilding will start If the drive configuration fails again due to read write error of t...

Page 203: ...drive to NAS to replace the fault drive and execute RAID 1 migration When the RAID configuration is RAID 5 or 6 The RAID configuration is changed to degraded mode read only It is recommended that you back up the data and run system installation and configuration again Note When plugging in or unplugging a hard drive please strictly adhere to the following rules to avoid abnormal system operation o...

Page 204: ...vides a handy LCD panel for you to perform disk configuration and view the system information When the NAS is started up you will be able to view the server name and IP address N A S 5 F 4 D E 3 1 6 9 2 5 4 1 0 0 1 0 0 Enter button Select button ...

Page 205: ...e option and press the Enter button to confirm For example when you turn on the NAS with 5 hard drives installed the LCD panel shows C o n f i g D i s k s R A I D 5 You can press the Select button to browse more options e g RAID 6 Press the Enter button and the following message shows Press the Select button to select Yes to confirm C h o o s e R A I D 5 Y e s N o To encrypt the disk volume select...

Page 206: ... the Main Menu The Main Menu consists of the following items 1 TCP IP 2 Physical disk 3 Volume 4 System 5 Shut down 6 Reboot 7 Password 8 Back 1 TCP IP In TCP IP you can view the following options 1 1 LAN1 IP Address 1 2 LAN1 Subnet Mask 1 3 LAN1 Gateway 1 4 LAN 1 PRI DNS 1 5 LAN 1 SEC DNS 1 6 Enter Network Settings 1 6 1 Network Settings DHCP 1 6 2 Network Settings Static IP 1 6 3 Network Setting...

Page 207: ... of the NAS The first line shows the RAID configuration and storage capacity the second line shows the member drive number of the configuration R A I D 5 7 5 0 G B D r i v e 1 2 3 4 If there is more than one volume press the Select button to view the information The following table shows the description of the LCD messages for RAID 5 configuration LCD Display Drive configuration RAID5 S RAID5 spar...

Page 208: ...on to restart the NAS Press the Select button to select Yes Then press the Enter button to confirm 7 Password The default password of the LCD panel is blank Enter this option to change the password of the LCD panel Select Yes to continue C h a n g e P a s s w o r d Y e s N o You may enter a password of maximum 8 numeric characters 0 9 When the cursor moves to OK press the Enter button Verify the p...

Page 209: ...system fan failed Sys Overheat The system overheat HDD Overheat The hard drive overheat CPU Overheat The CPU overheat Network Lost Both LAN 1 and LAN 2 are disconnected in Failover or Load balancing mode LAN1 Lost LAN 1 is disconnected LAN2 Lost LAN 2 is disconnected HDD Failure The hard drive fails Vol1 Full The volume is full HDD Ejected The hard drive is ejected Vol1 Degraded The volume is in d...

Page 210: ...contact us by the following means Online Support http www qnap com onlinesupport asp E mail q_support qnap com MSN q support hotmail com SKYPE qnapskype Technical support for North America users E mail support usa ieiworld com 1 800 Hotline 866 276 6754 ext 110 Address 168 UNIVERSITY PARKWAY POMONA CA 91768 4300 ...

Page 211: ...y other work released this way by its authors You can apply it to your programs too When we speak of free software we are referring to freedom not price Our General Public Licenses are designed to make sure that you have the freedom to distribute copies of free software and charge for them if you wish that you receive source code or can get it if you want it that you can change the software or use...

Page 212: ...ecting users freedom to change the software The systematic pattern of such abuse occurs in the area of products for individuals to use which is precisely where it is most unacceptable Therefore we have designed this version of the GPL to prohibit the practice for those products If such problems arise substantially in other domains we stand ready to extend this provision to those domains in future ...

Page 213: ...iable for infringement under applicable copyright law except executing it on a computer or modifying a private copy Propagation includes copying distribution with or without modification making available to the public and in some countries other activities as well To convey a work means any kind of propagation that enables other parties to make or receive copies Mere interaction with a user throug...

Page 214: ...ny on which the executable work runs or a compiler used to produce the work or an object code interpreter used to run it The Corresponding Source for a work in object code form means all the source code needed to generate install and for an executable work run the object code and to modify the work including scripts to control those activities However it does not include the work s System Librarie...

Page 215: ...rol copyright Those thus making or running the covered works for you must do so exclusively on your behalf under your direction and control on terms that prohibit them from making any copies of your copyrighted material outside their relationship with you Conveying under any other circumstances is permitted solely under the conditions stated below Sublicensing is not allowed section 10 makes it un...

Page 216: ... to produce it from the Program in the form of source code under the terms of section 4 provided that you also meet all of these conditions a The work must carry prominent notices stating that you modified it and giving a relevant date b The work must carry prominent notices stating that it is released under this License and any conditions added under section 7 This requirement modifies the requir...

Page 217: ...in or embodied in a physical product including a physical distribution medium accompanied by the Corresponding Source fixed on a durable physical medium customarily used for software interchange b Convey the object code in or embodied in a physical product including a physical distribution medium accompanied by a written offer valid for at least three years and valid for as long as you offer spare...

Page 218: ... from the Corresponding Source as a System Library need not be included in conveying the object code work A User Product is either 1 a consumer product which means any tangible personal property which is normally used for personal family or household purposes or 2 anything designed or sold for incorporation into a dwelling In determining whether a product is a consumer product doubtful cases shall...

Page 219: ...y the recipient or for the User Product in which it has been modified or installed Access to a network may be denied when the modification itself materially and adversely affects the operation of the network or violates the rules and protocols for communication across the network Corresponding Source conveyed and Installation Information provided in accord with this section must be in a format tha...

Page 220: ...fied versions of such material be marked in reasonable ways as different from the original version or d Limiting the use for publicity purposes of names of licensors or authors of the material or e Declining to grant rights under trademark law for use of some trade names trademarks or service marks or f Requiring indemnification of licensors and authors of that material by anyone who conveys the m...

Page 221: ...particular copyright holder is reinstated a provisionally unless and until the copyright holder explicitly and finally terminates your license and b permanently if the copyright holder fails to notify you of the violation by some reasonable means prior to 60 days after the cessation Moreover your license from a particular copyright holder is reinstated permanently if the copyright holder notifies ...

Page 222: ...ity transaction is a transaction transferring control of an organization or substantially all assets of one or subdividing an organization or merging organizations If propagation of a covered work results from an entity transaction each party to that transaction who receives a copy of the work also receives whatever licenses to the work the party s predecessor in interest had or could give under t...

Page 223: ... three paragraphs a patent license is any express agreement or commitment however denominated not to enforce a patent such as an express permission to practice a patent or covenant not to sue for patent infringement To grant such a patent license to a party means to make such an agreement or commitment not to enforce a patent against the party If you convey a covered work knowingly relying on a pa...

Page 224: ...k from you a discriminatory patent license a in connection with copies of the covered work conveyed by you or copies made from those copies or b primarily for and in connection with specific products or compilations that contain the covered work unless you entered into that arrangement or that patent license was granted prior to 28 March 2007 Nothing in this License shall be construed as excluding...

Page 225: ...r in detail to address new problems or concerns Each version is given a distinguishing version number If the Program specifies that a certain numbered version of the GNU General Public License or any later version applies to it you have the option of following the terms and conditions either of that numbered version or of any later version published by the Free Software Foundation If the Program d...

Page 226: ...IFIES AND OR CONVEYS THE PROGRAM AS PERMITTED ABOVE BE LIABLE TO YOU FOR DAMAGES INCLUDING ANY GENERAL SPECIAL INCIDENTAL OR CONSEQUENTIAL DAMAGES ARISING OUT OF THE USE OR INABILITY TO USE THE PROGRAM INCLUDING BUT NOT LIMITED TO LOSS OF DATA OR DATA BEING RENDERED INACCURATE OR LOSSES SUSTAINED BY YOU OR THIRD PARTIES OR A FAILURE OF THE PROGRAM TO OPERATE WITH ANY OTHER PROGRAMS EVEN IF SUCH HO...

Reviews: