


205
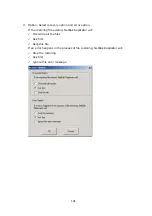
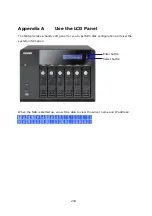
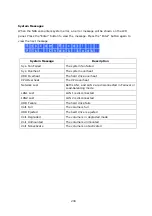
For the first time installation, the LCD panel shows the number of hard drives detected
and the IP address. You may select to configure the hard drives.
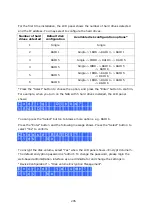
Number of hard
drives detected
Default disk
configuration
Available disk configuration options*
1
Single
Single
2
RAID 1
Single -> JBOD ->RAID 0 -> RAID 1
3
RAID 5
Single -> JBOD -> RAID 0 -> RAID 5
4
RAID 5
Single ->JBOD -> RAID 0 -> RAID 5
-> RAID 6
5
RAID 5
Single -> JBOD-> RAID 0 -> RAID 5
-> RAID 6
6 RAID
6
Single -> JBOD-> RAID 0 -> RAID 5
-> RAID 6
*Press the “Select” button to choose the option, and press the “Enter” button to confirm.
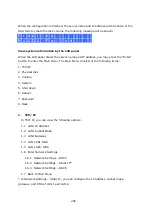
For example, when you turn on the NAS with 5 hard drives installed, the LCD panel
shows:
C o n f i g . D i s k s ?
→
R A I D 5
You can press the “Select” button to browse more options, e.g. RAID 6.
Press the “Enter” button and the following message shows. Press the “Select” button to
select “Yes” to confirm.
C h o o s e R A I D 5 ?
→
Y e s N o
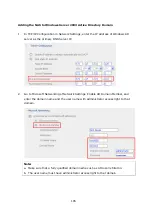
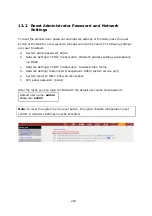
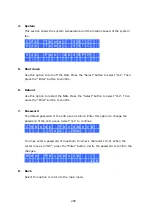
To encrypt the disk volume, select “Yes” when the LCD panel shows <Encrypt Volume?>.
The default encryption password is “admin”. To change the password, please login the
web-based administration interface as an administrator and change the settings in
“Device Configuration” > “Disk volume Encryption Management”.
E n c r y p t V o l
u m e ?
→
Y e s N o
Summary of Contents for TS-639 Pro Turbo NAS
Page 21: ...21 2 The following menu is shown Select Install QNAP Finder to continue ...
Page 25: ...25 7 Click Start installation to execute the quick configuration ...
Page 36: ...36 3 1 Server Administration There are 8 main sections in server administration ...
Page 69: ...69 ...
Page 82: ...82 3 5 6 2 Mac Users 1 On the toolbar click Go Utilities 2 Click Printer Setup Utility ...
Page 96: ...96 iv The user names will appear on the list on Create User page ...
Page 105: ...105 3 7 1 4 Delete Select a share and click Delete Click OK to confirm ...
Page 184: ...184 Backup Select files and folders for backup ...


