LED indicators: Power, Error, Network and Disk
指示燈:電源、錯誤、網路及硬碟
指示灯:电源、错误、网络及硬盘
LCD panel
LCD面板
/
LCD面板
Enter button
確定鍵
/
确定键
Down button
選擇鍵
/
选择键
Gigabit LAN 1
Gigabit LAN 2
Power button
電源按鈕
/
电源按钮
USB ports
USB埠
/
USB端口
SCSI tape drive connector
SCSI 磁帶機接頭
/
SCSI
磁带机接头
Power connector
電源接頭
/
电源接头
ATX Power Supply
電源供應器
/
电源供应器
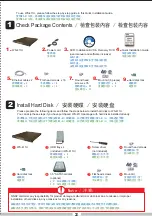
Important Notice
重要提示
Quick Installation Guide
WS-411U Turbo Server
WS-411U Turbo Server
快速安裝指引 /
快速安装指引
Always remember to back up your system to avoid
any potential data loss. QNAP disclaims any
responsibility of all sorts of data loss or recovery
.
請務必定期備份系統資料以避免任何可能發生的資
料遺失。威聯通不負責任何資料遺失或回復。
请务必定期备份系统数据以避免任何可能发生的数
据遗失。威联通不负责任何资料遗失或回复。
For the most updated product information and software
available, please visit us at www.qnap.com.tw.
要知道更新產品資訊及軟體,請至威聯通網站
www.qnap.com.tw
要知道更新产品信息及软件,请至威联通网站:
www.qnap.com.tw
。
Rear View
/
背面圖
/
背面图
Power cord
電源線
电源线
DVD: Installation DVD & Recovery DVD
(user manual and software inclusive)
DVD光碟:
安裝DVD及復原DVD(含手冊及軟體)
DVD光盘:
安装DVD及复原DVD(含手册及软件)
Quick Installation Guide
快速安裝指引
快速安装指引
Ethernet cable x 2
網路纜線 x 2
网络缆线 x 2
Flat head screws x 16
平頭螺絲 x 16
平头螺丝 x 16
Please prepare the following items and follow the steps below to install hard disk to WS-411U.
You can skip these steps if you have purchased WS-411U package with hard disks installed already.
請準備以下項目並按照以下步驟安裝WS-411U的硬碟。如已購買含硬碟之WS-411U,可略過此步驟。
请准备以下项目并按照以下步骤安装WS-411U的硬盘。如已购买含硬盘之WS-411U,可略过此步骤。
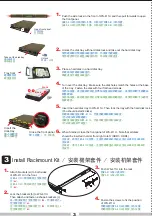
HDD tray x 4
(included in WS-411U)
硬碟抽取盒 x 4
硬盘抽取盒 x 4
3.5" SATA hard disk
(optional)
3.5" SATA硬碟(可另購)
3.5" SATA硬盘(可另购)
Flat head screws
平頭螺絲 (含)
平头螺丝 (含)
Screw driver
(not included)
螺絲起子(不含)
螺丝起子(不含)
WS-411U
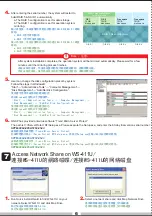
Push the side locks in the front of WS-411U and then pull forwards to open
the front panel.
按WS-411U前方兩側的卡榫,向前拉打開WS-411U的前蓋。
按WS-411U前方两侧的卡榫,向前拉打开WS-411U的前盖。
Open front panel.
打開前蓋。
打开前盖。
Take out the disk tray
.
拔出硬碟盒
拔出硬盘盒
Tray front
硬碟盒前方
硬盘盒前方
Insert the
disk tray
插入抽取盒
插入抽取盒
Close the front panel
閤上前蓋 /
合上前盖
Unlock the disk tray with hard disk lock and take out the hard disk tray.
使用硬碟鎖打開硬碟抽取盒的鎖,然後拔出硬碟盒。
使用硬盘锁打开硬盘抽取盒的锁,然后拔出硬盘盒。
Turn over the disk tray. Make sure the disk holes match the holes at the base
of the tray. Fasten the disk with four flat head screws.
反轉抽取盒,確定硬碟的鎖孔對準抽取盒底部的螺絲孔,再使用四顆平頭螺絲
鎖緊硬碟。
反转抽取盒,确定硬盘的锁孔对准抽取盒底部的螺丝孔,再使用四颗平头螺丝
锁紧硬盘。
Insert the hard disk tray to WS-411U. Then lock the tray with the hard disk lock.
(You should install 4 disks)
將硬碟抽取盒放回WS-411U,然後用硬碟鎖鎖好抽取盒。
(您必須安裝四個硬碟)
将硬盘抽取盒放回WS-411U,然后用硬盘锁锁好抽取盒。
(您必须安装四个硬盘)
http//:www.qnap.com.tw
E-mail: sales@qnap.com.tw
Technical Support: support@qnap.com.tw
Place a hard disk in a hard disk tray.
將硬碟放於硬碟抽取盒內。
将硬盘放于硬盘抽取盒内。
WS-411U
1.
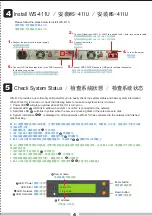
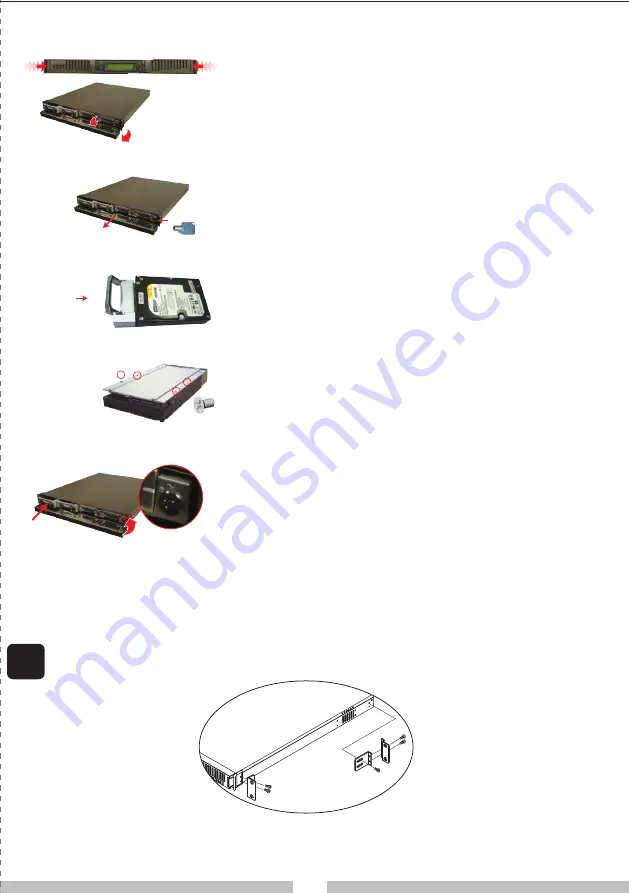
Attach brackets (
a
) to both sides
of WS-411U in the front.
在WS-411U二側前端鎖上金屬固定
片(
a
)。
在WS-411U二侧前端锁上金属固定
片(
a
)。
1.
Lock the brackets (b) to WS-411U.
Then attach and fasten z-shape brackets (c).
在二側後端鎖上金屬固定片(
b
),然後再鎖上z
型金屬固定片(
c
)。
在二侧后端锁上金属固定片(
b
),然后再锁上z
型金属固定片(
c
)。
2.
Push WS-411U into the rack.
將WS-411U放入機架中。
将WS-411U放入机架中。
3.
Fasten the screws to fix the position
of WS-411U.
用螺絲固定WS-411U在機架上的位置。
用螺丝固定WS-411U在机架上的位置。
4.
2.
3.
4.
5.
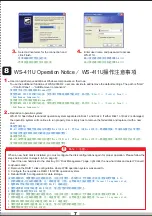
When finished, close the front panel of WS-411U. Note that all disks
should be inserted in order from right to left. (HDD1~HDD4).
完成後,請閤上WS-411U前蓋。注意所有硬碟必須由右至左以HDD1至HDD4順
序安裝。
完成后,请合上WS-411U前盖。注意所有硬盘必须由右至左以HDD1至HDD4顺
序安装。
6.
1.
2.
3.
6.
5.
Round head
screws x 35
圓頭螺絲 x 35
圆头螺丝 x 35
Round head screws
圓頭螺絲(含)
圆头螺丝(含)
7.
Mount kit (6 pieces)
金屬固定片 x 6
金属固定片 x 6
8.
Hard disk lock
硬碟鎖
硬盘锁
9.
4.
Install Hard Disk
/ 安裝硬碟 / 安装硬盘
Install Rackmount Kit
/ 安裝機架套件 / 安装机架套件
Please follow the steps below to install WS-411U
.
請依照以下步驟安裝WS-411U。
请依照以下步骤安装WS-411U。
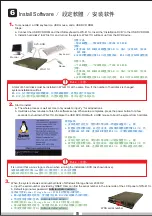
Turn on the server.
開啟系統。
开启系统。
Connect Gigabit port LAN 1 or LAN 2 to a switch / hub / router by a network cable.
使用網路纜線連接的 LAN 1或 LAN 2 至交換器。
使用网络缆线连接的 LAN 1或 LAN 2
至交换器。
4.
6.
Connect the power cord to power supply.
連接電源線至電源。
连接电源线至电源。
1.
Connect USB CD/DVD device to USB port for external expansion.
連接USB CD/DVD設備至USB埠作外部擴充應用。
连接USB CD/DVD设备至USB埠作外部扩充应用。
2.
5.
3.
QNAP disclaims any responsibility for product damage, malfunction or data loss due to misuse or improper
installation of hard disks in any occasions for any reasons.
威聯通不負責任何情況、原因下錯誤安裝或使用硬碟所導致的產品損壞與不正常運作下的資料損失。
威联通不负责任何情况、原因下错误安装或使用硬盘所导致的产品损坏与不正常运作下的数据损失。
Note / 注意:
2
3
4
Check Package Contents
/ 檢查包裝內容 / 检查包装内容
1
2
3
Install WS-411U
/ 安裝WS-411U / 安装WS-411U
4
To use WS-411U, please follow the step-by-step guide in this Quick Installation Guide.
使用WS-411U前,請根據快速安裝指引說明安裝及設定系統。
使用WS-411U前,请根据快速安装指引说明安装及设定系统。
R
R
Mount kit
金屬固定片(含)
金属固定片(含)
Hard disk lock
硬碟鎖
硬盘锁
HDD4
HDD3
HDD2
HDD1
a
b
c
Base
Front
Front View
/
正面圖
/
正面图
Unlock
開鎖 /
开锁
Connect to monitor.
連接螢幕。
连接屏幕。
Connect LVD interface tape drive to the SCSI connector
for tape back up service.
連接LVD介面磁帶機至SCSI接頭以啟用磁帶備份服務。
连接LVD接口磁带机至SCSI接头以启用磁带备份服务。
VGA port
VGA埠
/
VGA端口
Check System Status
/
檢查系統狀態
/
检查系统状态
5
LED: Power
電源
/
电源
LED: Error
錯誤
/
错误
LED: Network
網路
/
网络
LED: Hard disk
硬碟
/
硬盘
Server name
系統名稱
/
系统名称
IP address
IP位址
/
IP地址
Down button
選擇鍵
/
选择键
Enter button
確定鍵
/
确定键
1
2
3
4
5
WS-411U
10.8.10.49
WS-411U provides a user-friendly LCD panel for you to easily check the system status and basic system information.
When WS-411U is turned on, check the following items to make sure system status is normal.
1. Power LED will glow in yellow when WS-411U is turned on.
2. Network LED will blink in yellow when LAN 1 or LAN 2 is connected to the network.
3. Hard disk LED will blink in yellow when the server is checking disks or there is access to disk.
4. System information is displayed on LCD panel when WS-411U has connected to the network and finished
disk checking.
WS-411U提供簡單易用的LCD面板,方便您輕鬆地檢查系統狀態及基本系統資訊。開啟WS-411U後,請檢查以下項目以確
定系統狀態正常。
1.開啟電源後,電源指示燈 恆亮黃色。
2.LAN 1或LAN 2連接至網路時,網路指示燈 閃爍黃色。
3.系統檢查硬碟或存取硬碟資料時,硬碟指示燈 閃爍黃色。
4.WS-411U成功連接至網路及完成硬碟檢查時,系統資訊 會顯示在LCD面板上。
WS-411U提供简单易用的LCD面板,方便您轻松地检查系统状态及基本系统资讯。开启WS-411U后,请检查以下项目以确定
系统状态正常。
1.开启电源后,电源指示灯 恒亮黄色。
2.LAN 1或LAN 2连接至网络时,网络指示灯 闪烁黄色。
3.系统检查硬盘或存取硬盘资料时,硬盘指示灯 闪烁黄色。
4.WS-411U成功连接至网络及完成硬盘检查时,系统资讯 会显示在LCD面板上。