background image

Page 

4

 of 

29


First Use


Box Contents


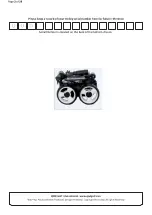
Assembled QOD Trolley


Lithium Battery with Charger


QOD Trolley Manual (What you are reading) Pictures in the manual are for illustration 

purposes. They may vary slightly with your cart but the working principals of the cart are 

the same. 


Trolley 

and Battery & Charger Manual


Assembly Instructions


1


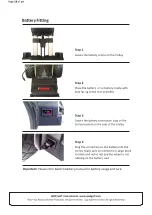
On  unpacking  the  box,  put  the  battery  on  charge  and  verify  battery 

charging information in the battery manual. Make sure the charger does 

not  share  the same wall plug as another appliance that is constantly 

drawing power such as a fridge or an appliance with a lot of power draw 

such as a dryer. When disconnecting the battery from the charger makes 

sure  the  power  point  is turned  off.  If  you  don’t  you  may  damage the 

connectors with power spikes.


2


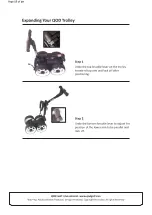
Expand the trolley to its setup position as per instructions in this manual.


Please note that the bottom arm on the QOD trolley is designed to be vertical 

for proper balance and control. The upper arm with the T handle can be 

adjusted to any height you desire for your playing comfort.
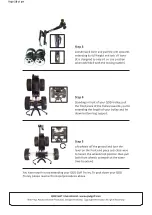


3


Put the battery in the cradle. Make sure the trolley is switched off before 

connecting the battery cable to the trolley


4


You must complete the warranty information online at www.qodgolf.com or 

fill out the warranty card and send it back to us in order to validate your 

warranty. Please include your email address and give us permission to 

communicate with you so that we are able to keep you informed about special 

offers and helpful hints on how to maintain your cart through our newsletters.


General Purpose Use of Your QOD Trolley


The trolley is designed to carry your golf bag on any golf course that you would 

normally walk or drive on a ride on golf cart. The heavier the bag the more energy 

it requires to propel the trolley and bag. Use good judgment as to where you want 

to walk. If you normally walk around a hill or steep incline then do so with the QOD 

trolley. The harder you work it, the harder you work yourself. The design of this 

trolley is to transport your golf bag with a minimum of effort. It is not designed to 

climb steep slopes that you would normally not climb or ride up or down in a 

riding trolley. The trolley was designed to accommodate a standard golf bag with 

clubs. Extra-large golf bags with a maximum diameter at the top of 22cm also fit 

the trolley.


QOD Golf International. www.qodgolf.com


Warning: Product Patent Protected, Design Protected, Copyright Protected. All rights Reserved
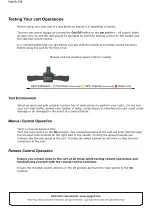


, Remote controller

Summary of Contents for Q1

Page 1: ...Page 1 of 29 User Manual QOD Electric Golf Trolley Version 2 0 QOD Golf International www qodgolf com Warning Product Patent Protected Design Protected Copyright Protected All rights Reserved...

Page 2: ...trolley serial number here for future reference Q O D Serial Number is located on the back of the bottom chassis QOD Golf International www qodgolf com Warning Product Patent Protected Design Protecte...

Page 3: ...Usage of the Trolley with the Controls 21 Tracking 22 One Way Bearings 22 Cruise Control 22 Guiding the Trolley in the Most Effective Way 23 Steering 23 General Warnings 24 Folding and Unfolding the...

Page 4: ...cting the battery cable to the trolley 4 You must complete the warranty information online at www qodgolf com or fill out the warranty card and send it back to us in order to validate your warranty Pl...

Page 5: ...of any instruction please call your local distributor or call QOD in Australia on 611300787924 Email enquiries are also welcome our email address is info QODGolf com If you need us to call you or we n...

Page 6: ...extreme environments such as very uneven terrain steep hills narrow and or sloped cart paths muddy areas close to bunkers and hazard around bushes and trees it is recommended to operate the cart via...

Page 7: ...etached from the handle or controller unit and render the cart inoperable Always tighten the knuckle knobs in both the extended and collapsed position Make sure the teeth in the round knuckles mesh be...

Page 8: ...dies of water steep slopes or anywhere the cart could cause damage or be damaged in the event of a control failure Manual Control Operation Test the manual function first Turn the main switch to the O...

Page 9: ...surface grass asphalt concrete and the weight of the cart with or without golf bag Operational Range of the Remote controller The remote controller is designed to have a maximum range of between 40 80...

Page 10: ...it to your walking pace Cruise control for flat or gradual sloping fairways Comfortable for right or left hand users Solid slope performance Handle adjusts up and down perfect for golfers of any heig...

Page 11: ...e power is on the cart A flashing red light indicates the battery is out of power The rheostat speed control knob lets you vary the speed to the desired pace The timer advance function can be activate...

Page 12: ...rrow will set the cart in forward motion 5 Speed and speed can be adjusted to slower with Backward Arrow Left Arrow initiates left turns When the arrows are released the cart stops turning and continu...

Page 13: ...the battery compartment cover and place the batteries according to the diagram in the battery compartment The remote control system is designed so it does not interfere with other remote controlled el...

Page 14: ...open space to allow the remote to work and to avoid knocking into something when the remote control connects to the cart Connect the battery to the QOD Cart and do not turn on the power to the QOD ca...

Page 15: ...to the charger The battery should be charged for at least 12 hours before using it for the first time please be aware that the charger can take up to a further 8 hours to show fully charged once the b...

Page 16: ...Rate Net Weight Trolley Approx 11 kg Approximately 8 0 km 20 km 18 Holes 35 kg 20 degrees 5v Stainless Steel Aluminum Zinc Plated Steel and Nylon 6 6 Folded 42 L x 30 W x 27 H Full 66 L x 59 W x Adjus...

Page 17: ...ley to extend top arm and lock off after positioning Step 2 Undo the bottom knuckle lever to adjust the position of the lower arm to be parallel and lock off QOD Golf International www qodgolf com War...

Page 18: ...length of your trolley and let down bottom bag support Step 5 Lift wheels off the ground and turn the lever on the front end piece anti clock wise to loosen the wheels lock position then pull both fro...

Page 19: ...rolley located on the side of the trolley Step 4 Plug the connection on the battery into the trolley Make sure the connections align black to black and red to red and the wheel is not rubbing on the b...

Page 20: ...lf bag to lock the bag in position onto your trolley Push one of the end knobs into the cord of the other like shown in the photos to lock the bag off as followed Step 1 Upper bag holder Step 2 Lower...

Page 21: ...rolley will be turned on or off Variable Speed Control Mutually Independent Variable speed adjustments up to 5 speeds Only one speed control can be used at a time as the potentiometer and variable spe...

Page 22: ...nes Use your good judgment Remember you need to have a good control of your trolley Never use the trolley to pull you up a hill Look at the terrain and you will soon become accustomed to the easiest a...

Page 23: ...from you Place the trolley sideways to avoid rolling if left unattended Steering Easy turning on the drive wheel by lifting the front wheels For small directional changes of less than 45 degrees simpl...

Page 24: ...Remember always keep control of the trolley and never operate the trolley faster than you wish to walk Lifting When lifting the trolley or battery at any time lift with your legs and not with your bac...

Page 25: ...or replacement parts or service Alternatively service issues can be sent to QOD Golf International via the website or email 5 Always disconnect the battery when you store the trolley and always put yo...

Page 26: ...transport It is opened and positioned then it has to be locked Knuckle must always be kept closed and meshing so it won t cause irreversible damages Note Please avoid leaving any loose joint as it wil...

Page 27: ...r email If you would prefer the manufacturer contact you please send an email to info qodgolf com and we will return your call to anywhere in the world Note For any questions or necessary repairs e ma...

Page 28: ...ttery must always be charged after every use regardless of the number of holes played Should I buy a second battery If you need to play 36 holes in a day you should either buy an extended range batter...

Page 29: ...Protection QOD Golf International Eagle Compac SARL and Oceania Lifestyle Distribution and its associated companies individually or collectable are the exclusive owner of all right title and interest...

Reviews: