background image

8


RGB cable. You can also control a projector using the controls on the 
visualizer by connecting the projector to the visualizer using a 6-pin to 9-pin 
RS232 cable. Some projector models may require a converter cable in 
addition to this standard RS232 cable to connect to the projector control 
port, for the pin locations and shape of some projectors’ control port 
connector may be different from the connector of a standard RS232 cable. 
Once the visualizer is connected to the projector, you can control the 
projector’s power on, standby and input selection by using the visualizer. 
(Aside from Hitachi projectors, the Code Writing program that comes with 
the visualizer is required to access this function.) 
 
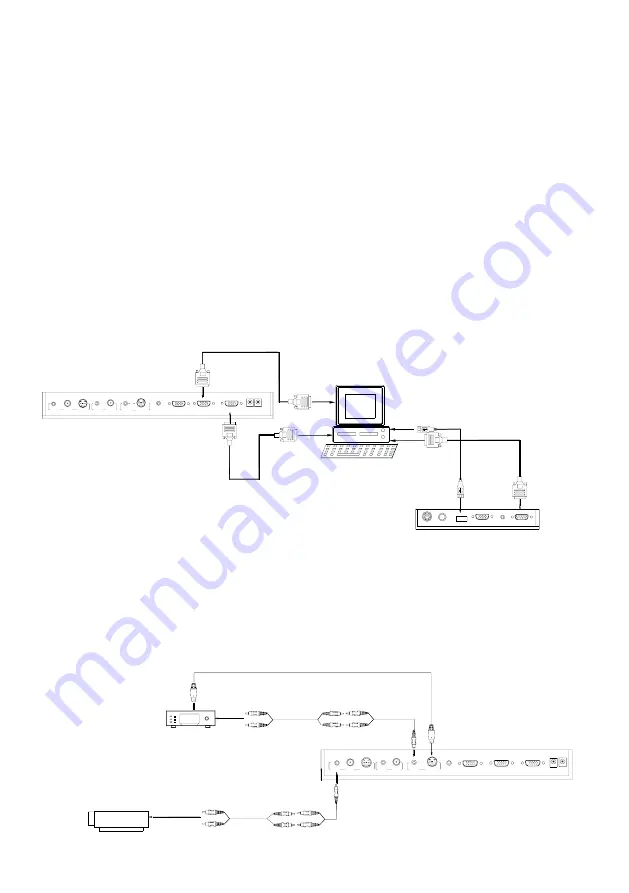
Step 3: Connect to a desktop computer. 

Note:

 You can connect a laptop computer to the RGB IN port of side panel 

using a RGB cable. 
 
Step 4: Connect to the first video equipment with S-Video input. 

AUDIO 

IN

S-VIDEO

OUT

OUT

VIDEO 

AUDIO 

VIDEO 

Video equipment

S-Video out

Audio out

Audio input

(or amplifier/speaker equipment)

Projector

S-Video Cable

S-VIDEO

AUDIO 

IN

PROJECTOR  

Rear Panel

AUDIO IN 

OUT-12V- IN  

OUT     -COMPUTER-     IN  

RS232 
Cable

MIC

PROJECTOR

Computer

USB

RGB IN

AUDIO IN

RS232

Side Panel

RGB Output

To the 
Monitor

USB Connector

AUDIO IN 

OUT

AUDIO VIDEO 

OUT

VIDEO 

AUDIO 

S-VIDEO

IN

S-VIDEO

AUDIO 

IN

PROJECTOR  

OUT   -COMPUTER-   IN  

OUT-12V- IN  

Rear Panel

Summary of Contents for QD6100SX

Page 1: ...eful not to spill water or other liquids onto the unit or allow combustible or metallic objects to get inside the cabinet Unplug the visualizer from the wall outlet when it is not in use for an extend...

Page 2: ...11 ADJUSTING IMAGE SIZE 11 WORKING WITH NEGATIVES 11 FOCUSING 12 FREEZING IMAGE 12 BRIGHTNESS ADJUSTMENT 12 WHITE BALANCE ADJUSTMENT 12 AUTO ADJUSTMENT 13 TEXT IMAGE MODE 13 COLOR AND B W MODE SWITCH...

Page 3: ...amera Camera stand Back light Remote control slot Operation panel Stage Connectors Connectors Button instruction CONTROL PANEL POWER LAMP AUTO VIDEO Rot Txt Save Frz Neg 1 2 4 5 B Ppw Pin CCD PC1 PC2...

Page 4: ...ove the image up down POWER Control the visualizer On Off CCD PC1 PC2 CCD RGB input signal selection VIDEO S Video Video input signal selection LAMP Control the arm lights and back light AUTO To auto...

Page 5: ...White mode SPLIT Image split function PROJECTOR POWER Control the projector On Standby PROJECTOR INPUT Projector input signal selection EXIT Exit selected function TELE WIDE Increase and decrease magn...

Page 6: ...ctor 16 RGB IN 17 RGB AUDIO IN 18 COMPUTER RS 232 Connector BASIC PREPARATIONS 1 Place one hand firmly on the base of the visualizer while carefully lifting up the camera stand using the other hand 2...

Page 7: ...ep 1 Connect power source First connect the power cord to the 12V IN connector Step 2 Connect to the projector Connect the PROJECTOR port to the projector s RGB IN port using the Projector RGB Input S...

Page 8: ...alizer Aside from Hitachi projectors the Code Writing program that comes with the visualizer is required to access this function Step 3 Connect to a desktop computer Note You can connect a laptop comp...

Page 9: ...signals can be seen in turn when pressing CCD PC1 PC2 and S VIDEO VIDEO on the control panel of the visualizer Step 5 Connect to the second video equipment with video input Step 6 Connections for exte...

Page 10: ...play unit PAL NTSC VIDEO OUTPUTS The S Video and composite video outputs are set to PAL NTSC during manufacturing WORKING ON THE STAGE 1 Place your material on the platform 2 Select the enlargement re...

Page 11: ...The back light turns on All the lights turn off ADJUSTING IMAGE SIZE To reduce or enlarge the image size displayed on the screen press the T Zoom in or W Zoom out button WORKING WITH NEGATIVES The vi...

Page 12: ...n the output signal is RGB press the Frz button The frozen image cannot be adjusted Zoom in out color adjustment etc BRIGHTNESS ADJUSTMENT If the image effect is not satisfactory you can adjust the br...

Page 13: ...INPUTS Press the VIDEO button to switch between S Video and composite video signals RGB INPUTS Use the CCD PC1 PC2 button to switch between CCD and different RGB signals Each time the CCD PC1 PC2 but...

Page 14: ...ent angels On the left side of the visualizer stage there is a built in remote control storage compartment where you can store the remote control when it is not in use Please note that an infrared rem...

Page 15: ...r system then the Software Setup window will be displayed automatically as below If it does not start automatically after inserting the CD ROM Click Start My Computer and double click the CD ROM drive...

Page 16: ...gh speed USB 2 0 cable provided we recommend using the USB port located on the rear of the mainframe The USB port on the front of the computer might have interference USB IMAGE CAPTURE You can capture...

Page 17: ...the application is running which will cause the program to be interrupted CONTROLLING VISUALIZER BY COMPUTER You can control the visualizer from a computer connected with a RS232 connector A Connect t...

Page 18: ...n the visualizer and the computer s RS232 connector is good If the indicator is red please check if the RS232 cable is connected correctly When all the cables are connected correctly please click Proj...

Page 19: ...string format input character string For example the POWER ON code in the SHARP C40 50 projector manual is P O W E 1 is space is enter In the POWER ON box input POWR 1 0d 0a Remarks There are 3 spaces...

Page 20: ...pin and GND pin the name may be different The parallelism of each data pin is shown as follows Visualizer s RXD pin Projector s TXD pin Visualizer s TXD pin Projector s RXD pin Visualizer s GND pin P...

Page 21: ...odes are correct If the visualizer can not control the projector please do the following 1 Check to see if the source control codes of projector are correct 2 Check to make sure the connection between...

Page 22: ...e unit down flat b Do not try to stand it on its rear or sides c Do not try to pick up this unit by pulling the camera stand SPECIFICATIONS Color system PAL system Resolution SXGA 1280 x 1024 XGA 1024...

Page 23: ...IC IN phone jack 1 PC Audio 2 Input connectors RGB DB15FLC 2 RGB DB15FLC 2 C Video OUT RCA 1 S Video OUT 4 pin DIN 1 Output connectors Audio OUT Mini Jack 1 Operating system Windows XP SP2 Service pac...

Page 24: ...Video cable Computer RS232 cable 9 pin to 9 pin Projector RS232 cable 6 pin to 9 pin USB cable Audio convert cable AC adapter User s manual Software CD Infrared remote control Warranty card Design and...

Reviews: