background image


Step 5: Add accessories 

Add the accessories (pointer, eraser and four color-coded pens) into their designated 

places on the pen tray finally, as shown in Figure 5. 


Installation on whiteboard with QWB300 Series 

Note: Please install the pen tray on the whiteboard before mounting the whiteboard 

onto the wall or to a stand. 


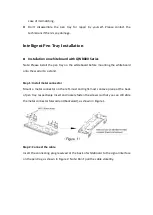
Step 1: Install metal connector 

Mount a metal connector on the left-most and right-most concave plane at the back 

of pen tray, respectively. Insert and loosely fasten the screws (so that you can still slide 

the metal connector forward and backward), as shown in Figure 1. 

Summary of Contents for QPT100

Page 1: ...Intelligent Pen Tray User Manual Standard Version QPT100 The Best Choice for Your Perfect Presentation Information in this manual is subject to change without notice...

Page 2: ...highest priority eraser and pointer being next As for pens the black pen has priority over red pen followed by green and blue pens black red green blue Notes The color recognition comes from the opti...

Page 3: ...board onto the wall or to a stand Step 1 Install metal connector Mount a metal connector on the left most and right most concave plane at the back of pen tray respectively Insert and loosely fasten th...

Page 4: ...metal connector with bolts on the whiteboard Then loosely fasten the nuts as shown in Figure 3 Step 4 Adjust Adjust the pen tray horizontally to the middle of the whiteboard frame Lift it up to make i...

Page 5: ...QWB300 Series Note Please install the pen tray on the whiteboard before mounting the whiteboard onto the wall or to a stand Step 1 Install metal connector Mount a metal connector on the left most and...

Page 6: ...Attach the pen tray to the whiteboard Attach the pen tray to the whiteboard with the four bolts on the back of the whiteboard passing through the circular holes in the metal connectors as shown in Fi...

Page 7: ...ten the screws installed loosely in Step 1 Screw the included 4 hexagonal nuts Accessory as shown in Figure 3 onto the bolts to finally secure the pen tray as shown in Figure 4 Step 5 Add accessories...

Page 8: ...ely as pen object eraser and laser pen when they are interacted with Flow Works Pro Specific functions as follows Pen tray Four pens Black and red pens are in the pen tray for the left side and the gr...

Page 9: ...Works Pro at a time E g when you pick up red pen green pen and black pen in turn Flow Works Pro will default to red pen no matter what color pen you use When you put the red pen into its designated sl...

Page 10: ...g implemented concurrently i e when the pen eraser and pointer are removed from the pen tray simultaneously Flow Works Pro will default to invoke pen function no matter what tools you use When you put...

Page 11: ...Supply Mode Powered by whiteboard Communication Mode Inter integrated Circuit IIC Operating Temperature 0 40 Storage Temperature 20 80 Induction Way Infrared Magnetic Induction Interactive Software F...

Reviews: