background image

3

Connections

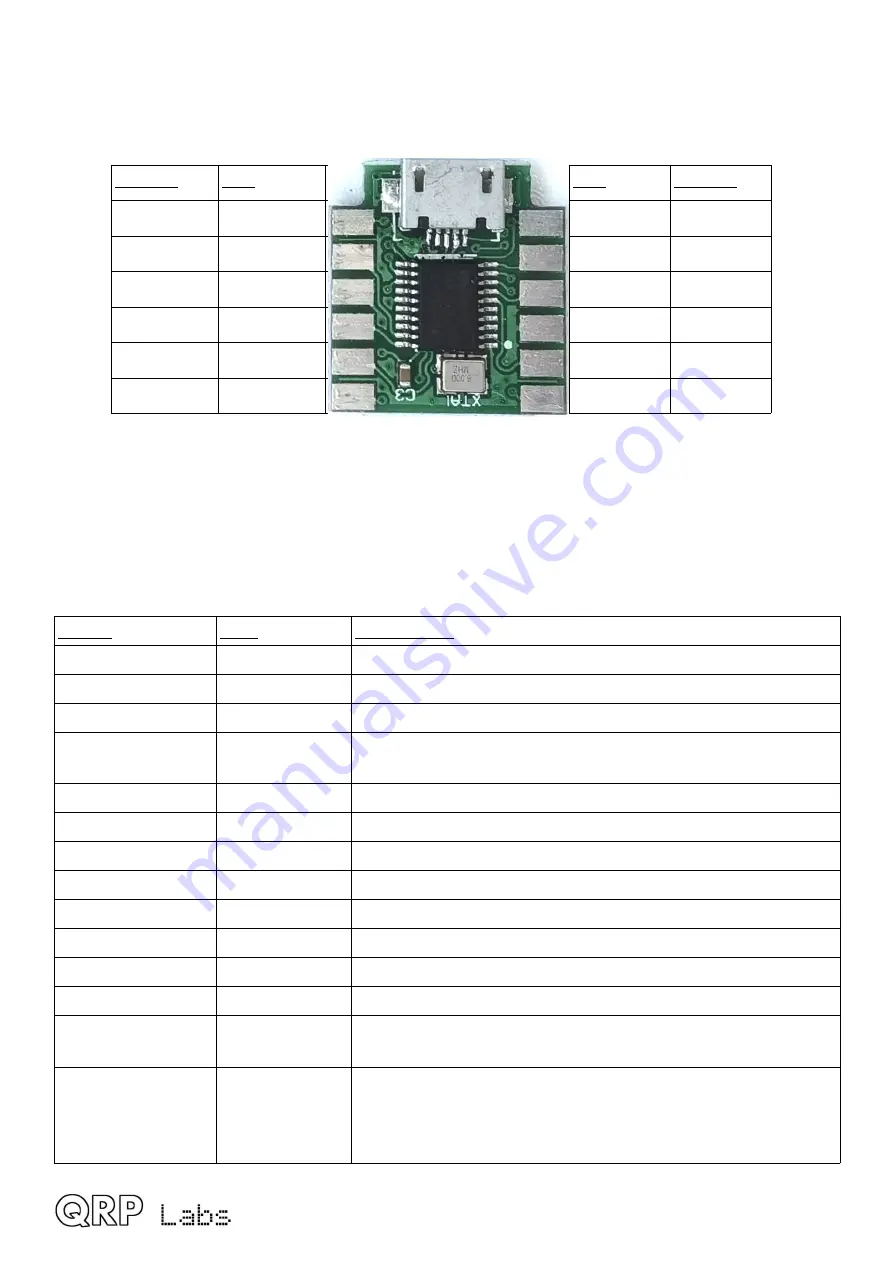
This table shows the pinout of the ProgRock2 module:

Bottom

Top

Top

Bottom

13. USB -

1. USB +

12. V+

24. CLK 2

14. SCL

2. SWDIO

11.BANK 2 23. CLK 1

15. SDA

3. GND

10.BANK 1 22. RXD

16. 1 PPS

4. SWCLK 

9. GND

21. TXD

17. +3V3

5. BANK 2

8. BANK 0 20. GND

18. GND

6. V+

7. CLK 0

19. GND

You will note that there is a row of 6 pads along each long edge of the PCB, on top and bottom 
sides, making a total of 24 possible connections. Some, such as GND, are on multiple pads. For 
convenience these are labeled 1 to 24. In the diagram above, the pads on the top side are shown 
closest to the PCB pads, and the bottom side pads are the outer table column. 

The layout was carefully designed to allow as much future flexibility as possible.

The signals are as follows:

Signal

Pins

Description

GND

3, 9, 18, 19, 20 Ground.

V+

6, 12

Positive supply voltage.

+3V3

17

3.3V output from onboard voltage regulator.

USB-, USB+

13, 1

USB port (also connected to micro-USB connector); note, 
also sometimes called USB_DM, USB_DP respectively.

SWDIO, SWCLK

2, 4

Chip programming pins: Factory use only.

SCL, SDA

14, 15

I2C serial bus (internal use only, currently).

RXD, TXD

22, 21

USART port (unused currently).

BANK 0

8

Bank select input 0 (3.3V max).

BANK 1

10

Bank select input 1 (3.3V max).

BANK 2

5, 11

Bank select input 2 (3.3V max).

CLK 0

7

Si5351A Clock 0 output.

CLK 1

23

Si5351A Clock 1 output.

CLK 2

24

Si5351A Clock 2 output (not available when using GPS 
discipline).

1 PPS

16

1 PPS input, connect to 1pps output of GPS for GPS 
discipline. Note that the signal requires 3.3V. If using a 5V 
GPS output, use a 3.9K series resistor (value not critical; 
3.9K was used during testing). 

ProgRock2 manual 1.00b

5

Summary of Contents for ProgRock2

Page 1: ...required 3 independent 3 3V p p squarewave outputs 2 if you use GPS discipline You can feed the outputs through LPF kits to get sinewave outputs 8 selectable banks of frequencies chosen by 3 input co...

Page 2: ...outputs each having a frequency range spanning 3 5kHz to 200MHz The frequency stability is governed by the a crystal reference Due to unavailability of the Si5351A the equivalent MS5351M may be used F...

Page 3: ...through a power cycle To provide persistent storage of parameters the microcontroller needs to retain the configuration parameters in non volatile storage STM32 series microcontrollers do not have on...

Page 4: ...PCB component layout top side PCB component layout bottom side ProgRock2 manual 1 00b 4...

Page 5: ...e signals are as follows Signal Pins Description GND 3 9 18 19 20 Ground V 6 12 Positive supply voltage 3V3 17 3 3V output from onboard voltage regulator USB USB 13 1 USB port also connected to micro...

Page 6: ...should be taken when powering ProgRock2 directly from the USB cable see below and using a power supply connected to V at the same time The USB cable 5V will power ProgRock2 via an onboard diode resul...

Page 7: ...s 1pps If a positive going 1pps signal from a GPS module such as the QRP Labs QLG2 http qrp labs com qlg2 is connected here the ProgRock2 frequencies will be GPS disciplined to a high accuracy However...

Page 8: ...connect a single 2x6 pin header along one edge and have the ProgRock2 module stand up vertical on your project board soldered in or plugging into a 2x6 female header socket The pinout was quite carefu...

Page 9: ...and bootloader flashing jig Install in an HC6 crystal case The pin layout was carefully designed so that at the left end furthest from the micro USB connector has pads for Gnd V and the CLK 0 output...

Page 10: ...urn character it will enter Terminal Applications mode this will send all sorts of characters back to the PC as ProgRock2 thinks it is now talking to a terminal emulator and it will disable CAT comman...

Page 11: ...w which serial port is being used by ProgRock2 There is also a guide to identifying the serial port at http qrp labs com qlg2 scroll down the page Note that only one PC application at a time can conne...

Page 12: ...The notable screen elements are identified in this annotated version ProgRock2 manual 1 00b 12...

Page 13: ...mixers To enable this mode set the CLK 1 frequency to one of 90 180 270 or 360 90 CLK 1 is on the same frequency as CLK 0 with a 90 degree phase shift 180 CLK 1 is on the same frequency as CLK 0 with...

Page 14: ...ment to the output frequencies at every single 1 second interval Cal 1 this is the minimum step expressed in units of 1 3650 ths of a Hz at 9 999 999 5 Hz applied at each GPS discipline measurement in...

Page 15: ...rror reducing it to 0 2 Frequency measurement in the last 1 second interval When GPS discipline has homed in on the correct adjustment amount this measurement will alternate between 9 999 999 and 10 0...

Page 16: ...ing features Easy anyone can do the firmware update No additional hardware required only a standard USB A B cable or micro USB cable if you have installed a micro USB connector No additional software...

Page 17: ...ly and a pop up window should appear on your PC On my system Linux XUbuntu 18 04 it looks like this Click the OK button The File Manager window will then open and on my system looks like this The Prog...

Page 18: ...e processor No other firmware file will work on the QRP Labs ProgRock2 board except an official QRP Labs encrypted ProgRock2 firmware file The procedure will vary slightly for different Operating syst...

Page 19: ...the assembly and operation of this kit please join the QRP Labs group see http groups io g qrplabs for details 8 Document Revision History 1 00 16 Feb 2023 First draft version version 1 00 1 00a 16 Fe...

Reviews: