background image

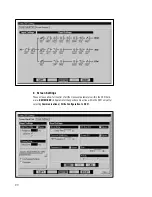
iii. Speaker Database

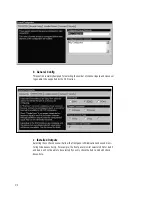
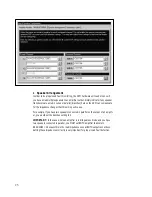
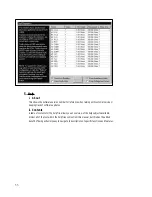
This window gives access to an extensive database of cinema speaker settings which can

fully configure the crossover and fault monitoring functions.   Each of these speaker files has

a manufacturer name (Make), a model number, a crossover type (1 way, 2 way or 3 way), and

the manufacturers impedance specifications.  Speaker models are separated into two cate-

gories, 

Default

 (supplied by QSC), or 

Custom

 (created by you).  

a Default Database

Many speaker types that are common in the cinema industry are available here. 

b Custom Database

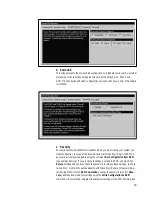
If you make or modify a factory speaker, you can adjust the crossover for maximum per-

formance and save those settings into a custom speaker database. 

NOTE:

 to create a Custom Speaker Model, see 

DSP Settings

.

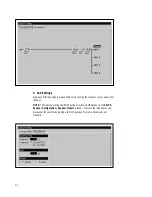
iv. Monitor Gain Levels...

When monitoring audio (from the front panel speaker) in the "

AMP

" mode, the signal that

you are listening to is AFTER the crossover.  For example, when monitoring the left amplifier

signal, the DCM actually combines the different frequency outputs which comprise the LEFT

signal.

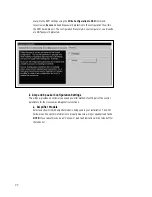
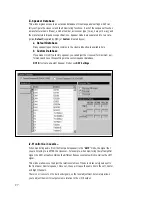
This window allows you to adjust the relative volumes of the post crossover signals sent to

the front panel monitor speaker.  Once set,  these will cause the same mix in the Left, Center,

and Right channels.

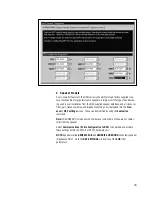
There is no crossover on the Surround signals, so the level adjustment here merely allows

you to adjust the monitor output volume relative to the L/C/R output.

27

Summary of Contents for DCM series

Page 1: ...DCM Series Digital Cinema Monitor Crossover System U S E R M A N U A L...

Page 2: ...ed under a licensing agreement It is against the law to copy the software on any medium except as specifically allowed in the licensing agreement DCM Commander is a trademark of QSC Audio Products Inc...

Page 3: ......

Page 4: ......

Page 5: ...by SA 10 6 9 Active Surround Ready 6 Front and Rear Panel Drawings 7 IV DCM Hardware Description 12 A Frontpanel Features 12 1 Power On Off 12 2 Audio Monitoring 12 3 Diagnostics Indicators 13 4 Test...

Page 6: ...figuration 20 i General Configurations 20 a General Info 20 b General Config 21 c Installed Outputs 21 c Surround 22 d Security 22 ii Amp and Speaker Configuration Settings 23 a Amplifier Models 23 b...

Page 7: ...paired Connection 36 7 Powered Subwoofer Connection 36 8 Surround Insert Connection 36 B System Calibration typical 36 1 Theater audio level adjustments 37 2 Emergency Bypass levels 37 3 Monitoring au...

Page 8: ...ty Notice that the DCM series takes advantage of the DCA amplifier DataPorts to allow extremely easy and reliable connection to all of the amplifiers with all inputs and monitoring signals being conne...

Page 9: ...e diskettes or CDROM An IBM compatible PC with at least a 486 or equiv processor Windows 95 or Windows 98 Minimum 16MB of RAM Minimum 1MB of available hard disk storage space A 3 5 1 44MB floppy drive...

Page 10: ...is user manual An envelope containing the DCM Commander installation diskettes or CDROM with the software license agreement A linecord for connection to AC power The DCM hardware unit main assembly ei...

Page 11: ...art high dynamic range Projectionist Features Easy to verify that all of the audio in the theater is okay Automatic monitoring will light an LED if there is trouble with a speaker output A backup sys...

Page 12: ...designed to minimize all background noise and react to the dynamic range of any film track In other words the quality of the DCM signal path is better than any state of the art cinema format availabl...

Page 13: ...oof method of getting sound into the theater no matter what To accomplish this a passive crossover has been built into the center channel routing so that even with a total loss of power to the DCM a u...

Page 14: ...7...

Page 15: ...8...

Page 16: ...9...

Page 17: ...10...

Page 18: ...DCM 2 and DCM 3 DataPort ABC and EF Detail 11...

Page 19: ...ier connected to DCM DataPort B which remains on 2 Audio Monitoring All of the processor and amplifier audio signals can be routed to a monitor speaker on the front panel so one can verify proper oper...

Page 20: ...tions are not electrically shorted or open All of these measurements are being performed constantly without user action on ALL output channels and any unusual readings will light the Load Fault LED If...

Page 21: ...nnecting improper frequencies can damage your speakers B Rear Panel Features The DCM uses mass termination connectors which makes a QSC cinema sound system extremely easy to wire together 1 Amplifier...

Page 22: ...available from several cinema supply houses Refer to Appen dix 1 for the pinout detail 3 RS 232 Connection This connects to the RS 232 serial port on an IBM compatible PC All of the crossover function...

Page 23: ...g Impaired output is a single mono audio output which contains a mix of the L C and R positional signals Center 6db compared to L R This is usually connected to a special cine ma system which supplies...

Page 24: ...for each of the physical locations L C R SL SR SUB and a large portion of the system calibration is finished NOTE QSC will be updating these files regularly as new models are introduced from speaker...

Page 25: ...hether or not a Screen EQ should be applied to the screen channels Verify all of these settings and you are ready to download everything to the DCM hardware unit WARNING The next step can change all o...

Page 26: ...mand which causes the DCM Software to exchange star tup information with the DCM hardware unit After selecting Communications Connect the Status indicator will display Connected The Security indicator...

Page 27: ...Write Configuration to DCM By writing data to the DCM you will cause all of the crossover monitor setup and fault diag nostics settings currently in the DCM Software to be transmitted to the DCM hardw...

Page 28: ...e supported by the DCM series c Installed Outputs Selecting these check boxes will allow the front panel LED indication and sound moni toring to behave correctly For example the front panel monitor se...

Page 29: ...able the Secure mode by writing to the DCM a password will be required before using the command Get Configuration from DCM see Communications If you are trying to change a setting in a DCM unit which...

Page 30: ...mp and Speaker Configuration Settings This window provides an extremely easy and powerful method of setting all of the control parameters for the crossover and diagnostics functions a Amplifier Models...

Page 31: ...dence settings will be loaded into the Cros sover DSP settings screen These can be modified by using the Customize command Note this DOES NOT include any channel delay or screen EQ as these are not ch...

Page 32: ...dence changes that this wiring will cause For example if you have two speakers connected in parallel on the output of an amplifi er you would set the banches setting to 2 IMPORTANT In the case where a...

Page 33: ...d Impedence Limits This allows a technician an overview of the impedence settings when troubleshooting 26...

Page 34: ...rossover for maximum per formance and save those settings into a custom speaker database NOTE to create a Custom Speaker Model see DSP Settings iv Monitor Gain Levels When monitoring audio from the fr...

Page 35: ...epeatable from unit to unit These settings can be modified and stored in Configuration files and activated using the Communications Write Configuration to DCM command a Screen Signal Path This shows a...

Page 36: ...These screens allow full control of all the crossover parameters within the DCM hard ware REMEMBER All parameter changes become active within the DCM only after selecting Communications Write Configu...

Page 37: ...py function allows all of DSP settings for that channel to be copied to other channels A NOTE ABOUT SPEAKER MODELS You should be careful to rename a speaker model if you make ANY changes to it Good ve...

Page 38: ...ponse of your subwoofer channel NOTE The Sub filter settings ARE NOT set by selecting a SUB Speaker in the AMP Speaker Configuration Speaker Models window That sets the impedences only Always set thes...

Page 39: ...also be shown on the Show Faults Only screen This powerful feature will tell you exactly which channel has the problem and was it due to a short or open connection This offers a very accurate history...

Page 40: ...ack of software updates ii Contents A table of contents for the help file allows you an overview of the help subjects available Almost all of the text within the help files comes from this manual but...

Page 41: ...at the selector switches are working properly and then set the DCM to monitor PROC C center This means that the signal that is coming in the From Processor Output connector on the rear panel of the DC...

Page 42: ...ply is a switch mode type and will accept a very wide range of input voltages Refer to the Appendix 2 for details 3 Control Computer Connection This connection is ONLY used to connect to a PC computer...

Page 43: ...als will be routed out of the DCM to the processor box and back into the DCM for output to the amplifiers via the proper DataPorts The pinout of the cable is shown in Appendix 1 B System Calibration t...

Page 44: ...he PC software allows balancing of the high low or high mid low signals being fed to the front panel monitor speaker Input pink noise into all of the DCM input channels and select individual channels...

Page 45: ...the screen We have in cluded some screen delay adjustment but most typical theaters will not need to use this because surround channels are delayed coming from the cinema processsor Consult an acoust...

Page 46: ...is on and the volume is up Reseat the cable for that channel and replace it with another if needed 3 If theater audio is distorted Verify that the DCM Input Clip LED is not flashing If it is the cinem...

Page 47: ...f the DCM unit is okay place the Bypass switch back to the NORMAL position and the Load Fault indicator will light after a few minutes if there was a gross defect open circuit or short in either of th...

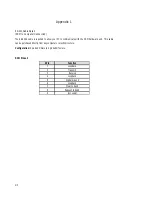
Page 48: ...ommunicate with the DCM hardware unit This cable can be purchased directly from any computer or electronics store Configuration 9 pin SubD male to 9 pin SubD female DCM Pinout 9 Pin Function 1 Loopbac...

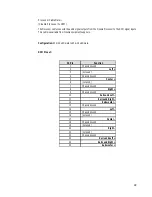
Page 49: ...tion 25 pin SubD male to 25 pin SubD male DCM Pinout 25 Pin Function 1 Chassis Ground 2 Left 3 not used 4 Chassis Ground 5 Center 6 not used 7 Chassis Ground 8 Right 9 Chassis Ground 10 Surround Left...

Page 50: ...nections are pin to pin for all 15 pins QSC offers these cables with special shielded internal cable for even higher quality Configuration 15 pin SubD High Density male to 15 pin SubD High Density mal...

Page 51: ...are needed to insert a Dolby SA Surround Processor Configuration 9 pin SubD female to loose wires attach to terminal strip Pinout 9 Pin Function 1 Surround Left Send 2 Surround Right Send 3 Signal Gr...

Page 52: ...9 pin D sub Surround Insert male 6 connection screw terminal Sub Out Hearing Impaired Output Screen Dataports Conversion 24 bit Delt Sigma 128x oversampling Filter Type DSP 24 bit digital IIR filters...

Page 53: ...Subwoofer Screw Terminals Max Output Level 14 2 dBu 4 0 Vrms Output Z 50 ohms 5 Hearing Impaired Output Max Output Level 11 8 dBu 200 mVrms Output Z 50 ohms 5 PC Communications Baud rate 19 200bps 46...

Page 54: ...6 1468 USA Telephone Numbers Main Number 714 754 6175 Sales Direct Line 714 957 7100 Sales Marketing 800 854 4079 toll free in USA only Technical Services 714 957 7150 800 772 2834 toll free in USA on...

Page 55: ......

Page 56: ...1675 MacArthur Boulevard Costa Mesa CA 92626 1468...

Reviews: