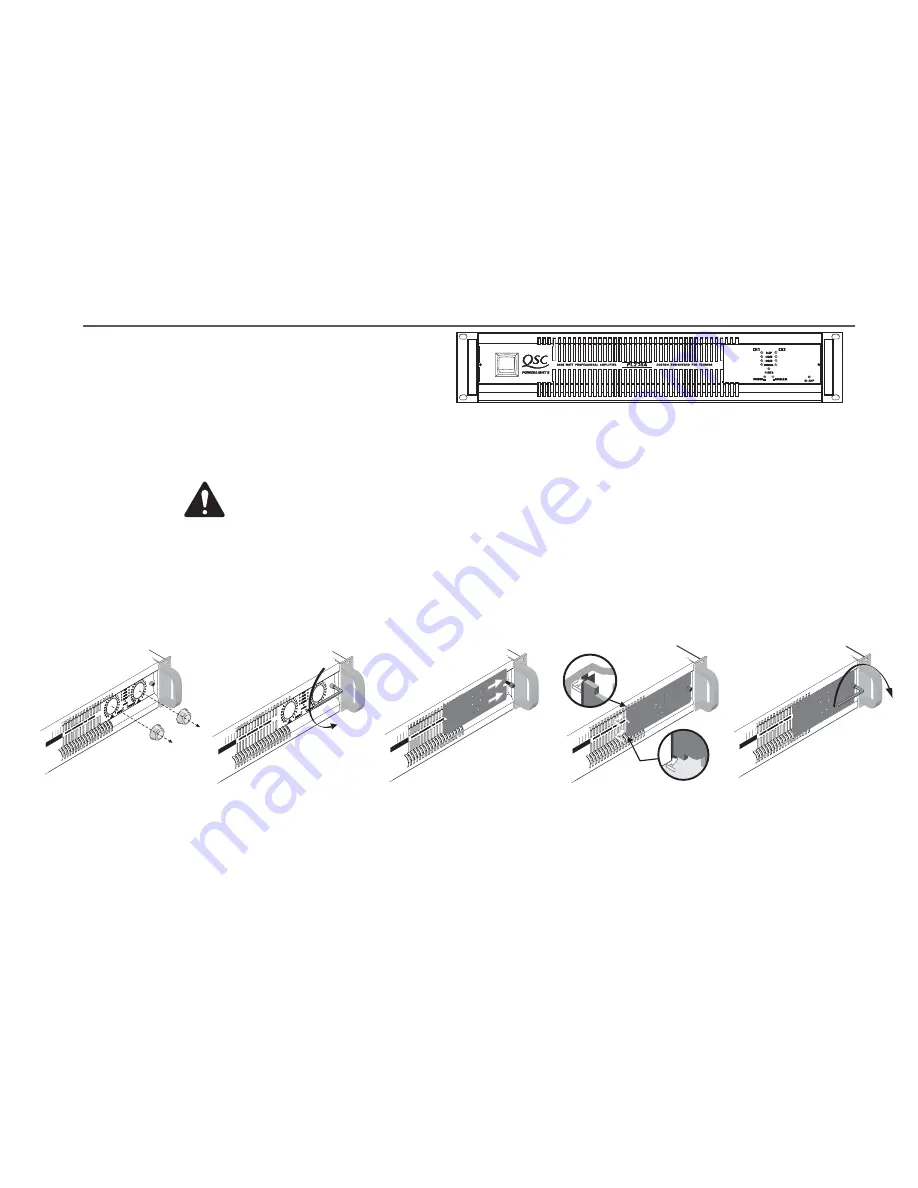
REMOVING THE SECURITY PANEL
1. Use an angle 9/64" or 3.5 mm hex key to loosen the screw.
2. Use a small flat screwdriver to lift the right end of the security panel so that its tabs are free of the slots in the front panel.
3. Slide the security panel to the left until you can lift the left end free; slide the panel to the left to remove it from behind the screw.
4. Reinstall the gain control knobs by aligning the flat spot on the control shaft with the flat spot on the knob's shaft opening and pushing the knob firmly onto the shaft.
SECURITY PANEL
After setting the gain controls, you can install the security panel to prevent tampering and accidental misadjustment. After the knobs have been removed and the gain setting checked,
install the security panel as shown in the general illustration to the left and on next page.
Right: a POWERLIGHT 2A amplifier with security panel installed
A droite: le panneau avant avec plaquette protectrice installée
Rechts: ein POWERLIGHT 2A-Verstärker mit Sicherheitsabdeckung
Derecha: un amplificador PL2 Acon el panel de seguridad instalado
SECURITY PANEL USE & INSTALLATION
Step 1
Step 2
Step 3
Step 4
Step 5
INSTALLING THE SECURITY PANEL
1. Remove the gain control knobs. Do not pry on the knob as damage to the gain control could result.
2. Use a 9/64" or 3.5 mm hex key to loosen the screw.
3. Slide the right end of the security panel under the screw head.
4. Insert the tabs into the keyed portion of the ventilation slots, then slide the panel to the right so it locks in the slot.
5. Align the right end of the security panel with the chassis openings; tighten the screw to secure the panel. Do not over tighten.
NOTE: The PL2A security panel has a viewing hole for the blue BI-AMP LED. DO NOT USE the PL2
security panel as it has no BI-AMP LED hole. The use of the incorrect security panel may result in
damage to the BI-AMP LED. Ensure PL2A security panels are used with PL2A amplifiers.
24


