68
69
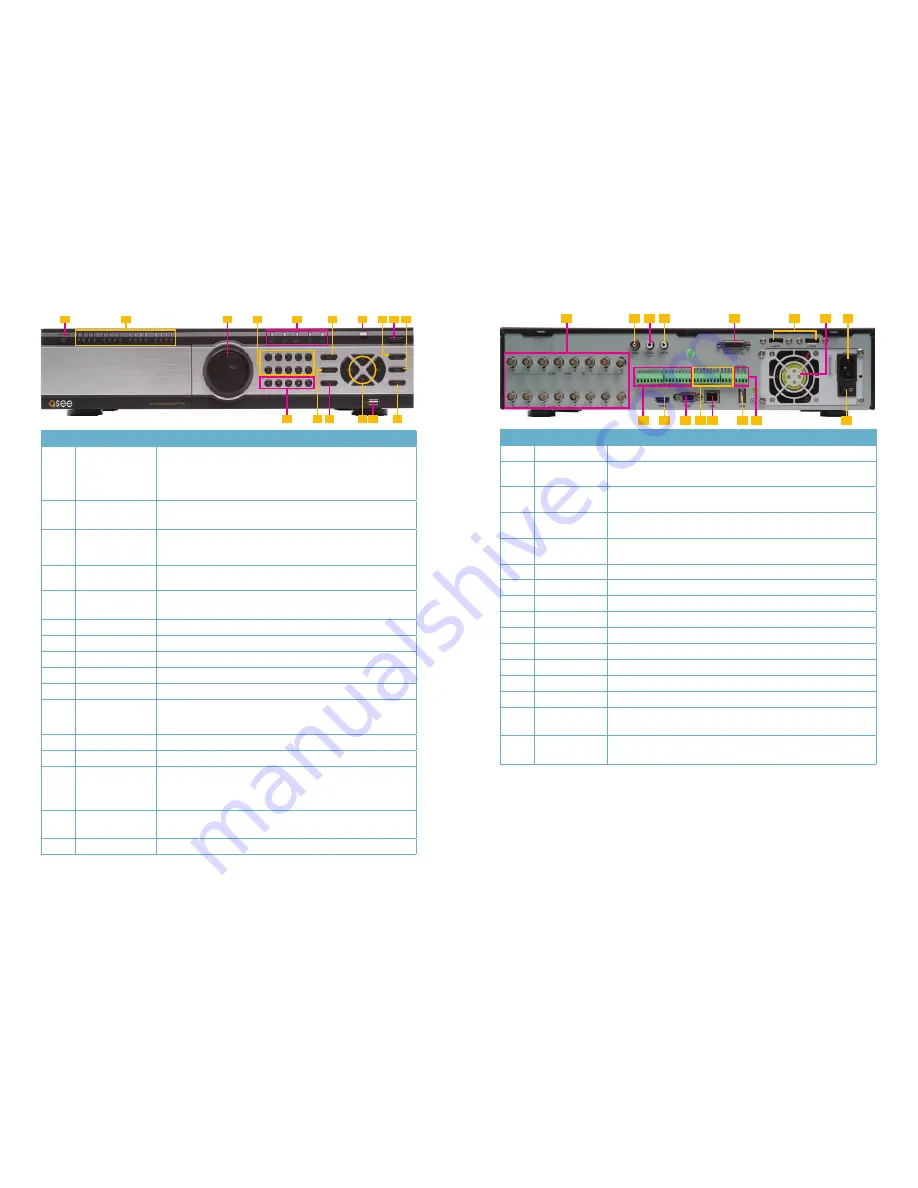
FRONT PANEL
REAR PANEL
QT7116
ITEM NAME
FUNCTION
1
SHUT DOWN
Press and hold to begin the shutdown process. the hard
drive(s) will spin down and the DVR will display a message
letting you know when it is safe to turn off the power using the
switch on the rear panel (Item #16 on the next page).
2
CHANNEL LED
INDICATORS
Shows the connection status of each camera.
3
VIDEO
PLAYBACK
KNOB
For use in Video Playback mode. Allows fine adjustment of
video playback speed.
4
NUMBERS
For selecting channels. Use the 0/10+ button for selecting
channels 10-16
5
LED
INDICATORS
Show status of power, hard drive, record, etc.
6
INFO
Opens the Information menu
7
IR RECEIVER
Receives signals from remote control
8
ENTER
Confirm selection
9
RECORD
Begins manual recording on all channels
10
MENU
Opens MAIN MENU
11
VIDEO
PLAYBACK
CONTROLS
For use in Video Playback mode. Pressing the magnifying
glass icon enters the Video Search mode.
12
AUDIO/+
Turns audio on or off. Increase the value in SETUP
13
PTZ/-
Opens PTZ control menu. Decreases the value in SETUP
14
DIRECTION/
MULTISCREEN
1. Navigate through on-screen options
2. Change screen display mode between 1, 4, 9 and 16
channels
15
USB
USB port to connect USB flash or external hard drives to
update firmware or back up recordings
16
BACKUP
Opens BACKUP window.
ITEM NAME
FUNCTION
1
VIDEO IN
Video input from up to 16 HD SDI cameras
2
CVBS (Video
Out)
Video output for connecting to TV (BNC) or monitor
3
AUDIO
OUTPUT
Connection for audio output – connect to an amplified speaker
4
MIC IN
RCA connection for using microphone. Requires speaker(s)
located with camera(s).
5
AUDIO IN
16 channel audio input for cameras equipped with audio. Dongle
is located in accessory box.
6
ESATA
Ports for connecting two external SATA hard drives for backup.
7
FAN
Cooling fan exhaust port. This should not be blocked.
8
DC +12V
Power input
9
ALARM IN
Input ports for 16 alarms.
10
HDMI
HDMI video output
11
VGA PORT
Video output for connecting to monitor at least 19” in size
12
ALARM OUT
Four output ports for external alarms
13
LAN
Network (ethernet) port
14
USB PORT
Connect USB mouse
15
PTZ RS485
BLOCK
Connections for Pan-Tilt-Zoom speed dome cameras. Y = “+” Z
= “-”
16
POWER
SWITCH
Use to turn on the DVR as well as to turn off after powering
down from within the GUI
1
3
2
10
8
4
6
5
7
9
11
12
14
16
13
15
1
2 3 4
5
10
9
12
11
14
16
13
15
6
8
7


