background image

3

11

www.qsfptek.com

V1.0

Hardware Overview

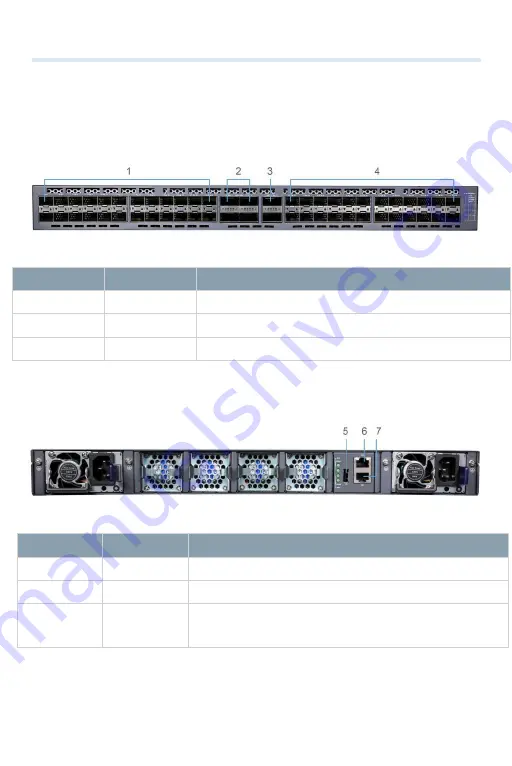
FrontPanel Ports

S7300-48X2Q4C

Back Panel Ports

No.

Ports

Description

1, 4

SFP+

Hot-swappable SFP+ ports for 1/10G connection

3

QSFP+

Hot-swappable QSFP+ ports for 40G connection

2

QSFP28

Hot-swappable SFP+ ports for 40/100G connection

No.

Ports

Description

7

CLI

An RJ45 console port for serial management

6

MNG

An RJ-45 Ethernet management port

5

USB

A USB management port for software and configuration backup
and offline software upgrade

Summary of Contents for S7300-48X2Q4C

Page 1: ...1 11 www qsfptek com V1 0 V1 0 S7300 48X2Q4C Quick Start Guide 48 Port 10G Ethernet L3 Switch 48x 10G SFP with 2x 40G QSFP And 4x 100G QSFP28 Uplinks Support Stacking ...

Page 2: ...structure networks The S7300 series switches provide a range of services such as IPv6 VPN network security flow analysis and virtualization to offer high performance L2 L3 L4 wire speed switching capacity To ensure maximum uptime the series employs reliable techniques like continuous forwarding graceful restarting and loop network protection all of which work seamlessly within the S7300 series fab...

Page 3: ... ports for 1 10G connection 3 QSFP Hot swappable QSFP ports for 40G connection 2 QSFP28 Hot swappable SFP ports for 40 100G connection No Ports Description 7 CLI An RJ45 console port for serial management 6 MNG An RJ 45 Ethernet management port 5 USB A USB management port for software and configuration backup and offline software upgrade ...

Page 4: ...tors 1 4 1 48 LINK A CT SFP port indicators If the indicator is always on the port is normally linked If the indicator is off the port is not linked If the indicator flickers there is data transmisson 3 40G 1 2 QSFP port indicators 1 working in the mode of 40GE If the indicator is always on the port is normally linked If the indicator is off the port is not linked If the indicator flickers there i...

Page 5: ... of the BREAKOUT indicator 2 40GE BREAKOUT 1 4 The 40GE port breaks out into 4 10GE port indicators 1 Working in the mode of 40GE the indicator of BREAKOUT is off 2 The 40GE port breaks out into 4 10GE ports which combines with QSFP port indicators If the indicator of QSFP is on the four indicators of 40GE BREAKOUT correspond to LINK ACT state of the 4 10GE ports of the QSFP port Back Panel S7300 ...

Page 6: ...x or working beside the power source When the power is on do not touch the power Correctly connect the device and the power socket Only professionals are allowed to operate and maintain the device Read the installation guide carefully before the system is powered on Site Environment The switch can be installed on the desk or the cabinet The location of the machine box cabinet planning and indoor c...

Page 7: ...the switch 2 Connect the other end of the power cord to an AC power source Connecting the SFP QSFP QSFP28 Ports 1 Plug a compatible SFP QSFP QSFP28 transceiver into the SFP QSFP QSFP28 port 2 Connect a fiber optic cable to the fiber transceiver Then connect the other end of the cable to another fiber device ...

Page 8: ...onsole cable into the RJ45 console port on the front of the switch 2 Connect the other end of the CLI cable to the RS 232 serial port on the computer Connecting the MNG Port 1 Connect one end of a standard RJ45 Ethernet cable to a computer 2 Connect the other end of the cable to the MNG port on the front of the switch ...

Page 9: ... and configuration backup and offline software upgrade Configuring the Switch Configuring the Switch Using the Web based Interface Step1 Connect the computer to the Management port of the switch using the network cable Step 2 Set the IP address of the computer to 192 168 0 2 Set thesubnet mask of the computer to 255 255 255 0 ...

Page 10: ...page Configuring the Switch Using the CLI Port Step 1 Connect a computer to the switch s CLI port using the supplied CLI cable Step 2 Start the terminal simulation software such as HyperTerminal on the computer Step 3 Set the parameters of the HyperTerminal 9600 bits per second 8 data bits no parity 1 stop bitand no flow control Step 4 Enter the default username and password admin admin ...

Page 11: ...oubleshooting If system password is lost or forgotten the password can be reset using the following method 1 Connect the console port of the switch to a computer using a console cable 2 Press ctrl b to access the Uboot mode Start the system with an empty configuration file with no password Bootrom boot_flash_nopass Bootrom Do you want to revert to the default config file Y N E Configuration System...

Page 12: ...resources customer success stories Product Warranty S7300 series switches are backed by a 5 year limited warranty supported by QSFPTEK And you are eligible to apply for a return or exchange of your items within 14 days of receiving them For more details about applying qualifications please live chat or email sales qsfptek com for support 5 Year Warranty 14 day Return Window ...

Reviews: