background image

35

MAINTENANCE AND CARE

Date _______________________

Vehicle Owner’s Name __________________________________   Vehicle Identification # ____________________________________     

Serial # of tiedown   

Occupant Restraint  ___________________________________________

1.  The following items should be inspected and serviced by an experienced and trained technician during the scheduled 

maintenance of the Q’Straint® 4-Point Wheelchair Securement System.

Clean all debris from floor anchorages.

o

  Clean all retractors.

o

  Verify that all manual release systems are functioning properly.

o

  Verify that all electrical release systems are functioning properly.

o

  Verify that all retractors are working properly.

o

  Verify that electrical retractors are properly connected to vehicle’s electrical system and working.

o

  Verify that fail-safe system for the electrical retractors are properly connected and working.

o

  Verify that occupant securement system (shoulder and lap belts) are working properly.

o

  Verify that all seatbelt systems are not worn or frayed. Replace as needed.

o

  Verify that occupant securement system is not damaged or corroded. Replace if needed.

o

  Verify that floor anchorages are not damaged or corroded. Replace if needed.

o

  Verify that all mounting bolts are tight.

o

  Inspect electrical retractors’ wiring for fraying. Replace any that have frayed.

o

  Inspect all webbing for fraying. Replace any that have frayed.

o

  Inspect entire system to make sure everything is working properly and replace anything that is needed.

2.  Any deficiencies shall be noted below and rectified before the Q’Straint® 4-Point Wheelchair Securement System is released 

to the consumer for use.

3. If the repairing technician has any issues not covered by this document or is not clear on what corrective action needs to be 

taken, they MUST consult the nearest Q’Straint® office listed on the back page of this manual.

Deficiencies Noted: ________________________________________________________________________________________
_________________________________________________________________________________________________________________
________________________________________________________________________________________________________

Action Taken: _____________________________________________________________________________________________
_________________________________________________________________________________________________________
_________________________________________________________________________________________________________

Dealership: ________________________________________ Technician: ___________________________________________

Summary of Contents for AL600 Series

Page 1: ...EMS Installation Manual THE 4 POINT WHEELCHAIR SECUREMENT SYSTEM AND COMPONENTS COMPLY WITH ALL APPLICABLE REQUIREMENTS OF SAFETY REGULATIONS AND STANDARD ISO10542 1 2012 PAS2012 AND UN ECE REGULATION 107 AS APPLICABLE QRT 1 3 5 SERIES Q 5000 SERIES M SERIES AL600 SERIES ...

Page 2: ... 2020 Q Straint All Rights Reserved QRT is a registered trademark of Q Straint Inc ...

Page 3: ...ECKLIST 9 10 FLOOR ANCHORAGES 11 FLOOR ANCHORAGE LAYOUT REQUIREMENTS 12 13 SLIDE N CLICK INSTALLATION 14 MINI SLIDE N CLICK INSTALLATION 15 POCKET ANCHORAGE INSTALLATION 16 L TRACK AND END CAP INSTALLATION 17 18 SHOULDER AND LAP BELT INSTALLATION 19 27 ELECTRICAL RETRACTORS INSTALLATION 28 30 TESTING THE 4 POINT TIEDOWN SYSTEM 31 32 TROUBLESHOOTING 33 34 MAINTENANCE AND CARE 35 4 POINT WHEELCHAIR ...

Page 4: ...within the vehicle Electrical Retractors MUST be mounted in a horizontal plane so that the webbing does not jam or at a 30 degree angle using Q Straint Bracket part Q8 6510 Regulations and standards in some countries require the installation of a shoulder and pelvic belt to be considered a compliant wheelchair securement system The Q Straint 4 Point Wheelchair Securement System plus compliant shou...

Page 5: ...using a 85kg forward facing surrogate wheelchair and a 78 KG Anthropomorphic Test Device ATD The ATD is restrained by both shoulder and pelvic belt restraints QRT350e used with either QRT1 or QER as front tiedown are dynamically crash tested at 30mph 48kph 20g using both a 85kg and 150Kg forward facing surrogate wheelchair and a 78 KG Anthropomorphic Test Device ATD The ATD is restrained by both s...

Page 6: ...WHEELCHAIR SECUREMENT SYSTEM COMPONENTS QRT 1 SERIES FRONT OR REAR TIEDOWN QRT STANDARD QRT DELUXE QRT MAX FRONT OR REAR TIEDOWNS QRT 3 SERIES QRT 5 SERIES QER SERIES M SERIES AL600 SERIES Q5000 SERIES FRONT ONLY ...

Page 7: ...T RETRACTOR UPPER OPTIONS WITH WITHOUT HEIGHT ADJUSTER WITH HEIGHT ADJUSTER SHOWN COMBINATION LAP SHOULDER BELT WITH LOWER RETRACTOR K12 BUCKLE STALKS MANUAL LAP SHOULDER BELT COMBINATION LAP SHOULDER BELT WITH LOWER RETRACTOR RETRACTABLE LAP BELTS ...

Page 8: ...ates 8mm bolts 100 254cm in length Standard 90 degree countersunk holes are pre drilled every 4 102mm Accommodates 8mm bolts QC06058 End Cap for Flange Series L Track These L Track End Caps finish off your flush mount flange series installation for a professional look They feature a tapered edge to minimize snags and catches on the track edge QC06059 End Cap for Surface Angled Series L Track With ...

Page 9: ...n the vehicle available on request QRT 3 OR 5 SERIES 4 POINT WHEELCHAIR SECUREMENT SYSTEMS o 2 QRT Max or Deluxe RETRACTORS for FRONT o 2 QRT 350e OR 550e RETRACTORS for REAR o 1 OCCUPANT SECUREMENT SHOULDER LAPBELT o OMNI ANCHORAGES track pockets or SnC sold separately o 1 WARRANTY CARD o 1 USER PLACARD for displaying in the vehicle available on request QRT 1 SERIES 4 POINT WHEELCHAIR SECUREMENT ...

Page 10: ...ly o 1 WARRANTY CARD o 1 USER PLACARD for displaying in the vehicle available on request AL600 4 POINT WHEELCHAIR SECUREMENT SYSTEMS M2 M3 VEHICLES ONLY o 4 AL600 RETRACTORS o 1 Double Inertia Retractor DIR Occupant Securement o OMNI ANCHORAGES track pockets or SnC sold separately o 1 WARRANTY CARD o 1 USER PLACARD for displaying in the vehicle available on request DIR Occupant Securement System m...

Page 11: ... Pas 2012 1 compliance It may be used in either in line or traverse orientation for M2 M3 vehicle Reg107 compliance NOTE 2 Minimum track length to be 300mm 12 3 fixings Traverse orientation means the track is perpendicular or 90 degrees to the vehicle direction of travel J In line orientation means the track is in line with the direction of travel I REAR TIEDOWNS Flange Surface Oval Covered SNC SN...

Page 12: ...ion per ISO 7253 or ASTM B117 or per customer requirements o Modifications to Backing Plate MUST only be made where necessary as a smaller plate size reduces the floor load distribution Always leave a minimum of 6 15mm adjacent the bolt hole in the plate o Electrical Retractors are designed and tested to ONLY be used in the front positions together with Q Straint 4 Point Securement Systems o Elect...

Page 13: ...m our recommendations Distances for the placement of the Upper Shoulder Belt Anchorage and or the Shoulder Belt Retractor will vary for different Occupant Restraint Systems The section SHOULDER AND LAPBELT INSTALLATION should be read before installing floor anchorages Side View Top View 816 450mm 8FCZ From 40 1016mm for 6 Year Old Child To 61 1549 4mm for a Tall Adult AND 8FCZ 817 72 450mm 88 200m...

Page 14: ... floor C 4 Put bolt through Anchorage floor Backing plate and Washer D We recommend using sealant between Backing Plate and floor 5 Secure Bolt with Locknut leaving a minimum of 2 3 threads from Bolt sticking out Recommended torque 35 FT LB 47 Nm 6 Insert Rubber Plug into Floor Anchorage and push it down firmly onto Bolt head E Leave a minimum distance of approximately 20 5 08mm from Rubber Plug t...

Page 15: ...h Backing Plate and Washer F We recommend using sealant between Backing Plate and floor 3 Secure Bolt with Locknut leaving a minimum of 2 3 threads from Bolt sticking out Recommended torque 35 FT LB 47 Nm This anchorage has a raised profile and may cause a trip hazard consideration should be given to its suitability if used in a vehicle aisle vehicle entrance or pathways OMNI Slide N Click Mini Fl...

Page 16: ...ng x 1 4 36mm wide x 0 4 10mm deep 2 Insert Pocket and use as template to mark centre of two 2 holes to be drilled H 3 Remove pocket and drill two 5 16 8mm holes through floor 4 Clean out debris and place sealant in floor opening Reinstall pocket 5 Pass 5 16 8mm bolt through pocket vehicle floor Backing plate and Washer 6 Sealant may be used between Backing plate and floor is desired 7 Securely fa...

Page 17: ...Floor Determine location of Anchorages refer to Figure 1 2 1 For FLANGE L TRACK route the floor for each track 1 42 36mm wide x 13mm deep K 2 For END CAPS route an area in the floor for end caps 1 2 13mm deep and 1 42 36mm wide with semi circular diameter to match End Cap profile L For SURFACE and REGULAR L track proceed to Step 4 3 Clean out debris and place track in routed area 4 With track in p...

Page 18: ... out debris Place sealant inside floor opening and install End Caps into floor O 10 Secure End Caps to floor with screws P 11 Clean out debris from L Track and end caps with pressurized air Q 12 Place L Track and snap into place R Q 8Floor 8Locknuts 8L Track 82 3 Threads 8Floor 8Sealant 8End Caps 8Screws 8Floor 8Floor 8Clean Out Debris 8L Track Cover 8Floor L Track Cover Installation Sequence ...

Page 19: ... 3 The lapbelt pelvic restraint should be worn low across the front of the pelvis so the belt bears on the bony structure of the body The junction between the lapbelt and shoulder belt should be located near the occupants hip S 4 Lapbelt should not be held away from the occupant by wheelchair components such as arm supports or wheels T 5 Shoulder belts should lie across the occupants torso with th...

Page 20: ... ISO SWC Flange Surface POCKETS TRACK Regular Oval Covered UPPER SHOULDER BELT ANCHORAGE a LOWER SHOULDER BELT RETRACTOR LOWER C LAPBELT ANCHORAGES Wall Floor Wall Floor Wall Only Floor Only HSB HALF SHOULDER BREADTH mm 50 60 66 76 81 130 160 175 200 210 775 875 1000 1100 1200 OCCUPANT SIZE These are average figures and do not necessarily represent the heights of all wheelchairs on the market TABL...

Page 21: ...the vehicle sidewall then we recommended that an Occupant Restraint with an ANTI ROTATION BRACKET is purchased See Table 3 13 Check wheelchair position allows lapbelt angles to fall within the recommended Zones EE page 23 COMBINATION LAP AND SHOULDER BELTS RETRACTOR LOWER WITH HEIGHT ADJUSTER Y a Height Min 1550mm Height Min 1450mm a Max 480mm from C L a Max 480mm from C L Upper Anchorage a instal...

Page 22: ...d MUST be 90 degrees horizontal to ensure proper webbing movement Z AA If the lower retractor is to be mounted into track on the vehicle sidewall then we recommended that an Occupant Restraint with an ANTI ROTATION BRACKET is purchased See Table 3 17 Check wheelchair position allows lapbelt angles to fall within the recommended Zones EE page 23 Combination Lap Shoulder Belt Lower Retractor no Heig...

Page 23: ...ket on mounting location ensuring the triangular point is facing in towards the wheelchair location Use bracket as a template to mark holes to be drilled 21 Drive five pilot start holes into the solid frame member of the vehicle wall structure Install the triangular bracket using the supplied 6 5mm hardware DD 22 Make sure the shoulder belt is secure but has ability to swivel and snap plastic cove...

Page 24: ...rmulas It is recommended that the actual wheelchair or range of wheelchairs are placed inside the vehicle to check the accuracy of the occupant belt geometry FORMULAE 1 P point to Buckle Anchorage X Seat Height 50mm TAN lapbelt angle FORMULAE 2 P point to Buckle Anchorage Z Seat Height 50mm FORMULAE 3 Diagonal length from P point to Anchorage Seat Height 50mm SIN lapbelt angle Seat Height see Tabl...

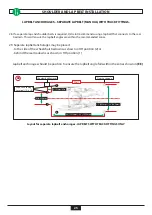
Page 25: ...ay be placed to the side of the wheelchair tiedowns as shown in HH position 2 or behind the rear tiedowns as shown in HH position 1 Lapbelt anchorages should be position to ensure the lapbelt angle falls within the zones shown in EE SHOULDER AND LAP BELT INSTALLATION Wall 2 51mm Min Min 330mm 48 1220mm 54 1520mm 27 685mm 34 865mm Shoulder Belt Retractor Floor Anchorage HH Layout for separate lapbe...

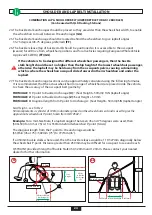
Page 26: ...y should be angled so that the webbing is coming out of the retractor in a straight line with the webbing forming an angle of between 30 75 degrees the direction of the wheelchairs users hip EE INSTALLING SHOULDER BELT RETRACTOR ANCHORAGE DIRECT TO FLOOR 34 Temporarily place Bolt through Shoulder Belt Retractor L Bracket and Washer JJ 35 Use L Bracket as a template to mark centre hole for drilling...

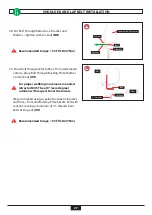
Page 27: ...ath vehicle place Bolt through Backing Plate Washer and Locknut OO For proper webbing movement mounted retractor MUST be at 0º zero degree rotation with respect to vertical access We recommend using a sealant between L Bracket and floor floor and Backing Plate Secure Bolt with Locknut leaving a minimum of 2 3 threads from Bolt sticking out OO Recommended torque 35 FT LB 47Nm NN 8Shoulder Belt Retr...

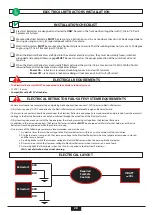
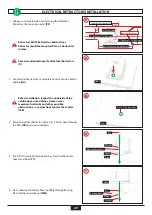
Page 28: ...me to a complete stop and parking brake applied then connect 12VDC power to Electric Retractors All systems require a 12 VDC connected to the Electric Retractors and isolated through an Electrical Switch The two wire connectors need to be placed near the Electrical Retractors and properly secured covered and protected from the elements Voltage to the Electric Retractors can only be initiated throu...

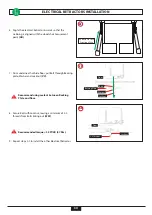
Page 29: ... tanks and other possible obstructions any questions contact the vehicle OEM 3 Remove Electrical Retractor drill a 3 8 10mm hole through the floor RR and clean out debris 4 Put 3 8 10mm Bolt through Washer Electrical Retractor Spacer and floor TT 5 From underneath vehicle floor put Bolt through Backing Plate Washer and Locknut MM ELECTRICAL RETRACTORS INSTALLATION Wall 2 51mm Min 13 330mm 15 380mm...

Page 30: ...ut VV Recommend using sealant between Backing Plate and floor 8 Secure Bolt with Locknut leaving a minimum of 2 3 threads from Bolt sticking out WW Recommended torque 35 FT LB 47 Nm 9 Repeat steps 2 7 to install the other Electrical Retractor UU V V WW ELECTRICAL RETRACTORS INSTALLATION 8Floor 8Bolt 8Backing Plate 8Washer 8Locknut 8Floor 82 3 Threads 8Locknut Retractor to Face Direction of Use ...

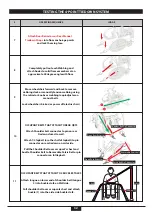
Page 31: ...nt point power off Electrical Retractors and unlock wheelchair brakes 3 Use CAUTION as you push wheelchair up ramp and into wheelchair Securement Zone Proceed to step 7 4 Front Mechanical Retractors or Manual Straps Center wheelchair facing forward in Securement Zone 5 Attach Mechanical Retractor or Front Tiedown Strap into floor anchorage points and lock them in place 8Power On 8Power Off 6 Compl...

Page 32: ...CUPANT BELTS THAT ATTACH TO REAR QRTS Attach Shoulder belt connector to pin on rear tiedown closest to wall Attach 1 2 lapbelt or other half of lapbelt to pin connector on rear tiedown on aisle side Pull the Shoulder Belt over occupant s chest and buckle Shoulder Belt to Removable Pelvic Belt or pin connector on full lapbelt Pin on Rear Retractor Shoulder Belt Pin Connector Attach tongue on lower ...

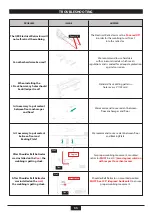
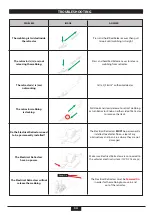
Page 33: ...stuck For proper webbing movement mounted retractor MUST be at 0º zero degree rotation with respect to vertical access After Shoulder Belt Retractor was installed on the wall the webbing is getting stuck Shoulder Belt Retractor in mounted position MUST be at 90 degrees horizontal to ensure proper webbing movement 8Floor 8Wall 0 Degree 8Floor 8Wall 90 Degrees Can other hardware be used We recommend...

Page 34: ...ease to retract webbing or turn Retractor Knob on either side of Retractor to remove the slack Do the Electrical Retractors need to be permanently installed The Electrical Retractors MUST be permanently installed to vehicle s floor clear of any obstructions and in an area where they are not damaged The Electrical Retractors have no power Make sure Electrical Retractors are connected to the vehicle...

Page 35: ...Verify that all mounting bolts are tight o Inspect electrical retractors wiring for fraying Replace any that have frayed o Inspect all webbing for fraying Replace any that have frayed o Inspect entire system to make sure everything is working properly and replace anything that is needed 2 Any deficiencies shall be noted below and rectified before the Q Straint 4 Point Wheelchair Securement System ...

Page 36: ...tum is a registered trademark of Q Straint Inc FOR TECHNICAL SUPPORT OR TO FIND YOUR NEAREST AUTHORIZED DEALER Q Straint Europe 72 76 John Wilson Business Park Whitstable Kent CT5 3QT United Kingdom Tel 44 0 1227 773035 Fax 44 0 1227 770035 Email info qstraint co uk Q Straint America 4031 NE 12th Terrace Oakland Park FL 33334 Tel 800 987 9987 Fax 954 986 0021 Email qstraint qstraint com Q Straint ...

Reviews: