background image

7

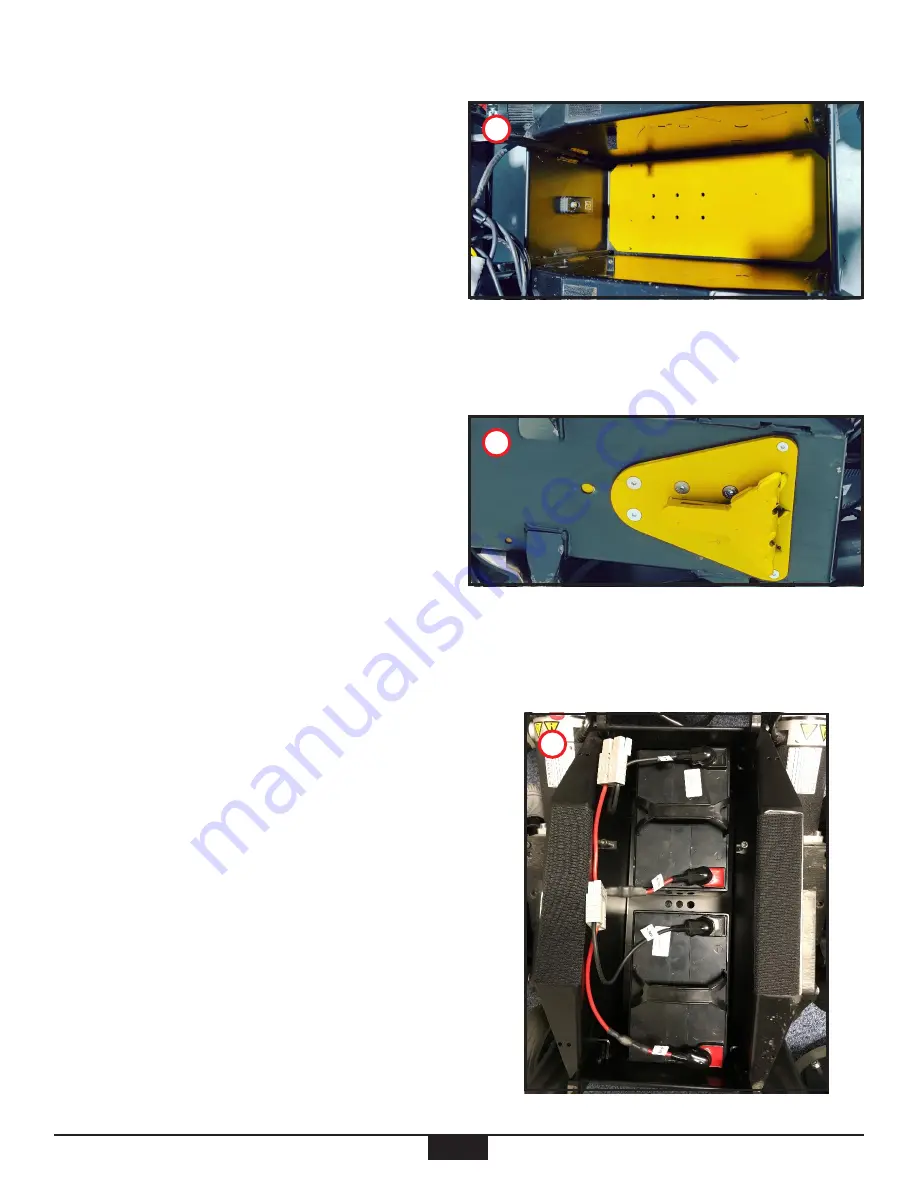
Step 7 – Align Plate

Carefully place chair on its side and insert inner battery 
tray plate (P/N Q03C0141) as shown, ensuring that the 
orientation is correct.  

Step 8 - Install bolts

Offer up the Main Bracket Welded Assy (P/N QS00738) 
as shown, and fix with the 6 x M8x16CSK and 2 x M6x16, 
engaging the threads with the inner battery tray. Tighten 
with the use of a 5mm and 4mm Allen Key.

Step 9 – Replace Batteries

Turn the chair the correct way up, reinsert the batteries into 
the battery tray and reconnect them.

7

8

9

Summary of Contents for QLK-150

Page 1: ...entative The QLK 150 Wheelchair Docking System should not be operated by anyone who does not have full comprehension of how the System works or if the System is not working properly The QLK 150 Wheelc...

Page 2: ...6 STEP 2 UNSCREW BOSSES 6 STEP 3 PIVOT SEAT 7 STEP 4 REMOVE COVER 7 STEP 5 DETACH MODULES 8 STEP 6 REMOVE BATTERIES 9 STEP 7 ALIGN PLATE 9 STEP 8 INSTALL BOLTS 10 STEP 9 INSTALLATION OF QLK DOCKING SY...

Page 3: ...m x1 COMPONENT CHECKLIST PART AND DESCRIPTION QTY IMAGE Q03BR018 Q300M Mini Bracket As sembly x1 QE 9124 Q300M Mini Hardware Kit x1 ITEM Bracket kit Q03BR018 to be used with Q04S151 and QS99020 Comple...

Page 4: ...GE QS00738 Q300M Main bracket Welded Assembly x1 QS00738 Q300M Main bracket Welded Assembly x1 ITEM 1 2 Within Kit Q03BR018 QE9 8142 M6 x 16mm CSK QE9 8147 M8 x 16mm x 1 25 CSK x6 1 2 Within Kit QE 91...

Page 5: ...stem as shown in Fig 1 Step 2 Unscrew bosses Carefully unscrew the 2 bosses as shown in Fig 2 being cautious about finger entrapment If the bosses are not tethered keep to one side Step 3 Pivot Seat P...

Page 6: ...batteries is later required Please note that there may be optional systems fitted please make a note of where the components are fitted including their orientation to allow them to be replaced in exa...

Page 7: ...t Step 8 Install bolts Offer up the Main Bracket Welded Assy P N QS00738 as shown and fix with the 6 x M8x16CSK and 2 x M6x16 engaging the threads with the inner battery tray Tighten with the use of a...

Page 8: ...efer to the inverse order of steps 1 and 2 Step 12 QLK Alignment Alignment between the wheelchair bracket and the QLK must be checked and adjusted before bolting the QLK to the vehicle floor The chair...

Page 9: ...upper and lower height limits Once the QLK height is determined bolt the QLK to the vehicle using the same spacing arrangement to ensure correct bracket alignment Suggested configuration of using a 2...

Page 10: ...instructions contain the most current information at the time of printing Q Straint reserves the right to modify systems components and content without notice FOR TECHNICAL SUPPORT OR TO FIND YOUR NEA...

Reviews: