12
QLK MOUNTING
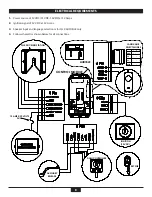
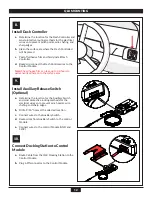
Install Dash Controller
a.
Determine the location for the Dash Controller and
most protective routing methods for the electrical
wires so to prevent pinch points, wire chafing, and
sharp edges.
b.
Clean the surface are where the Dash Controlled
will be placed
c.
Peel off adhesive film and firmly install Dash
Controller.
d.
Route and connect the Dash Control wires to the
Control Module.
Note: The adhesive film can take up to 48 hours to
permanently adhere onto the surface area.
Install Auxiliary Release Switch
(Optional)
a.
Determine the location for the Auxiliary Switch
and most protective routing methods for the
electrical wires so to prevent pinch points, wire
chafing, and sharp edges.
b.
Drill a 9/16” holes at the selected location
c.
Connect wires to the Auxiliary Switch.
d.
Route wires from Auxiliary Switch to the control
Module.
e.
Connect wires to the control Module (GND and
SW2).
Connect Docking Station to Control
Module
a.
Route Cable from the QLK Docking Station to the
Control Module.
b.
Plug 6 PIN connector to the Control Module.
10.
9.
8.


